Showing posts with label paint. Show all posts

Friday, February 24, 2023

Where's Rover?

So, when I came back to the boat in November, the goal was to again make her ready for a trip to the Bahamas. There were two big-ticket items I wanted to get done in a boatyard: new bottom paint and finally getting the new standing rigging I had purchased just before the pandemic installed. There were also a few other items that needed to be ticked off the repair list. 

 I tried, and failed, to get boatyards near Southport to haul out the boat and get the work done. Eventually I was able to schedule an appointment with Wilmington Marine Center on Jan 9th. So I went back home for the holidays, expecting I would return to take the boat to the yard at the beginning of the year. Unfortunately, that boatyard went radio silent and I was unable to confirm the appointment after the holidays. So, figuring that Wilmington Marine apparently didn't want my business, I then scheduled with another yard in New Bern NC. 

It was a 3 day trip to relocate the boat there with the help of some friends in Southport. Unfortunately, the trip was during some of the coldest weather of the season, but the new 3/4 enclosure made the trip far better than our trip down from Virginia in January a few years back after building the hardtop. 

A calm but cool evening...

The boat was hauled two weeks ago last Tuesday after a one day delay due to high winds. It was on the hard for 2 weeks. The bottom fortunately didn't look as bad as I had feared, thanks to a trustworthy diver I found in Southport that took a great deal of time to remove the marine sanctuary that grew there during my absence caused by the pandemic. The bottom was cleaned and new bottom paint was applied. 

Rover out of the water


 I was also able to find a good rigger in New Bern that was willing to install the standing rigging I had purchased just prior to the beginning of the pandemic. On the hard, and using a man-lift, it took about a day and a half to replace the rigging without un-stepping the mast. Other than one set of fittings that were supplied required modification, the rigging kit from Sparcraft contained everything we needed.  The rigger reported during the rigging replacement that the threads in one of the old turnbuckles all but crumbled during disassembly...so it was definitely good that I didn't try to squeeze in one more sail. Finally, after almost 3 years, Rover now has brand new standing rigging. 
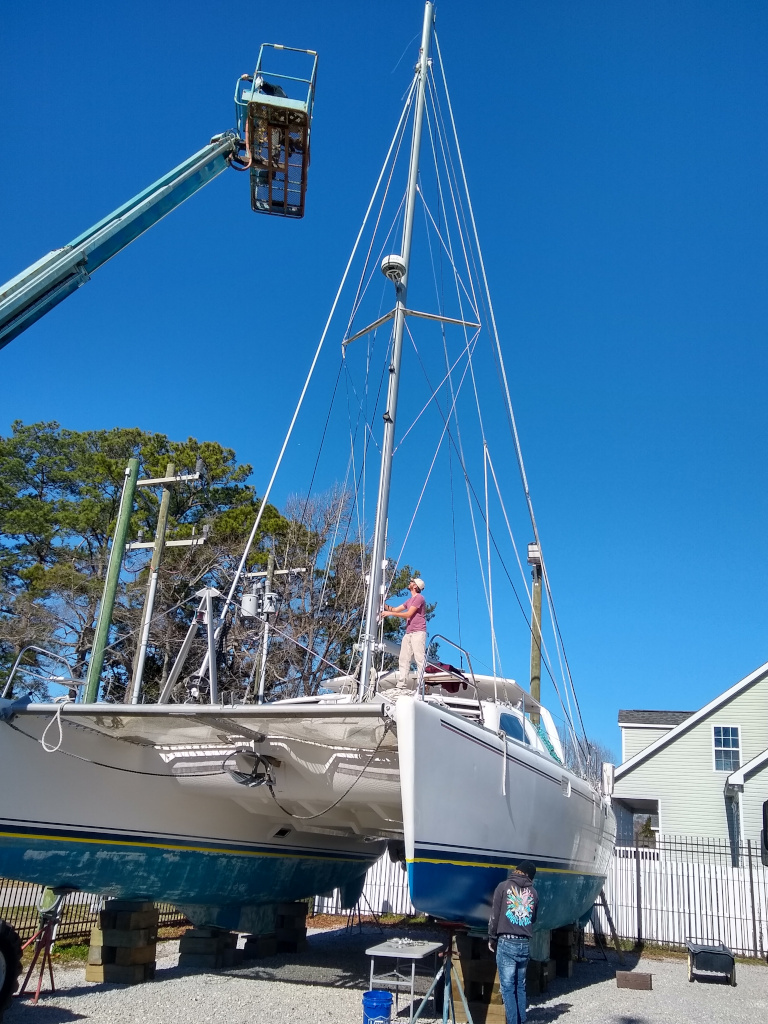
New rigging and bottom paint


During the trip up to New Bern, I found that one of the shaft seals was leaking a bit. I also found some wear of the cutlass bearings during my out-of-water inspection. So, I pulled both props, bearings, seals, and prop shafts. The shafts were cleaned, inspected, polished, and reinstalled with new shaft seals and bearings. Both props were cleaned and painted with cold galvanizing compound (the same stuff Petit sells as prop coat...only at 1/3 the price) and reinstalled with new zincs. The motors were then re-aligned with the prop shafts.

While at the yard, I also had the chance to replace the last of the fluorescent fixtures in the cabin with new dimmable LED fixtures. Unfortunately the puck lights I ordered to replace the main cabin lights were a little too large so I donated them to my friends at The Retirement Project. At least the bulbs in the existing fixtures are already LED. The raw water strainers for the air conditioning units that were failing (the baskets were breaking apart and replacements were impossible to find in the US) were also replaced with brand new strainers. 

The boat was splashed last Monday, and after spinning up the motors and checking for leaks, the boat left the yard in much better mechanical condition than when it arrived.  

With all the problems getting reliable marine services and parts in Southport, and the fact that my slip rental was doubling in price with an expected 50% additional increase in a year, I have decided to change the home base for Rover. I was able to find a marina near the boatyard where we were hauled out at the same rate we were initially paying at the old marina before the price increase. The marina doesn't have a pool, but it also doesn't have a ferry blowing its horn at 5:30am or rocking the boat every half hour. Being a bigger town, it is also much easier to find any needed parts and supplies.  The facility is simple but nice with several showers, a boaters lounge, and laundry. The docks are floating with large steel pilings and a wave attenuator that seems to do a really good job of keeping the water inside the marina calm.  The harbormaster and his assistant are really nice folks, are happy to help with anything you need, and they seem to keep up with maintenance.  I'm looking forward to having my boat here. 

And a new home.


Saturday, June 11, 2016

Education and Expectations

"You learn something everyday, if you pay attention". -Ray LeBlond

How about "If you want to properly maintain a boat you must learn something new everyday"...I think that is my version for it as it seems like I'm constantly searching for information on how to do something the right way on this boat.  How to properly wire a windlass, how to install a Plexiglass port light, how to build a hardtop bimini...it is a never ending list.

The past couple days I've been researching and soliciting opinions on what I need to do in order to strip all the bottom paint off the boat and start over.  The theory behind ablative or self-polishing paints is that they slowly wear off, keeping their anti-fouling properties going until the paint is gone.  Of course, they don't wear evenly and you don't want to wait until all the paint is gone before applying new paint, so the result is that over the years layers build up.  Eventually, or so I'm told anyway, the thickness of the layers and age of the older paints result in increasingly larger chips of paint coming off.  Thus the need to remove the paint.

What happens when bottom paint fails
(from a previous boat we surveyed, not ours now)
But, how to remove the paint.  That was the question. I wasn't 100% sure what was under the flaking paint on my boat, all I know is I don't want to screw up the hull because that would be very bad. Sanding off all the old paint is one way to remove it.  That would be a long and tedious approach and could potentially do damage if not very careful of how far to sand.  At the other end of the spectrum seem to be chemical strippers.  Paint the stripper on, wait a while, scrape off the softened paint.  Repeat until you are down to the gelcoat.  No damage to the underlying structure, but tedious and sanding the gelcoat to get another layer of paint to stick would still be required. Sandblasting the paint off would make quick work of the bottom paint, but would also make quick work of the gelcoat and underlying fiberglass.  The best solution seems to be soda-blasting.  Similar to sandblasting but with a media that is far less aggressive than sand.

Then the question is what to apply to the boat. While Leopards don't typically have much problem with blistering, application of a barrier coat seems to be the recommended way to go. A proper barrier coat seals the hull and prevents water intrusion...as long as the hull is dry (don't want to seal in water). Apparently cured barrier coats are, ironically, not the best surface to which to apply anti-fouling paint. So the first layer of anti-fouling paint needs to be applied before the barrier coat is cured. Of course, what anti-fouling paint to use is also a question.  Some paints are better than others, and their effectiveness seems to vary depending on where you are. Some have suggested paints such as Jotun SeaQuantum Static that are used on commercial ships.  We still haven't decided on what paint to use but hope to find a reasonable balance between cost and performance.

That is my recent education.  Of course, I also need to apply something I've learned from previous experiences with boatyards.  I wrote a letter to the yard where I would like to have the work done, explaining in detail what I expect in the business relationship.  I explained how I expect to come up with a detailed estimate before I leave the boat in their care.  I continue on to explain that I understand that unforeseen complications can arise, but I expect to be consulted if costs are going to exceed the estimate by more than a small percentage.

I hope that this is the yard's standard operating procedure, as it should be and is the standard in most industries.  Unfortunately, my experience with boatyards seems to indicate that this is somewhat foreign and running up a bill of twice the estimate without any consultation seems normal. I feel bad, and even apologized several times, that I had to write out basic business expectations.  If I ran a business, I'm not sure how I would feel if a customer was trying to tell me how I already know I should run my business...but again, my history in dealing with yards seems to indicate that this process is a rather foreign concept. So I felt I had to set expectations and make sure we are all on the same page.

Hopefully I've learned enough to do a good job in my choices on our anti-fouling bottom job and to ensure the boatyard we choose does a good job for me.

Friday, July 24, 2015

Almost Sank The Boat

Ok, not really...but we did let a bit more seawater in than we wanted to.  But let me back up a bit...

Today is the day we are supposed to launch the boat.  Finally, we could be off of "the hard" (what us sailors call it when a boat is intentionally put on land...where it obviously isn't supposed to be) where the boat sits in the air, acting as a solar oven while surrounded by trees that block even the slightest of breeze.

Where Rover started the day.

But first, we needed to touch up a bit more bottom paint.  When a boat is put on the hard, it is sitting in the air on blocks or stands.  When the bottom paint is as thick as it is on our boat (yes, at some point we need to do a full strip and repaint...but I'd like to get another year or two out of it first), the blocking can actually stick to chips of the paint and pull them off of the hull. This may also have something to do with the original surface prep, but in any case, it seems to happen.

So, early this morning the Travelift operator showed up to pick the boat up off the blocks so we could touch up those areas.  Hanging in the Travelift slings, we cleaned and touched up areas under the blocks and bottom of the keel. Now, the Petit Hydrocoat paint we are using typically wants 12 hours or more to dry, but we were scheduled to go in between two and three...so hopefully it will dry enough in time. Thus far I've liked the Petit Hydrocoat paint, the boat has remained pretty clean and there are no noxious fumes from the paint.  The only negative I've found so far is that it takes a while to dry, and getting the yard to give me enough time to allow the paint to dry while off the blocks (they prefer hanging in the Travelift slings to re-blocking a catamaran it seems) is near impossible.

With the paint applied and drying, we headed out to breakfast.  Since the boat was swinging in the lift, we figured we should probably limit any time on board to only absolutely necessary...and going out for breakfast seemed like a good option.  After breakfast and taking the dogs for a walk at a nearby park, we returned to the boat.

We decided to apply some wax to the hull at the waterline (we started waxing the whole hull a day or two ago, but ran out of time after one side of one hull), since it is easier to do on land than floating in a dinghy.  We hand applied wax to the bottom 8 inches or so of bare fiberglass.  By the time we were done, it was almost time to go back into the water.

We quickly went around the boat, removed the tarps we had put up to help shade us from the sun, and set up dock lines and fenders so we could be moved out of the haul-out slip and over to the slip we will call home while I work on the hard top.  The lift operator arrived while we were getting the tarps put away, so we felt a bit rushed.  This turned out to be a bad thing.

The boat made its slow roll from the yard to the haul out pit.  The boat was slowly lowered into the water and as soon as I was allowed, I hopped on board and started inspecting the through hulls to make sure none were leaking.  I started with the starboard engine room as there were two down there and the access is through the hatch in the sugar scoop.  They looked good when closed, so I opened them up and there were no leaks.

Then I went inside.  As soon as I got through the door I could hear running water.  Oh crap.  I quickly followed the sound to the starboard holding tank cabinet and I knew what the problem was.  I opened the cabinet door and found the valve in the half-opened position that I left it in when I installed it. In our hurry to get the boat going, I forgot to go through and check each of the through hulls. Since we had two through hulls that were not connected to hoses yet, we basically had two big potential holes in the bottom of the boat.  I quickly shut off the valve and the leak was stopped, but not until about three buckets full of water made its way into the bilge.  Good thing it didn't take too long to find.

Fortunately, after shutting off the valve, no other leaks were found. I burped the prop shaft seals to remove the air and allow water to cool the seals and then it was time to start the engines.  The engines fired right up.  We made our way out of the haul-out pit and over to the narrow fairway leading to the slip. It was a tight fit but we made it into the slip without incident and are finally back in the water.

Rover at the end of the day.  Much better.

In the slip there was even a nice evening breeze so we were able to open up the boat.  It is soooooo nice to be back on the water and not stuck in the hot, dusty, breeze-less boatyard.  So, maybe tomorrow I'll go back to the yard and set up my work area for the top...or maybe I'll take a day off.

Note: The last two posts were a day or so behind due to internet access issues...yes, in the marina/yard. Seems marinas are difficult places to implement WiFi with all the boats that have repeaters blasting away at full power.

Thursday, July 23, 2015

Almost Ready To Splash

Whew.  Yeah, that is about the best word to describe the last few days for both my wife and I.  But the good news is that, barring any unforeseen issues (ahem...yeah, we are talking about a boat) we should be back in the water tomorrow.

After pulling the cutlass bearing sleeve the other day, I needed to wait for the yard shop to open up so we could press out the old bearing and press in the new one. I have to admit, I do like the fact that the bearing holder unbolts from the boat and slides can be pulled out.  Being able to take the sleeve holding the bearing to the shop and use a press to pop out the old bearing makes that a breeze.

Old cutlass bearing removed and new in the holder.

Once the old bearing was pressed out, I cleaned up and inspected the holder.  The previous bearing wasn't the phenolic sleeve bearing that is called out for in the manual but was a bronze sleeved bearing. There was some corrosion in the holder, but thankfully it was still in pretty good shape.  We pressed in the new phenolic sleeve bearing and I headed back to the boat. I then used a drill to create a dimple in the bearing for the set screw and then installed the set screws with some Locktite.  The assembly was now ready to install.

Installation of the bearing holder was surprisingly easy.  I thought, given how difficult it was to extract, putting it back in would be similar. But, after cleaning the holder as well as the shaft log where it resides, it slid into place with only minimal resistance.  There was a fair amount of debate on the use of any sealant during the install, but I decided to put a small amount on the back of the flange just as it was when I removed it. I also used a rubber mallet to make sure the holder was seated properly along the bottom edge since there was a possibility that using the bolt alone to seat the holder (or some combination of it and the sealant) might cause a slight mis-alignment. At least theoretically this could have contributed to the encountered wear, so the mallet seemed like an easy solution to a problem that might or might not have existed.

Propeller installation was very straight forward.  I cleaned all the metal contact surfaces to ensure that the prop zinc takes the corrosion before the bronze propeller or stainless steel shaft does.  I'm actually a bit surprised about all the bronze and stainless touching as I would think that would lead to dissimilar metal issues.  A stainless steel prop shaft, stainless steel key, bronze prop, stainless steel locking washer, bronze prop nut, and a stainless steel screw that holds on the zinc. I guess that zinc must work well.

Everything back together.

With the through hulls, cutlass bearing, and propeller installed, there were only two tasks left.  First, I needed to reconnect all the hoses to the through hulls.  It had been several days since the sealant was applied so everything should be about as cured as it was ever going to be.  I ended up buying two boxes of AWAB stainless steel hose clamps to replace a bunch of the cheaper, rusting, hose clamps that were removed.  I like these clamps because they are high-quality stainless, seem to be well constructed, and are designed so they don't cut into hoses like standard clamps do.  Unfortunately the down side is they are a bit pricey compared to standard hose clamps...but I think well worth the difference. I also needed to replace one hose as the new valve required the hose to be about an inch longer. So, other than a couple of the black water hoses (a system we still need to investigate a couple issues with...thanks to the last boatyard), the "plumbing" should be back in working order.

The last task is to touch up the bottom paint.  Pulling through hulls out required the hull be cleaned around the through hull location on the hull so the sealant will do what it is supposed to do (unlike what was done with the air conditioner through hulls).  This results in the need to repaint around the areas. Of course, the smallest amount of bottom paint you can get is a quart, and after using about a half-pint to touch up the areas, we ended up touching up the keels and the waterline since they can usually use a little help. Interesting thing about bottom paint is that it apparently fades in the water.  I bought the same paint as I applied last year and the new paint was noticeably darker than what was currently on the hull.  Oh well, I guess the fish won't mind and I'm not going to spend another $400 or more in paint plus a few extra days in the yard to repaint the whole thing when most of the bottom paint is in good shape and was working well.

So, I think we are ready.  Hopefully come tomorrow, we will be back in the water.

Thursday, October 30, 2014

Bottom Paint

After patching the hole left when the through-hull was removed and finding and fixing a few other defects in the bottom of the boat, I needed to get some bottom paint back on those spots so the sea life that likes to make itself home on boat hulls would be deterred.  With all the patches, and since the boat is already out of the water, we decided that I should put a coat of paint on the entire boat.

While we were at the boat show, we checked out a few vendors of boat bottom paints trying to decide what we really need.  There are a variety of paints out there.  There are hard bottom paints as well as ablative varieties.  If you already have paint on the boat, you also need to determine compatability of the new paint with the existing paint.  For instance, you can't put a hard paint over an ablative paint.

Since we already had an ablative paint on the boat and we didn't want to strip off all the existing paint, we needed to choose an ablative paint.  Most ablative paints have copper oxides as one ingredient to deter marine life.  Some also have other chemicals that deter algae and grass growth.  Yet others have additional biocide chemicals.  Recently, new water based paints have appeared on the market that tout easier cleanup with lower VOC content.  It can get rather confusing.

I liked the idea of the water based options due to their easier handling, thinning, and cleanup.  We also liked the more "eco friendly" (if you can call a bottom paint that) concepts of some of the non-copper based paints.  Unfortunately, at $200 a gallon or more, some of these paints I felt were just too expensive for my first foray into bottom painting.  In the end, we decided on Pettit Hydrocoat.  It is water based, claims it can be applied to just about any other bottom paint (and we didn't know what had been previously used), and was the cheaper of the water based paints on sale at the local hardware store for about $150 a gallon.

The lightly sanded and taped off bottom

The preparation instructions on the can said to lightly sand the bottom before application.  The yard claims they just power wash, scrape off any growth and loose paint, and then paint the boat.  I decided I would go with the manufacturers recommendation and lightly sand.  I bought a pole sander, some 80 grit sandpaper, sanding sponges, goggles and a respirator.  Let me just say, in hindsight, I should have picked up a Tyvek suit as well.  The result of sanding is very fine particulates of the old bottom paint and the stuff sticks to everything.  After sanding, I rinsed off the boat to get rid of as much of the dust as possible.

Painting isn't that difficult.  One of the keys is to have the paint well shaken before application and then keep it stirred during application.  Apparently the copper tends to settle so you need to make sure it stays mixed.  First, I took some painters tape to mask off the waterline so the bottom paint only goes where it is supposed to. After using a brush to paint the corners and hard to reach places, the rest of the paint is rolled on with a short nap paint roller.  The Pettit Hydrocoat didn't have any obnoxious fumes and really reminded me of exterior home paint during application...other than the need to keep stirring it.

I applied a couple coats over the patched areas and then put a coat over the entire boat.  The result wasn't perfect (it would probably look better if I did a second coat) but it accomplished the goal.  The patched areas are well coated and everything looks fairly uniform now.  Hopefully this paint will work out OK.

The (almost) finished paint job

I'll need to paint the spots covered by the stands just before we launch the boat, but it is otherwise done.  The new paint is slightly darker than the old paint, so I'm glad we painted the whole bottom.  It does look a bit better now.  It took about a gallon and a half of paint to cover what I've done so far.  Looks like it would take about 3 gallons to do the whole boat with the proper two coats.  Hopefully that, and the sanded paint below it, will keep the barnacles away for a while.

And I definitely learned one thing...if I ever want to strip all the old paint off the boat, I think I'll hire someone to do it.