Showing posts with label corrosion. Show all posts

Saturday, July 11, 2015

She Won't Float Now

Nope, if you drop Rover in the water right now, she would probably sink rather quickly. Ok, so being a cored composite construction catamaran, she probably won't become submerged (since I don't have a big lead weight in my keels, she would only sink to the point that the natural buoyancy of the plastic, balsa, and wood she is made of) but she would take on some water pretty quickly. After all, I don't think the painters tape that is currently covering the 11 holes in the boat are likely to stop sea water.

Yep, yesterday and the day before we made 11 holes below the waterline in the boat.  Ok, you caught me again, we actually removed 11 old through hulls and ball valves, so technically we opened up 11 existing holes. There is only one through hull that remains, and it is an obviously much newer one than the rest, so we decided it still should have plenty of life left in it.

The two removed from two days ago

Why did we remove them? Well, some of them didn't look in the best of condition, and I had heard several reports of people having problems with electrolysis weakening the original valves or through hulls in much shorter time frames than one would expect of quality valves under normal conditions. There were also reports that some boats had through-hull holes that were not properly sealed and would allow water penetration into the balsa core. The final straw was that I managed to break the handle off one of the old valves trying to open it on our trip north, rendering it permanently closed. Since I didn't want a valve coming off in my hand (as the handle already did) and I don't want any delamination problems with the hull, we decided to pull and replace all the old through hulls.

Now, to the uninitiated or those unfamiliar with boat maintenance, replacing one of these things might not sound all that difficult.  Remove the attached hose, unscrew the valve, remove the through hull nut, and remove the through hull itself with assembly being exactly the opposite, adding in a little sealant along the way. But, in reality, one thing will almost always prevent this easy sounding process: corrosion.. Since 1999, or whenever some of these parts were previously replaced, corrosion has been doing its best to convert these collection of parts into one giant, seized together piece. The chances of me getting one to come apart...well...I'm probably far better off expecting that lottery ticket I bought will hit the jackpot.

The only real way to remove these things is to cut off the head of the through hull (this is the part that is clamping it to the hull from the outside) and then coax the remaining bit out of the hole. I find a lot of swearing helps coax it out...preferably in multiple languages if you know them.

The head of a through hull before we started work on it

Cutting the head off can be done using a hole saw and a wooden bung. You pound the bung into the through hull from the outside, carefully center your hole saw guide bit in the middle of the bung, and drill a hole the size of the through hull until the head pops off. Or that is the hole saw process I've been told. I don't have hole saws nor enough bungs to sacrifice 11 of them to the cause, so I took an alternate approach. I grind the heads off with an angle grinder that I do have.

This sounds difficult and potentially dangerous to a fiberglass boat hull, but if you go slowly and keep control of the grinder, it isn't that bad. Using the curve of the grinding wheel, you simply grind away a cup or tapered shape at the center of the through hull.

Ground down through hull head about ready to come off.

You will reach a point where you will begin to see the head separate.  Underneath that separation line is actually sealant (the through hulls are designed with a taper to hold a bead of sealant...it help keeps them water tight and all of that).so you aren't grinding into your hull.  Once you get that line to appear (at least in regular intervals) around the through hull, you can stop grinding and use a screwdriver to break any remaining thin layers of metal and then pop the head off.  I use a utility knife to score the bottom paint around the through hull in an attempt to prevent the head of the through hull from taking off too much of the adjacent bottom paint.

Carefully popping the head off without damaging the hull.

At this point, providing the previous installer didn't use something as stupid strong as 3M 5200, you can probably twist the valve assembly and work it free.  If it was stuck with 5200...well..I'm not exactly sure what you would do besides curse a lot more.  You might need to go invest in those hole saws at this point because my understanding is that 5200 is very permanent...as in fiberglass and gel coat will come off with it.

Looking at the cut through hulls, I'm not sure if I had a problem with zinc being leached out of the bronze (I think the theory was that the "bad" through hulls had a high zinc content and electrolysis was leaching the zinc out of the bronze). There were certainly some surface areas that were more copper colored than bronze, but internally they seemed properly colored to me.  I did notice a couple different colors of bronze (in the picture below), but neither were decidedly copper looking to my untrained eye, so I'm guessing those are just different bronze formulations.  If you happen to have any knowledge on this, please leave me a comment below.

Different colors of bronze or a zinc problem, what do you think?

One problem I did find was that the two through hulls for the air conditioners did not have the core properly sealed, and only the sealant was preventing water from entering the balsa core.  So, before I re-install them, I will need to cut out a bit of the balsa and seal it with epoxy to guarantee no future water penetration. I haven't inspected all the holes yet, but thus far the other ones on the starboard hull all seem to be in solid fiberglass with no exposed core.

All except the two largest valves.  4 different manufacturers.

So, here you have it....a picture of most of yesterday's work.  Wonder if I can find a metal recycling company nearby and recoup a little bit of the money involved in this project.

Saturday, December 20, 2014

If It Fails On A Boat, It Is Probably Corrosion

Well, as I mentioned in my last post, I'm running out of things to try in fixing my deck light. Short of replacing the entire wire, the connectors up at the fixture are the only other possible failure points. So, for my first try today, I decided to replace the connectors.

Of course, I already know that the wires up at the fixture are pretty short (I had previously repaired the positive lead), so I'll need to add a length of wire along with a new connector...or I'll never be able to get a bulb connected. I don't have any "boat approved" 14 gauge wire on the boat, fortunately there is a place nearby that is supposed to have a bunch at much better than West Marine prices named Genuine Dealz.

I plug the address into my phone's GPS and head over. My phone directs me to this nondescript warehouse that almost looks like it is abandoned, except for the two cars parked near an open door. No signs or any other indications I'm in the right place, but I park and poke my head in the open door. Inside there are a lot of spools of wire and other electrical parts. Definitely a low-budget, mostly internet based operation. There were a couple nice employees that confirmed I was in the right place. I told them I was looking for some 14 gauge wire and a few connectors. They hooked up their giant spools of wire and made me a 100 foot spool while I waited. Given their prices, I ended up buying a couple spools of the marine grade tinned wire and some additional heat shrink connectors to extend my parts stock.

I return to the boat with my supplies and construct some 5 inch extension wires with spade terminals on one end and butt splice connectors on the other end. Best to assemble what I can on the ground instead of trying to do it all while swinging from the mast.

After doing what I can on the ground, I once again get out the Bosun's chair and go up the mast. Instead of using my harness, I borrowed the Bosun's chair I had used before from a friend here at the dock (I have to admit, after trying a few different chairs and harnesses, Jesse has the most comfortable one I've found). Another friend, Bill, here at my dock has an interesting rig to allow you to pull yourself up the mast. He has rigged up a couple fiddle blocks, one with a jam cleat and becket and a lot of 1/2 inch line to create a 4:1 purchase system. With this, and a rope climbing ascender, someone can pull themselves up the mast while only having to lift 1/4 of their weight. This setup made it easy and comfortable to go up to the deck light as many times as I have over the past few days.

Bill's mast rig with an eye splice I did for him.

I make my way up the mast to the light, pop the light out of the holder, and carefully unscrew the lugs on the back of the bulb enough to remove the bulb. Then the surgery begins. I cut off the existing spade connectors and strip the wires so I can attach the butt connector that is already attached to the new spade assembly. I make sure that the stripped wire is clean and in good condition. I then crimp on the new wire assemblies. This all sounds quite simple...but imagine doing it mostly one-handed while sitting on a swing hovering 20 feet over the deck of the boat. After the crimp is solid, I use a BBQ lighter (they work a bit better in the wind than the average lighter) to carefully shrink the heat-shrink end of the butt connector for a weather-tight seal. Now I have longer, weather-resistant connections for the deck light. I reattach the bulb and snap it back in the holder. The moment of truth arrives...will this Hail Mary attempt work or will I need to pull a new wire.

I make my way back down the mast, wriggle out of the Bosun's chair and head over to the electrical panel. I flip the switch....and...the light comes on!  Yes! It appears that a connector was the issue after all.

Being an engineer, I now wanted to know why this was the failure. When I was up on the mast, I did some tests, including pulling on the connectors to make sure they were well crimped, so I wanted to know exactly what the failure was. The first thing I noticed is that the crimp on connector on the ground wire is not the right size.  The wire is 14 gauge and the crimp on connector is red for 18 to 22 gauge wire...but it seemed solidly connected.  The red connector is also not sealed so weather (or on a boat, salt water, could theoretically make it's way into the connection and wire. I stripped a little bit of insulation off of the wire and found that the ground doesn't appear to be tinned wire and there was some corrosion over an inch down the wire from the connector.

Top: Bad Ground spade, Bottom: Good power spade

Checking the resistance from the spade to the cut and stripped end of the wire on the ground connector I removed, I found resistance in the 18 mega-ohm range. That's a lot of resistance. In comparison, the positive connector I removed, that I had previously replaced and only replaced again because I wanted a longer length of wire, showed 0 ohms of resistance. Clearly the ground connector is the issue.  Pulling on the wire using pliers, I was able to pull the wire out of the connector.  I found the charred and corroded remains of the wire. I guess the insulation was what was holding the connection together as well as it was.

So, it seems that corrosion slowly turned the connector into a resistor and then the heat and corrosion eventually weakened the wire to the point it would not provide enough power to light the light (I think it was more carbon and corrosion than wire).

If you have stayed with me this far in this story, here are your tips (or my lessons learned) should you run into a similar issue with electrical on your boat. First, always use heat shrink connectors anywhere corrosion may be an issue (is there any place on a boat where corrosion isn't an issue?). The combination of the shrinking and the oozing of the "glue" that seeps out as the result of the shrinking should go far to protect connections from corrosion (you can see the difference in the two types of connectors in the picture above). Next, if it looks corroded on the end, it is probably corroded where you cannot see it and it is worth replacing even if it seems to be connected. And finally, always assume it will take 10x longer to perform a task on a boat than you think it should. I'm sure there's a joke in here about how long it takes for a boater to change a light bulb...and it being 3 days by the time you fix the things found along the way.

Thursday, October 23, 2014

A Tale of Two Holes

In case you haven't guessed yet, I'm back on our boat in Deltaville VA.  After the boat show, my wife and I came down to try and get some work done on the boat.  My wife flew back to our house earlier today (can't really call it home anymore...more of our things we intend to keep are  now on the boat) and I needed to take a break so I thought I would try to catch up on my blog writing.

Of course, right now even writing posts is a bit of a challenge.  One of the holes I mentioned in the title is the technology black hole of Deltaville.  The Stingray Point Boatyard, where Rover is currently on the hard, has internet access...but only if you are within about 2 feet of the office building.  Even my Wirie, that can pick up a number of locked signals in the area, can't get a reliable connection to their access point.  And forget about using my cell phone.  Unless you have Verizon (the most expensive wireless carrier in my experience) you are lucky to get any voice coverage and no 2G internet access.

So, sometimes I'll go sit on the chair in front of the office with my tablet in the evenings...until the mosquitoes chase me away.  Or I go to Patti's Diner, who has WiFi, to read some news, research my tasks, look for parts, and upload posts.

If atmospheric conditions are just right, I can occasionally get a local TV channel for news...but most of the time the digital TV is doing it's best Max Headroom impression.  It really is a technology/information black hole around here.  On the bright side, I guess I'm not getting barraged by all the political ads that are probably plaguing the country right now.

The other hole is a hole in the boat.  One of the tasks I left for the boatyard was the replacement of two through hull valves that were seized or otherwise inoperative.  After some other labor snafus and after reading about other Leopard boats that were having electrolysis issues with their through hulls, I decided we would take care of all the through hulls when we got back to the boat.

There's a hole in the boat dear Liza...
I ordered about a thousand dollars worth of bronze parts to replace all the through hulls such that they would arrive at the boat the same day we did.  When we got to the boat, I tried disassembling one of the through hull and seized valves and, as expected, corrosion had essentially welded the parts together.  So, out came the grinder and I was able to remove the entire through hull/valve assembly.  In the process of grinding out the through hull, I was able to determine that my bronze fittings weren't suffering from the same issues that others had experienced so I shouldn't have to replace all the other through hulls now.  So far, so good...but it is a boat so we know that will probably change.

Cut out through-hull and valve
And, it did.  I ordered the shortest through hull I could find and dry-fitting the new parts revealed that they simply would not fit.  The through hull itself is just too long and as a result the valve will not fit under the floor.  I tried all sorts of configurations but it just wouldn't work.  So, I decided we had nothing to lose and cut down one of the through hulls so it would fit.

Here is where we get into the semi-technical explanation of NPS and NPT threads.  Through hulls are typically NPS (straight) threaded so they will mate with nuts or seacocks and can clamp to any thickness of hull (a nut can spin all the way down the threads).  NPT is a tapered thread that only tightens so far before binding and forming a seal. Since there isn't enough clearance between the hull and the floor board, the Leopard through hull goes straight into a 90 degree elbow and then a valve is attached to it.  The elbows are only available with NPT (tapered pipe) threads.  Since many manufacturers are going to this configuration, some through hulls now have a combination thread so the very end of the through hull is NPT and the remaining thread is NPS.

By cutting down the through hull, I removed the NPT threaded end.  I knew this would likely be an issue, but didn't really have much of an option.  Now the elbow would only screw on about a turn and a half before the straight threads would bind in the NPT threaded elbow.  Not a safe option for something that, if it gives way, leaves a 1.5 inch hole in the bottom of the boat.  What I need is to be able to re-thread the through hull so it would again have the NPT tapered thread on the end.  In theory, this should be do-able.  In reality, not so much.  You see, pipe threaders apparently expect a long straight pipe to be inserted in them and the now 2.25 inch long through hull with the mushroom head on one end won't fit in any reasonable pipe threader.

I spent a good couple days trying to find options to get the tapered threads cut, but had little luck.  One machine shop in town said he could setup one of his machines to do it, but it would be several hours of labor to setup the machine and the cost was rather prohibitive...not to mention the hassle if when we ever need to replace the thing again and don't have access to a well equipped machine shop.

Doing a little more research, I found that most people that have had to deal with these through hulls have simply gotten rid of them.  The through hull is the direct discharge for the head and the boat is designed so you can direct discharge through the holding tank so it is somewhat superfluous.  And getting rid of a 1.5" hole in the bottom of the boat is generally a good thing, so I think we will be glassing over the hole and changing the plumbing.  Just wish I had decided this before I bought all the parts and replaced all the hose.

Hopefully I'll get the work that needs to be done finished soon, as the chill in the night air indicates I really need to be heading south.  Of course, with my wife back in Colorado, I need to see if I can find a hand with that task too.

Monday, February 24, 2014

A Little Too Secure.

Included with the purchase of my Leopard 38 catamaran was a dinghy with a motor.  The dinghy wasn't in the greatest shape (in fact one hole appears to have been "fixed"...to use the term loosely...with some sort of caulk like sealant that looks like bird poo) but it does hold air for at least a little while.  The motor, if it works, is a 2 stroke 15hp Yamaha...something definitely worth keeping if it runs or can be revived.  When I took possession of the boat, the motor was mounted on the dinghy and both were hoisted in the davits.  The weight imbalance was causing the davit bar to bend down on the motor side, so it was time to remove the motor from the dinghy.

You can see how the davit bends in this old picture.

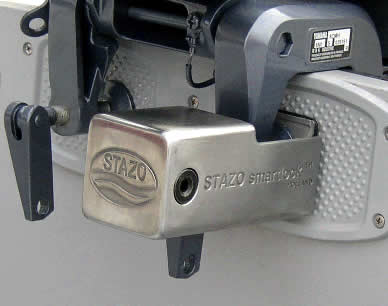
The previous owner was apparently worried a great deal about someone stealing the dinghy motor and bought a fancy lock to lock it onto the dinghy in addition to his Master Cable Lock.  The Stazo lock is a big hollow square piece of stainless steel that fits over one of the clamping arms of the motor and prevents the clamp from being set free.  I rummaged around and found the key to the lock and gave it a try.  Of course, as is my usual luck, the lock would not budge.  I sprayed some penetrating oil into the lock...and a stream of rusty oil came out.  This does not look good.  Who would make a lock for an outboard motor where the lock cylinder would rust?

Stock photo - Mine was far more rusted.

The next several days I would spray some penetrating oil into the lock and try the key...and each time the lock would not budge. A fellow boater in the marina had a die grinder and some cut-off blades, so we decided that we would take the brute force approach and cut the lock off the dinghy.  It took two cutoff blades but we were finally able to remove the lock.  Underneath the lock I found a prime example of dissimilar metal corrosion as the stainless steel lock had corroded a hole through the aluminum motor mount on the transom of the dinghy.  I had wondered why that mounting plate had looked so corroded. It is true that aluminum doesn't rust (because rust is defined as iron oxide), but aluminum certainly does corrode. The entire motor mount was rather corroded and had warped to the point that, even with the lock off and the clamps backed off all the way, we were having a hard time removing the motor from the mount.  Cleaning out the (aluminum oxide) corrosion from behind the plate we were finally able to get enough clearance to remove the motor.

Trying to remove the motor from the corroded mount.

The motor is now resting comfortably on the pushpit railing mount and I have a new project...to replace the corroded engine mounting plate on the dinghy.

Corrosion hole from the lock.

I was able to find a small, used piece of StarBoard (high density polyethylene plastic) at Sailors Exchange for a few dollars that I figure would work well as a replacement for the corroded mount.  I cut it to shape, drilled and countersunk the mounting screw holes, and viola, good as new...well...OK...not so pretty...but good enough for this dinghy.  No point throwing too much money at it when this should work for the remaining life of the dinghy.

Maybe not pretty, but a functional mount.

And below is part of the pile of aluminum oxide left behind after the replacement.  Too bad there isn't a sandpaper plant nearby...bet they would like to have it (your bit of trivia for today...some sandpaper uses aluminum oxide as the abrasive grit).

A lot of aluminum "rust" in the bottom of the dinghy when we were done.
Of course, in true boat project fashion, while working with the dinghy I found another problem.  The davit winch that spins nicely when free, squeaks under load and I also noticed the plastic stripper for the self-tailer is broken (after it tried jamming the davit line under the tab on the winch), so winch servicing is now added to "the list".  The dinghy and motor can now be separated and the davits look happier without the motors weight on them, so task completed.