Showing posts with label impeller. Show all posts

Sunday, February 14, 2016

Just In Time

I had a hard time with the title for this post.  There were so many options based on what we've been up to the last couple days. "How not to burn down your boat", "Battling freezing temperatures", and a few others.  But, as of yesterday, this one seems to sum it up best.

We are still in Southport, North Carolina, waiting on the weather to improve enough to continue the trip.  Cold and/or windy and/or  rainy sums up the forecast for the last couple and next couple days. While we sit, it only made sense to knock a couple more items off the to-do list.

Weather Underground report this morning.

Due to the cold weather, we decided to utilize an electric space heater in the boat.  The reverse cycle air conditioning units can generate heat, but they get less efficient as the water temperature drops. Once the water temperature dips below 40F, there just isn't enough heat to extract out of the water. This boat, being designed for Caribbean charter, just doesn't have much option for dealing with really cold weather. In the process of using the plug-in electric heater, we found that a few of the 115v AC electrical outlets were in need of replacement.

Electrical outlets have a limited lifetime.  Anyone who has owned an older home knows that the outlets wear out and eventually don't hold a plug all that well.  And in the harsh marine environment, you add corrosion to that mix.  The combination of poor clamping force on the plug and corrosion can cause a lot of resistance in the outlets.  Resistance causes heat, and if you have enough heat...well, it ain't pretty.  So, it was obviously time to retire the 15+ year old outlets on the boat.  What to replace them with was the next question.

The old outlet and the new mounting "box".
One of the corroded plug contacts below.

Off I went down the rabbit hole of what is a good, marine-grade electrical outlet. I tried finding the plugs currently used on the boat, but they are, naturally, no longer made. Searching all the usual marine suppliers resulted in GFCI outlets touted as marine.  We have two 15 amp 115v circuits on the boat and both are currently protected by newer GFCI outlets already, so we just need standard plugs down the line. The only standard plug provided by a marine supplier is a bright yellow plug that looks just like any normal household 3-prong outlet.  In fact, looking closely at the picture showed it was made my Leviton. The information I found showed that, internally, it was no different than the normal weather resistant Leviton or other industry standard plugs.  Since we prefer white to bright yellow, we decided to go that route for the replacements.

Naturally, as a boat project, this wasn't the end of the puzzles on the project. When attempting to remove the old outlets, I discovered that the factory didn't mount the plugs well (the holes were cut just a bit too large for the mounting screws), and a previous owner resolved the issue by gluing them in with silicone caulk. In order to make everything mount properly, I picked up some low voltage remodeling electrical boxes.  These are basically the front edge of an electrical box (so it has the needed receptacle mounting holes) and can clamp to a hole cut in drywall (or in this case, fiberglass). Now the outlets can be secured in the holes without the need of silicone to glue them in place.

No sooner had we finish installing the new outlets than the boat decided to give us another challenge.  We discovered that the reverse cycle air conditioner in our berth was not producing any heat. Checking out the system, I found the raw water pump stopped working sometime in the past few hours.  Not good when the coldest temperatures we will experience on the boat thus far were only 24 hours away. Good thing we just finished the plugs so we could use the space heater that night.

The next morning we dug into the issue. We started with the obvious. Since it was a little past time for us to clean the sea water strainers, we pulled the strainers and cleaned them. Unfortunately the strainer on this unit didn't look that bad so it likely wasn't the issue.  But, just to confirm it was a boat project, the strainer decided to leak when we put it back together.  It took a while messing with it, but we were finally able to get it to seal properly.

Since I already had a little experience dealing with the raw water pump (this is the pump I previously replaced), I decided to dig into it to see if we couldn't get it running again.  Attempting to run the unit this morning resulted in a small amount of water being produced, so there was some hope.  I pulled the head off the pump (not an easy feat given its location in the bilge) and it became obvious what was wrong.  The used pump I purchased had obviously been rebuilt, and the rebuild wasn't done properly.  A spacing washer was missing from the impeller housing, and one of the spindle supports was broken.  The missing spacer may have been the initial fault and the impeller rubbing on the housing may have been what broke the support, but I'm not really sure.
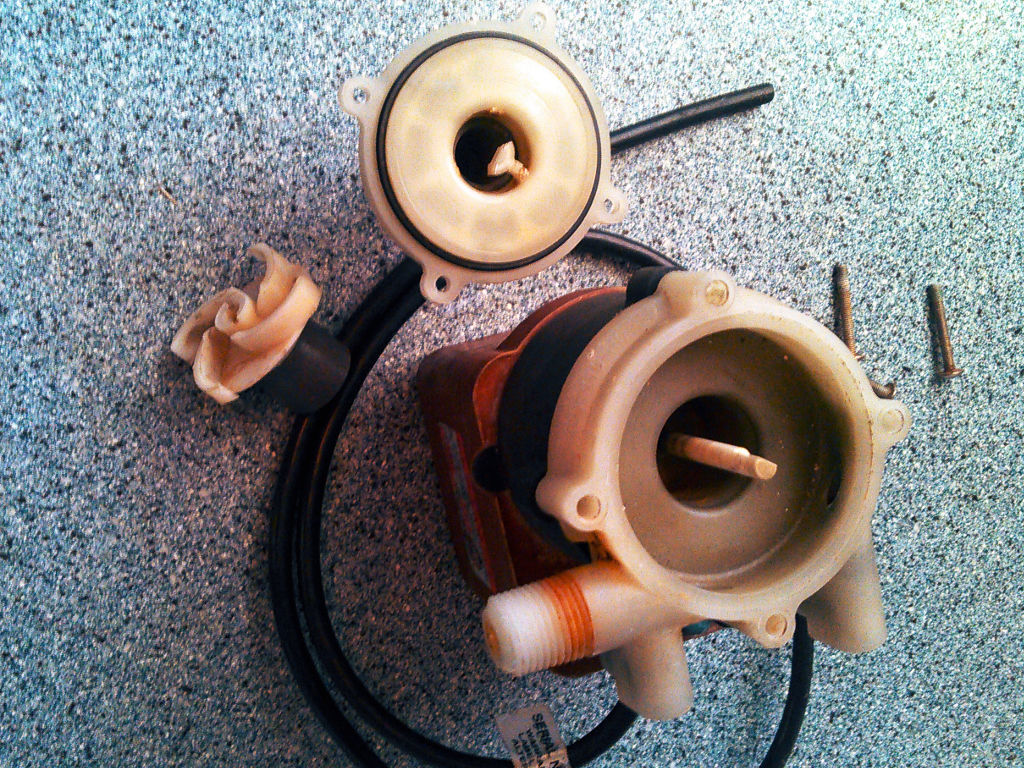
March Pump. Worn cover with broken support top.
Worn impeller left.
In any case, we were in luck.  I still had the old pump that was removed when it failed.  On that pump, the motor seized but the pump head was still in good shape.  I was able to scavenge the impeller, housing with the intact support, and missing spacer from my old pump to "rebuild" the pump head.  After getting it all back together, we once again have good water flow from the pump. While it is a pain to have to fix things, it is nice when everything needed to repair a complex thing like an air conditioner raw water pump can be found on the boat, and all it cost was a little time.

So, just in time for the cold, we have all our possible heat generating items working again on the boat, although we would much prefer warmer weather.

Friday, January 8, 2016

Feeling Neglected

After all the time spent building the new hardtop, it seems other things on the boat have been a bit neglected. The salon seat cushions that we have wanted to reupholster because of the ugly blue vinyl have degraded into cushions mostly covered in vinyl fragments. The port side hull, that has no climate control capability, is slowly turning into a mold forest and is in desperate need of some cleaning.  But these aren't the things that are preventing our departure from cold Virginia.  Other systems have started acting up.  In particular, the ones that run on diesel.  Both the engines and the generator have decided to prove that they need a little love too.

When I fired up the generator as a test and part of my semi-regular attempt to make sure oil gets circulated on all those internal, rustable parts, no water was found shooting out of the exhaust.  For those that aren't aware, boat diesels use seawater as part of the engine cooling circuit and said water is ejected via the exhaust.  If no water is flowing from the exhaust, it indicates the raw water is not being sucked up to cool the engine and the engine will overheat.  The lack of water can usually be attributed to a blockage at the intake (including the intake seacock [valve] being closed) or a failure of the replaceable rubber impeller in the raw water pump.

Picture of a raw water pump with the impeller access plate removed.
Photo from Compass Marine (an awesome site for boat repair information).

I check the seacock, and it was indeed open.  I open the inline strainer and pour some water in to see if it will flow out through the intake and it did, so no blockage there.  I then remove the plate on the pump expecting to see the broken rubber bits of the impeller.  Unfortunately, the impeller looked in pristine condition.  None of the usual culprits was the cause, and this is not a good thing.  With the cover removed, I have my wife bump the starter to verify that the pump is turning the impeller.  The impeller didn't move.  Drat.  It is starting to look like something may have broken inside the pump.  I pull the pump in preparation for taking it up to the marina shop to see if they have one.  When I pull the pump, I find that the nut that holds the gear on the back side of the pump is loose.  The result is that the gear would spin freely on the pump shaft. I tighten the nut and viola, turning the gear now turns the shaft which, in turn, spins the impeller. I reinstall the the pump and when I start the generator, the magic cooling water once again flowed from the exhaust.  So, the good part of this story is that the fix was nothing more than tightening a nut.  The bad part is that it took up a few hours that could have been spent preparing for our departure.

While messing with the generator, I noticed that the radiator cap looked like it might be leaking. Fortunately, radiator caps are relatively easy to find and one was procured from a local auto parts store. Hopefully that will resolve that little problem.

The two Westerbeke engines that propel the boat through the water (when not under sail) were also being cranky.  They, not unlike my wife and I, were protesting the cold weather and were incredibly hard to start.  The last time I started them they weren't too happy, but I figured it was due to the amount of time since I last started them in combination with the cold.  This time it hadn't been all that long, but it was a bit colder and they nearly refused to start. It took me over an hour to coax them to life so we could move the boat as the marina requested.  This simply would not have worked at all if we weren't attached to marina power where we could recharge the batteries between attempts. This needed to be fixed before we leave since I'm sure we would have killed the start batteries trying to get the engines started.

Diesels are pretty simple systems as far as engines go.  They run on fuel, air, and compression.  No pesky ignition systems to complicate issues.  But they don't like cold temperatures.  To battle this, they have things called glow plugs, basically little heaters that warm up the combustion chamber for those cold starts. I did some quick checks of the air intake and fuel and quickly focused my efforts on the glow plug system. On the starboard engine I verified that I could hear the click of the solenoid that activates the glow plugs.  I checked for voltage on the wires and it seemed fine. I then pulled one of the glow plugs and checked the resistance and it was just a little low compared to what the book said it should be (1 ohm instead of the 1.2 ohms). That didn't seem bad but we went to see if I could find a local source for them (it was getting late and I wanted to check availability before the stores closed). No one had them in stock, and I would have to order them if I needed them.  The next morning I tested the glow plug I pulled by taking a couple wires and connecting them directly to the battery.  The glow plug worked just fine.  Hmm.  I then hooked the plug back up to its voltage supply wire and attached a separate ground so I could see it work while it was hooked up to the engine.  We pushed the preheat button and nothing.  I re-verified that I was seeing voltage on the wire, and I was.  The only explanation I could think of is that the contacts in the solenoid were old and over time have developed a high resistance. This would explain seeing voltage but not enough power to make the glow plug glow.  I reinstalled the glow plug and then used a jumper wire to bypass the relay.  This time when we tried to start the engine it quickly roared to life.  Aha!

The solenoid causing the starting problem.

So, off we went to try finding a replacement solenoid.  The only diesel shop in town said they didn't have the Westerbeke part but might have a suitable replacement if I could bring them a picture.  I took several pictures and went to the shop to see what they could do.  They took a look at the pictures, walked in back and came back with a solenoid that looked very similar to the OEM part.  I took it back to the boat and installed it.  During the installation I double checked the wiring diagram and the installation on the other engine just to make sure everything was hooked up correctly.  We gave the new solenoid a try...and nothing.  This time I couldn't even hear or feel the solenoid click.  I removed the new solenoid and reinstalled the old one.  I verified that the old one still clicked and that I got the wiring right.  It was right.  Sigh.

We had wasted enough time on this issue and the weather window to leave was getting shorter, so we decided we would just press on using the jumper wire workaround until we got someplace where we could order the Westerbeke part and have it shipped in.  We took the new solenoid back.

Suspecting a similar issue on the port engine, I ran the same tests.  Voltages were fine.  I pulled one of the glow plugs and tested it and it was fine.  I did the test for the solenoid expecting it to be the fault, but was surprised when it worked fine too.  I reinstalled the glow plug and decided to give the engine one more test before I pulled the other glow plugs to see if one of them is at fault.  The engine fired right up.  Huh.  My only guess is the process of removing and testing the first glow plug must have cleaned up some corrosion and now the system is working fine. I'll call that a win.

When doing instrument checks in preparation for departure, I ran across another issue.  The chart plotter was complaining about not getting a signal from the remote GPS.  Figuring this was a connection issue, I pulled all the plugs from the back of the plotter and plugged them back in.  Restart the chart plotter, and it was again happy.  I do like these simple fixes.

When I get to warmer climates I'll need to revisit a few things.  I should take some dielectric grease to some of the electrical connections to help combat corrosion.  I also need to clean and paint the engines...but I'm not sure the paint will even dry at these temperatures.

So, we are a few days behind in our preparation to leave, but with any luck we should be heading out soon.  Now where is that grocery list...

Saturday, April 12, 2014

Another Impeller!

In my last post I mentioned that I've been focusing my recent attention on my dinghy (a.k.a. family car).  While I work on the registration and debate the best way to fix the leaks in the Caribe RIB, I figured I would look over the motor and see if I can get it running.

The motor is a 15 hp, 2-stroke Yamaha engine.  Using a manual I found online (the previous owner didn't leave me the hard copy), I opened it up and went through all the basic checks to make sure the controls work and it had at least a reasonable potential to start.  While mounted on the storage mount, I hooked up the gas tank and a clamp-on adapter to provide fresh water for cooling.

It took a couple tries, but the motor did fire up.  Of course, the stream of cooling water failed to appear from the appropriate hole in the motor housing where it is supposed to be found.  Since running the engine without cooling water is very bad, I quickly shut down the engine.  With my recent impeller experience, I figure there is a very good chance that this is the problem.  Now, where do they hide the water pump on an outboard motor?

Looking through the manual, I found that the water pump is actually located in the lower end of the motor on the drive shaft.  I guess it makes sense, but it certainly isn't a convenient location for checking the impeller. Guess I will need to disassemble the engine just to check and see if my suspicions are correct.  As I've learned to do, I consult Google and YouTube for additional information on the process and I found this video that demonstrates the general process.


A little more complicated than replacing the impellers on the inboard engines, but it doesn't seem too bad. I locate the impeller (actually a kit, more on that below) at a local store and begin the process of checking and changing the impeller.

Motor on the cockpit table...where else would you work on it?

I remove the lower unit containing the transmission and the water pump housing just like it shows in the video (except I disconnected the transmission linkage before I removed the other bolts).  I disassemble the water pump and viola, the culprit of my lack of cooling water is found.  Another destroyed impeller.  As I've learned, it is very important to locate all the pieces of the impeller and I dig through the passages and am able to find enough rubber bits to account for the entire thing.

Disassembled pump, another destroyed impeller found.

Yamaha did something kind of clever with the pump.  Instead of just providing the impeller, they provide a kit that contains not only the impeller, but also replacement walls for the housing and a few other bits so you can rebuild the water pump and all of the working surfaces are new.  They do this with simple stamped metal parts so the entire kit costs about the same amount as a single impeller for my Westerbeke engines.

New shiny pump walls.

With a refurbished pump, I reassembled the motor.  I did check the lower unit (transmission) oil before reassembly.  With everything back together, I put the motor on the storage mount, hooked everything back up and gave it a try.  As soon as the motor fired, a good stream of water came shooting out of the motor housing just like it was supposed to. Another impeller problem solved.

Of course the engine only ran for a minute or so and then sputtered to a stop.  I probably need to get some fresh gasoline, but at least now I know the motor does run and seems to be in better condition than I suspected might be the case.

Tuesday, March 18, 2014

Hot Engine

Once returning to the boat, the first order of business, maintenance wise anyway, was to determine the state of the engine.  We had obviously overheated the engine, but without the alarm the engine could have been hot for anywhere between 10 seconds and 10 minutes.  My hope is that it was at the shorter end of that spectrum.

Since a prior mechanic had done a fair amount of work on the cooling system of that engine, I decided I should have another mechanic (an unbiased third party) come help determine what had happened.

Now, before I left I knew that the coolant was down quite a bit and suspect that the missing coolant was the cause of the steam in engine room.  The plastic overflow bottle was empty and the cap was found elsewhere in the engine room. The secondary coolant reservoir (this is the engine that is plumbed into the hot water heater) was empty and I couldn't see coolant in the engine when I removed that radiator cap either.  These are not good signs. I had looked around and didn't see any loose or broken hoses or missing clamps either.  On the bright side, there did not appear to be any contamination in the oil.

The mechanic arrived and did similar inspections and could find nothing wrong either.  Then we checked the impeller.  For those not familiar with a boat impeller, it is the working part of the raw water pump.  Unlike your car that uses air to cool the engine coolant that then cools the engine, a boat uses sea water (raw water) instead of air to cool the engine coolant.  Since sea water can contain contaminants, the pump needs to be more forgiving of the liquid it pumps and so the working part of the pump is a series of neoprene rubber fins attached to a hub kind of like a water wheel..this is the impeller. When the impeller rotates, it moves water and if you restrict the clearance on one side of the impeller chamber, water will flow in one direction and you have a pump.

Impeller conceptual drawing - found on the internet.

So, you might have guessed that this little piece of rubber is fairly important.  When we opened up the impeller housing, we found that the impeller had self destructed. As a result the engine wasn't getting cooling water to cool the engine coolant and this was the direct cause of the overheat (just as if you had completely blocked the radiator in your car).

A new impeller on the left, the one from the engine on the right.

As the impeller spins, it rubs against the metal housing of the pump body.  As you can imagine this causes quite a bit of friction.  When it is pumping water, the water lubricates and cools the impeller, but if the water supply is blocked, the impeller will generate heat and rip itself apart.  It is our best guess that this is what happened.  Maybe a piece of plastic or other trash was sucked up against the intake and blocked cooling water.  The truth is we will probably never know.

We removed the pump, dug out all the parts of the impeller (as shown in the above picture), did our best to confirm we had all the pieces of the impeller and checked the raw water entrance to the heat exchanger (radiator) for any additional impeller pieces.  We checked the strainer and the hoses to ensure there was no blockage anywhere in the system (and we found none) and then put it all back together.  When we added coolant we found that it took about half the amount of an empty engine (so at least we didn't boil it all out).

We then tried to start the engine.  It was a little hard to start but did start up and didn't appear to smoke or do anything out of the ordinary.  We carefully watched the temperature as the engine ran and it came up to it's prior operating temperature.  Watching the needle, we could see when the thermostat opened and the temperature stabilized.  Since the temperature needle stopped at 188°F and the prior mechanic indicated that the gauge was indicating 15~20 degrees high, we again checked the temperature of the engine using a laser thermometer on a number of engine locations.  At the temperature sensor, the temperature was actually 168°F and the hottest temperature we could find was 172°F.  So we did confirm that the gauge was reading a bit high as was previously reported.  Guess I'll need to see what options I have to make this system more accurate.

The other issue was why the high temperature alarm didn't go off.  We tested the circuit by grounding the wire and the alarm did sound...albeit not as loud as I would like.  I'll have to pull the sensor and put it in some boiling water to see if it is working at some point.

But the good news is that the engine is alive and that is a relief...particularly to my bank account.