
Thursday, February 27, 2014
Sometimes A Picture...
...is worth...well you know. This is what I saw off the back of my boat this evening.

Tuesday, February 25, 2014
A Winch is not a Wheel Bearing
While freeing the motor from the dinghy, one thing I found was that the winch at the rear of the boat needed to be serviced. It sounded OK, clicking and spinning as it was supposed to, but started complaining (squeaking) when under the load of the davit system. So, what do you do when you need to do something and don't know how...consult The Oracle naturally. A brief search found the following YouTube video on the subject.
Seems straight forward enough. The cap was a little tighter than hand tight but came off with a bit of persuasion. After removing the caps I tried to remove the collets. Note how easily they are removed in the video...well, this winch doesn't appear to have been serviced in a while and the collets were stuck. I couldn't even pull them out with pliers (something you should avoid doing with softer metals unless absolutely necessary). I applied some penetrating oil and let it sit...for a day.
The next day I came back and the collets still would not budge. A far cry from what you see in the above video. I guess servicing a brand new winch on a table isn't the same as servicing a well used, and probably abused, winch on a boat. I didn't find much information on sticking collets, so I guess this isn't a common occurrence. In any case, I need to get this thing apart to either service it or replace it so these collets will have to come out one way or another. In the end, I used a heat gun and vice grips and were finally able to get them out without too much damage to the collets.
From what I can tell, it appeared that dried grease was the reason that the collets were stuck. As I disassembled the rest of the winch, I found the parts to be just as in the above video, but in my case most were caked with grease. Some older and dried and some that was in better shape. But, if you watch the video above you will note that they say "lightly" oil and "lightly" grease...but this winch was treated more like a wheel bearing that was packed with grease.
It took me 4 hours and copious amounts of solvent (most of my supply) to clean all the grease off of the gears and other parts (next time I'll just use diesel). It was a real pain to get this winch clean. The picture below doesn't really do it justice, I should have pulled the gear stack on the right apart so you could see the gobs of grease caked inside and surrounding the pawls.
After the thorough cleaning, I lightly greased and lightly oiled as it showed in the video (ok, I put a little bit more on than the video shows...but just barely coating surfaces) and reassembled the winch. Since I didn't have spare collets, I used some jewelers diamond files to file off the burs made in the collets by the vice grips. Everything went together just fine.
The real test was to winch the dinghy back up and, other than the broken stripper ring I still need to order (so for now this winch's self-tailing feature shouldn't be used), it worked flawlessly. It raised the dinghy without complaint and sounded like a happy winch. Going to have to do this to the rest of the winches, I do hope that the rest are not packed in grease...but I guess I better go pick up some diesel to use as solvent just in case.
Seems straight forward enough. The cap was a little tighter than hand tight but came off with a bit of persuasion. After removing the caps I tried to remove the collets. Note how easily they are removed in the video...well, this winch doesn't appear to have been serviced in a while and the collets were stuck. I couldn't even pull them out with pliers (something you should avoid doing with softer metals unless absolutely necessary). I applied some penetrating oil and let it sit...for a day.
The next day I came back and the collets still would not budge. A far cry from what you see in the above video. I guess servicing a brand new winch on a table isn't the same as servicing a well used, and probably abused, winch on a boat. I didn't find much information on sticking collets, so I guess this isn't a common occurrence. In any case, I need to get this thing apart to either service it or replace it so these collets will have to come out one way or another. In the end, I used a heat gun and vice grips and were finally able to get them out without too much damage to the collets.
From what I can tell, it appeared that dried grease was the reason that the collets were stuck. As I disassembled the rest of the winch, I found the parts to be just as in the above video, but in my case most were caked with grease. Some older and dried and some that was in better shape. But, if you watch the video above you will note that they say "lightly" oil and "lightly" grease...but this winch was treated more like a wheel bearing that was packed with grease.
It took me 4 hours and copious amounts of solvent (most of my supply) to clean all the grease off of the gears and other parts (next time I'll just use diesel). It was a real pain to get this winch clean. The picture below doesn't really do it justice, I should have pulled the gear stack on the right apart so you could see the gobs of grease caked inside and surrounding the pawls.
 |
| Clean on the left, dirty on the right. |
The real test was to winch the dinghy back up and, other than the broken stripper ring I still need to order (so for now this winch's self-tailing feature shouldn't be used), it worked flawlessly. It raised the dinghy without complaint and sounded like a happy winch. Going to have to do this to the rest of the winches, I do hope that the rest are not packed in grease...but I guess I better go pick up some diesel to use as solvent just in case.
Monday, February 24, 2014
A Little Too Secure.
Included with the purchase of my Leopard 38 catamaran was a dinghy with a motor. The dinghy wasn't in the greatest shape (in fact one hole appears to have been "fixed"...to use the term loosely...with some sort of caulk like sealant that looks like bird poo) but it does hold air for at least a little while. The motor, if it works, is a 2 stroke 15hp Yamaha...something definitely worth keeping if it runs or can be revived. When I took possession of the boat, the motor was mounted on the dinghy and both were hoisted in the davits. The weight imbalance was causing the davit bar to bend down on the motor side, so it was time to remove the motor from the dinghy.
The previous owner was apparently worried a great deal about someone stealing the dinghy motor and bought a fancy lock to lock it onto the dinghy in addition to his Master Cable Lock. The Stazo lock is a big hollow square piece of stainless steel that fits over one of the clamping arms of the motor and prevents the clamp from being set free. I rummaged around and found the key to the lock and gave it a try. Of course, as is my usual luck, the lock would not budge. I sprayed some penetrating oil into the lock...and a stream of rusty oil came out. This does not look good. Who would make a lock for an outboard motor where the lock cylinder would rust?
The next several days I would spray some penetrating oil into the lock and try the key...and each time the lock would not budge. A fellow boater in the marina had a die grinder and some cut-off blades, so we decided that we would take the brute force approach and cut the lock off the dinghy. It took two cutoff blades but we were finally able to remove the lock. Underneath the lock I found a prime example of dissimilar metal corrosion as the stainless steel lock had corroded a hole through the aluminum motor mount on the transom of the dinghy. I had wondered why that mounting plate had looked so corroded. It is true that aluminum doesn't rust (because rust is defined as iron oxide), but aluminum certainly does corrode. The entire motor mount was rather corroded and had warped to the point that, even with the lock off and the clamps backed off all the way, we were having a hard time removing the motor from the mount. Cleaning out the (aluminum oxide) corrosion from behind the plate we were finally able to get enough clearance to remove the motor.
The motor is now resting comfortably on the pushpit railing mount and I have a new project...to replace the corroded engine mounting plate on the dinghy.
I was able to find a small, used piece of StarBoard (high density polyethylene plastic) at Sailors Exchange for a few dollars that I figure would work well as a replacement for the corroded mount. I cut it to shape, drilled and countersunk the mounting screw holes, and viola, good as new...well...OK...not so pretty...but good enough for this dinghy. No point throwing too much money at it when this should work for the remaining life of the dinghy.
Of course, in true boat project fashion, while working with the dinghy I found another problem. The davit winch that spins nicely when free, squeaks under load and I also noticed the plastic stripper for the self-tailer is broken (after it tried jamming the davit line under the tab on the winch), so winch servicing is now added to "the list". The dinghy and motor can now be separated and the davits look happier without the motors weight on them, so task completed.
 |
| You can see how the davit bends in this old picture. |
The previous owner was apparently worried a great deal about someone stealing the dinghy motor and bought a fancy lock to lock it onto the dinghy in addition to his Master Cable Lock. The Stazo lock is a big hollow square piece of stainless steel that fits over one of the clamping arms of the motor and prevents the clamp from being set free. I rummaged around and found the key to the lock and gave it a try. Of course, as is my usual luck, the lock would not budge. I sprayed some penetrating oil into the lock...and a stream of rusty oil came out. This does not look good. Who would make a lock for an outboard motor where the lock cylinder would rust?
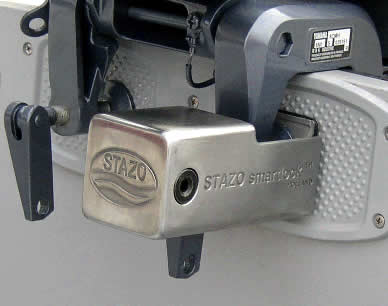 |
| Stock photo - Mine was far more rusted. |
The next several days I would spray some penetrating oil into the lock and try the key...and each time the lock would not budge. A fellow boater in the marina had a die grinder and some cut-off blades, so we decided that we would take the brute force approach and cut the lock off the dinghy. It took two cutoff blades but we were finally able to remove the lock. Underneath the lock I found a prime example of dissimilar metal corrosion as the stainless steel lock had corroded a hole through the aluminum motor mount on the transom of the dinghy. I had wondered why that mounting plate had looked so corroded. It is true that aluminum doesn't rust (because rust is defined as iron oxide), but aluminum certainly does corrode. The entire motor mount was rather corroded and had warped to the point that, even with the lock off and the clamps backed off all the way, we were having a hard time removing the motor from the mount. Cleaning out the (aluminum oxide) corrosion from behind the plate we were finally able to get enough clearance to remove the motor.
 |
| Trying to remove the motor from the corroded mount. |
The motor is now resting comfortably on the pushpit railing mount and I have a new project...to replace the corroded engine mounting plate on the dinghy.
 |
| Corrosion hole from the lock. |
I was able to find a small, used piece of StarBoard (high density polyethylene plastic) at Sailors Exchange for a few dollars that I figure would work well as a replacement for the corroded mount. I cut it to shape, drilled and countersunk the mounting screw holes, and viola, good as new...well...OK...not so pretty...but good enough for this dinghy. No point throwing too much money at it when this should work for the remaining life of the dinghy.
 |
| Maybe not pretty, but a functional mount. |
And below is part of the pile of aluminum oxide left behind after the replacement. Too bad there isn't a sandpaper plant nearby...bet they would like to have it (your bit of trivia for today...some sandpaper uses aluminum oxide as the abrasive grit).
 |
| A lot of aluminum "rust" in the bottom of the dinghy when we were done. |
Thursday, February 20, 2014
Drippy : 1, Mike : 0
Well, I did successfully get the refrigerator valve (a.k.a Drippy) to stop sweating and dripping. Unfortunately I also got it to stop cooling as well. Sigh. I went back to the manuals I found on the Sea Frost refrigeration system and they do say that if this valve is mounted outside of the "cold box", that it needs to be insulated. They, of course, recommend the cork tape stuff I was unable to ever find, but this foam tape should have been an acceptable, and probably better insulating, option. So it sure seemed like what I did would not have caused this response in the refrigerator.
But, what is step one in trouble shooting any problem: "Did you mess with it when the problem started -> If yes, put it back the way you found it". So, I ripped some of the insulation back off of the valve. When I did, I discovered what might be the problem. Since the vapor line, liquid line, and thermostat probe are bundled together and all run through the same 1 + inch hole into the cold box, I wrapped the lines together. After all, without the wrapping, this was exactly how the system was configured.
The problem is that bundling the lines together actually leaves a small amount of air space in the middle of the bundle. I apparently wasn't able to get the tape to produce an air tight seal for this air space, so the result is that ice then formed in the airspace between the pipes. Now that there is a nice amount of insulation around this airspace, I created what was probably a permanent ice cube. My current theory is that this ice was causing false readings for the thermostat and that caused the temperature to rise in the refrigerator but the rising temperature in the box didn't make it to the thermostat because of the ice.
To test the theory, I used a heat gun on low to melt the ice and I tried to separate the thermostat control wire from the liquid and vapor lines as best I could. The refrigerator is now cooling better...but ice is once again forming on the valve and condensing when the refrigerator cycles off. Since there is still some insulation in place, the cooling isn't completely back to where it was. Guess I will need to dig more of it out and try to re-route the thermostat wire.
Some days, far too many it seems recently, have been of the fixing either not working or the process of fixing results in finding a bunch of other issues. I have to say it is wearing on me more than just a little. The fun to suck ratio seems to be spiraling out of control in the wrong direction during this last push to get things ready to leave Florida.
But, what is step one in trouble shooting any problem: "Did you mess with it when the problem started -> If yes, put it back the way you found it". So, I ripped some of the insulation back off of the valve. When I did, I discovered what might be the problem. Since the vapor line, liquid line, and thermostat probe are bundled together and all run through the same 1 + inch hole into the cold box, I wrapped the lines together. After all, without the wrapping, this was exactly how the system was configured.
The problem is that bundling the lines together actually leaves a small amount of air space in the middle of the bundle. I apparently wasn't able to get the tape to produce an air tight seal for this air space, so the result is that ice then formed in the airspace between the pipes. Now that there is a nice amount of insulation around this airspace, I created what was probably a permanent ice cube. My current theory is that this ice was causing false readings for the thermostat and that caused the temperature to rise in the refrigerator but the rising temperature in the box didn't make it to the thermostat because of the ice.
To test the theory, I used a heat gun on low to melt the ice and I tried to separate the thermostat control wire from the liquid and vapor lines as best I could. The refrigerator is now cooling better...but ice is once again forming on the valve and condensing when the refrigerator cycles off. Since there is still some insulation in place, the cooling isn't completely back to where it was. Guess I will need to dig more of it out and try to re-route the thermostat wire.
Some days, far too many it seems recently, have been of the fixing either not working or the process of fixing results in finding a bunch of other issues. I have to say it is wearing on me more than just a little. The fun to suck ratio seems to be spiraling out of control in the wrong direction during this last push to get things ready to leave Florida.
Wednesday, February 19, 2014
Meet Patches...
One of the things I noticed during the engine fiasco (not discovered by the mechanic paid to look things over) was that the port side muffler had a very small leak. In the following picture you can see the stains created by the leak on the left side of the hose.

My friend and broker Pete recommended a welder in St. Augustine that he thought could fix it. I gave Capo Welding a call and they thought they could but couldn't be sure without seeing it. So a few days ago I dropped off the muffler at the welder. I decided to take the rail with the broken stud that I discovered in this post as well to see if the welder could fix the stud. After seeing them both, the welder said they could take care of both and would try to squeeze it into their busy schedule. I was very surprised to get a call from them the next day saying that they were able to fix both and it was only an hour of labor. Total cost was $65...a lot cheaper than two new parts.
I think I'll call the muffler patches...because it seems to fit.
This past weekend it was time to install the repaired muffler. You may have noticed in the first picture that the hose isn't in the best of shape, so I decided I should replace it as well. While you can go to West Marine and get the hose, they tend to be a bit pricey. There is a shop in St. Augustine that deals in overstock as well as used and trades called Sailors Exchange and I was able to pick up hose and good replacement hose clamps for about 1/3 the price of West Marine.
Installation was pretty straight forward. Using a heat gun was helpful for getting the hose on as well as off. The only snag was that the little piece of hose in the top picture has to be precisely the right size in order to be long enough to get the required dual hose clamps on each end and short enough so the muffler lines up with the mounting holes. Fortunately I had some extra hose and got the hose right on the second try.
I now have an exhaust system that isn't leaking...a pretty good thing, especially for the engine under the rear berth. I also installed the pushpit rail, rebedding it just as I did in this post. The boat is operational and looking fully assembled again.
All are good things as we need to move the boat out of Florida waters pretty soon to avoid their exorbitant taxes. It is too bad for Florida too, I could stay here and continue working on the boat and supporting their local businesses for another month or so, but since I'm not a resident, I don't see why I need to pay extra use taxes to them so I'll play by their rules and leave. I'm sure Georgia businesses appreciate Florida sending customers to them.
My friend and broker Pete recommended a welder in St. Augustine that he thought could fix it. I gave Capo Welding a call and they thought they could but couldn't be sure without seeing it. So a few days ago I dropped off the muffler at the welder. I decided to take the rail with the broken stud that I discovered in this post as well to see if the welder could fix the stud. After seeing them both, the welder said they could take care of both and would try to squeeze it into their busy schedule. I was very surprised to get a call from them the next day saying that they were able to fix both and it was only an hour of labor. Total cost was $65...a lot cheaper than two new parts.
I think I'll call the muffler patches...because it seems to fit.
 |
| Shiny patched muffler |
Installation was pretty straight forward. Using a heat gun was helpful for getting the hose on as well as off. The only snag was that the little piece of hose in the top picture has to be precisely the right size in order to be long enough to get the required dual hose clamps on each end and short enough so the muffler lines up with the mounting holes. Fortunately I had some extra hose and got the hose right on the second try.
I now have an exhaust system that isn't leaking...a pretty good thing, especially for the engine under the rear berth. I also installed the pushpit rail, rebedding it just as I did in this post. The boat is operational and looking fully assembled again.
All are good things as we need to move the boat out of Florida waters pretty soon to avoid their exorbitant taxes. It is too bad for Florida too, I could stay here and continue working on the boat and supporting their local businesses for another month or so, but since I'm not a resident, I don't see why I need to pay extra use taxes to them so I'll play by their rules and leave. I'm sure Georgia businesses appreciate Florida sending customers to them.
Monday, February 17, 2014
More Leaks
I have a bone to pick with the Florida Tourism department. They call this "the sunshine state" and winter is supposed to be the dry season. Well, much of the time I've been here it has been cold and rainy. I guess I can't complain though, as much of the rest of the country seems to be in winter blizzard mode. But I didn't pack much in the way of winter clothes, so temperatures in the 30's and 40's farenheit have made it an interesting time...I even had to break down and buy a sweatshirt when I was running low on long sleeve clothing.
One thing the cold and rain has done is point out that several hatches and windows leak. Ironically, the hatch that isn't leaking is the one that the surveyor said probably was. Of course, the problem when it rains and rains, all you can do is sit in the boat and play "catch the drip" with cups and towels. One of the worst offenders is a hatch located above the settee table...aka the dining room table and office desk. Not a great place for a leak.
I tried taping up the seams where the hatch mounts to the fiberglass to see if I could better determine if it was the gasket that was the problem or if I would need to rebed the hatch. The tape didn't help the next time it rained, so I started looking for gasket and hinge pins for the hatch. You would think a quick search would yield results, but you would be wrong. This South African manufactured boat used Goiot hatches that are made in France and I could only find one source in the U.S for the hatch parts and they were very expensive.

I was able to find the same parts at 1/2 to 1/4 the price at Budget Marine in St. Maarten. I thought shipping would be a hassle, but I was given a contact and decided to order from them. The shipping was a bit expensive, but not as bad as I would have thought for next-day and was easily covered (and then some) by the price difference in parts. The shipment arrived the next day and all I can say is I'm very impressed by the service received through Budget Marine...I can see why they are the go-to chandlery in the Caribbean.
I replaced the gasket and hinge pins and the hatch seems to seal well. Of course, the next rain proved that my trick taping the seams didn't work as the leak returned. I had to rebed the hatch. We finally had a nice weekend, so I decided to give it a try.
Since I have the butyl tape, I figured I would give it a try on the hatch since it has good properties for remaining flexible and maintaining a seal. In hindsight, I probably should have used 4200 since the hatches are screwed into the fiberglass without much additional support or backing material that makes compression of the butyl difficult.

To remove the hatch frame, you need to remove the hatch first. This requires you remove the hinge pins. As I've learned, they are a simple friction hinge consisting of a plastic cylinder that is squeezed by a screw and nut that each have a hex head. You loosen the screw and then from the slot in the middle of the hinge assembly on the hatch frame, you can push the hinge out. Or, if they are as old as the ones I have, you can remove the screw and the plastic disintegrates and the hatch just comes right off...then you push the pieces out. Taking out the screws on the frame made it apparent it was the source of the leak as half the frame was not attached to the surrounding fiberglass, the sealant had released from the frame. A thin scraper helped to sever the seal with the other half of the frame.

Once the frame was out, I used a plastic scraper to remove as much of the sealant from the frame and hole as possible. I then cleaned both with a little acetone and applied the butyl tape to the frame with loops around the screw holes. I centered the frame over the hole and pressed it into place. Since the screws only attach to the fiberglass, after applying some butyl to the heads and around the base, I very carefully tightened them...and went very slowly. I didn't get it as tight as I would have liked, but didn't want to risk stripping out the screw holes. I did consider removing it and going to find some 4200, but after backing out the screws the frame seemed to be stuck pretty well to the hull, so I reapplied some butyl and reinserted the screws.

Hopefully that will resolve the issue with this hatch...of course I'd like the nice weather to hold for a while so, Mother Nature if you are listening, I'm OK with not having to test it out anytime soon.
One thing the cold and rain has done is point out that several hatches and windows leak. Ironically, the hatch that isn't leaking is the one that the surveyor said probably was. Of course, the problem when it rains and rains, all you can do is sit in the boat and play "catch the drip" with cups and towels. One of the worst offenders is a hatch located above the settee table...aka the dining room table and office desk. Not a great place for a leak.
I tried taping up the seams where the hatch mounts to the fiberglass to see if I could better determine if it was the gasket that was the problem or if I would need to rebed the hatch. The tape didn't help the next time it rained, so I started looking for gasket and hinge pins for the hatch. You would think a quick search would yield results, but you would be wrong. This South African manufactured boat used Goiot hatches that are made in France and I could only find one source in the U.S for the hatch parts and they were very expensive.

I was able to find the same parts at 1/2 to 1/4 the price at Budget Marine in St. Maarten. I thought shipping would be a hassle, but I was given a contact and decided to order from them. The shipping was a bit expensive, but not as bad as I would have thought for next-day and was easily covered (and then some) by the price difference in parts. The shipment arrived the next day and all I can say is I'm very impressed by the service received through Budget Marine...I can see why they are the go-to chandlery in the Caribbean.
I replaced the gasket and hinge pins and the hatch seems to seal well. Of course, the next rain proved that my trick taping the seams didn't work as the leak returned. I had to rebed the hatch. We finally had a nice weekend, so I decided to give it a try.
Since I have the butyl tape, I figured I would give it a try on the hatch since it has good properties for remaining flexible and maintaining a seal. In hindsight, I probably should have used 4200 since the hatches are screwed into the fiberglass without much additional support or backing material that makes compression of the butyl difficult.
To remove the hatch frame, you need to remove the hatch first. This requires you remove the hinge pins. As I've learned, they are a simple friction hinge consisting of a plastic cylinder that is squeezed by a screw and nut that each have a hex head. You loosen the screw and then from the slot in the middle of the hinge assembly on the hatch frame, you can push the hinge out. Or, if they are as old as the ones I have, you can remove the screw and the plastic disintegrates and the hatch just comes right off...then you push the pieces out. Taking out the screws on the frame made it apparent it was the source of the leak as half the frame was not attached to the surrounding fiberglass, the sealant had released from the frame. A thin scraper helped to sever the seal with the other half of the frame.
Once the frame was out, I used a plastic scraper to remove as much of the sealant from the frame and hole as possible. I then cleaned both with a little acetone and applied the butyl tape to the frame with loops around the screw holes. I centered the frame over the hole and pressed it into place. Since the screws only attach to the fiberglass, after applying some butyl to the heads and around the base, I very carefully tightened them...and went very slowly. I didn't get it as tight as I would have liked, but didn't want to risk stripping out the screw holes. I did consider removing it and going to find some 4200, but after backing out the screws the frame seemed to be stuck pretty well to the hull, so I reapplied some butyl and reinserted the screws.
Hopefully that will resolve the issue with this hatch...of course I'd like the nice weather to hold for a while so, Mother Nature if you are listening, I'm OK with not having to test it out anytime soon.
Friday, February 14, 2014
Refrigerator Drip
Originally, the wet wood under the sink was attributed to the condensation from the refrigerator. Later I found a leak in the pressure water system that was the primary culprit. Unfortunately, it wasn't the only culprit. The refrigerator does play a smaller role in the issue.
You see, there is a valve in this Sea Frost cold plate system that is mounted outside the refrigerator box itself. It seems like an expansion valve and performs the same function, but someone told me it actually has another name...whatever...I think I'll name it Drippy. After all, being mounted outside the refrigeration box and being the point where it starts to cool, it does condense water out of the air and drip. It would make for a great dehumidifier if it would get rid of the water, but dripping it back into the cabinet where it can run down to the spot on the floor that was rotting.
After fixing the water leak a while back I noted the drip but have just been keeping a rag under it to keep the water in check while the floor dried. Well, every once in a while I would forget (or maybe the dripping was getting worse) and it started producing just enough water that the floor wouldn't fully dry, so I decided it was time to deal with Drippy.
There is a gooey black tape with cork (or some other semi-insulative) material in it that is often used to insulate refrigeration lines. It is pliable so I figured it would work well insulating this valve. In fact, there was a small amount of it wrapped around the valve in a feeble attempt by the installer to insulate it (visible in the picture above...the black wet stuff). Well, I found that this refrigerant line tape is rather difficult to find. It is not available in any of the hardware or big box stores anywhere in the area. I did, however, find a sticky foam rubber tape that should work at the local Lowes so I bought some in hopes it would work.
I also noted that the small refrigerant pipes running into the refrigeration box and cold plates pass through a hole that is over an inch in diameter and is completely un-insulated. Well, by the time I found it the hole was actually filled with ice (also visible in above picture). So I decided to pick up some spray foam and seal up that hole as well. Should help make the refrigerator more efficient as well as stop the condensation.
So, I turned off the fridge, defrosted the pipes and used the spray foam to seal up the big hole. Once the foam cured I trimmed it flush with the cabinet with a serrated steak knife (since I couldn't see the hole as I was filling, I overfilled it a bit and had a big blob to get rid of). I then wrapped the valve and exposed pipe with the foam tape, making sure there was at least 50% overlap per the instructions.
I turned the refrigerator back on and came back to check on it a day or so later. Unfortunately, there was still some condensation on the valve. It was far less than before, but there was still some. So, since I still had half of the roll of rubber foam tape, I doubled up on all the wrapping. I couldn't get the additional tape wrapped well when it got close to the cabinet and in a bit of frusteration, I got the can of spray foam out and sprayed that into the areas I couldn't wrap again. By the end, the valve looked a bit like a little black Michelin Man sitting on a yellow cloud of foam.
After the second wrapping, I waited a day and checked again. Still just a very tiny bit of condensation...drat. Well, it is far less than it was, it has been very humid lately, and the valve doesn't really seem to be dripping...just a few beads of water on the foam covering the valve. So, I decided I will just let it be for now and see if it is "good enough".
Oh, and I have noted that the pipes inside the fridge are frosting up where they did not before...so I appear to have changed something. And in the days since the floor has remained dry even without a towel under the valve...so definitely a good amount of progress was made on the dripping. Now maybe the floor will dry the rest of the way and I can complete that repair.
You see, there is a valve in this Sea Frost cold plate system that is mounted outside the refrigerator box itself. It seems like an expansion valve and performs the same function, but someone told me it actually has another name...whatever...I think I'll name it Drippy. After all, being mounted outside the refrigeration box and being the point where it starts to cool, it does condense water out of the air and drip. It would make for a great dehumidifier if it would get rid of the water, but dripping it back into the cabinet where it can run down to the spot on the floor that was rotting.
 |
| Drippy - Note the frost and ice in the hole behind |
After fixing the water leak a while back I noted the drip but have just been keeping a rag under it to keep the water in check while the floor dried. Well, every once in a while I would forget (or maybe the dripping was getting worse) and it started producing just enough water that the floor wouldn't fully dry, so I decided it was time to deal with Drippy.
There is a gooey black tape with cork (or some other semi-insulative) material in it that is often used to insulate refrigeration lines. It is pliable so I figured it would work well insulating this valve. In fact, there was a small amount of it wrapped around the valve in a feeble attempt by the installer to insulate it (visible in the picture above...the black wet stuff). Well, I found that this refrigerant line tape is rather difficult to find. It is not available in any of the hardware or big box stores anywhere in the area. I did, however, find a sticky foam rubber tape that should work at the local Lowes so I bought some in hopes it would work.
I also noted that the small refrigerant pipes running into the refrigeration box and cold plates pass through a hole that is over an inch in diameter and is completely un-insulated. Well, by the time I found it the hole was actually filled with ice (also visible in above picture). So I decided to pick up some spray foam and seal up that hole as well. Should help make the refrigerator more efficient as well as stop the condensation.
So, I turned off the fridge, defrosted the pipes and used the spray foam to seal up the big hole. Once the foam cured I trimmed it flush with the cabinet with a serrated steak knife (since I couldn't see the hole as I was filling, I overfilled it a bit and had a big blob to get rid of). I then wrapped the valve and exposed pipe with the foam tape, making sure there was at least 50% overlap per the instructions.
I turned the refrigerator back on and came back to check on it a day or so later. Unfortunately, there was still some condensation on the valve. It was far less than before, but there was still some. So, since I still had half of the roll of rubber foam tape, I doubled up on all the wrapping. I couldn't get the additional tape wrapped well when it got close to the cabinet and in a bit of frusteration, I got the can of spray foam out and sprayed that into the areas I couldn't wrap again. By the end, the valve looked a bit like a little black Michelin Man sitting on a yellow cloud of foam.
 |
| Drippy No Longer |
After the second wrapping, I waited a day and checked again. Still just a very tiny bit of condensation...drat. Well, it is far less than it was, it has been very humid lately, and the valve doesn't really seem to be dripping...just a few beads of water on the foam covering the valve. So, I decided I will just let it be for now and see if it is "good enough".
Oh, and I have noted that the pipes inside the fridge are frosting up where they did not before...so I appear to have changed something. And in the days since the floor has remained dry even without a towel under the valve...so definitely a good amount of progress was made on the dripping. Now maybe the floor will dry the rest of the way and I can complete that repair.
Subscribe to:
Posts (Atom)