
Thursday, February 27, 2014
Sometimes A Picture...
...is worth...well you know. This is what I saw off the back of my boat this evening.
Tuesday, February 25, 2014
A Winch is not a Wheel Bearing
While freeing the motor from the dinghy, one thing I found was that the winch at the rear of the boat needed to be serviced. It sounded OK, clicking and spinning as it was supposed to, but started complaining (squeaking) when under the load of the davit system. So, what do you do when you need to do something and don't know how...consult The Oracle naturally. A brief search found the following YouTube video on the subject.
Seems straight forward enough. The cap was a little tighter than hand tight but came off with a bit of persuasion. After removing the caps I tried to remove the collets. Note how easily they are removed in the video...well, this winch doesn't appear to have been serviced in a while and the collets were stuck. I couldn't even pull them out with pliers (something you should avoid doing with softer metals unless absolutely necessary). I applied some penetrating oil and let it sit...for a day.
The next day I came back and the collets still would not budge. A far cry from what you see in the above video. I guess servicing a brand new winch on a table isn't the same as servicing a well used, and probably abused, winch on a boat. I didn't find much information on sticking collets, so I guess this isn't a common occurrence. In any case, I need to get this thing apart to either service it or replace it so these collets will have to come out one way or another. In the end, I used a heat gun and vice grips and were finally able to get them out without too much damage to the collets.
From what I can tell, it appeared that dried grease was the reason that the collets were stuck. As I disassembled the rest of the winch, I found the parts to be just as in the above video, but in my case most were caked with grease. Some older and dried and some that was in better shape. But, if you watch the video above you will note that they say "lightly" oil and "lightly" grease...but this winch was treated more like a wheel bearing that was packed with grease.
It took me 4 hours and copious amounts of solvent (most of my supply) to clean all the grease off of the gears and other parts (next time I'll just use diesel). It was a real pain to get this winch clean. The picture below doesn't really do it justice, I should have pulled the gear stack on the right apart so you could see the gobs of grease caked inside and surrounding the pawls.
After the thorough cleaning, I lightly greased and lightly oiled as it showed in the video (ok, I put a little bit more on than the video shows...but just barely coating surfaces) and reassembled the winch. Since I didn't have spare collets, I used some jewelers diamond files to file off the burs made in the collets by the vice grips. Everything went together just fine.
The real test was to winch the dinghy back up and, other than the broken stripper ring I still need to order (so for now this winch's self-tailing feature shouldn't be used), it worked flawlessly. It raised the dinghy without complaint and sounded like a happy winch. Going to have to do this to the rest of the winches, I do hope that the rest are not packed in grease...but I guess I better go pick up some diesel to use as solvent just in case.
Seems straight forward enough. The cap was a little tighter than hand tight but came off with a bit of persuasion. After removing the caps I tried to remove the collets. Note how easily they are removed in the video...well, this winch doesn't appear to have been serviced in a while and the collets were stuck. I couldn't even pull them out with pliers (something you should avoid doing with softer metals unless absolutely necessary). I applied some penetrating oil and let it sit...for a day.
The next day I came back and the collets still would not budge. A far cry from what you see in the above video. I guess servicing a brand new winch on a table isn't the same as servicing a well used, and probably abused, winch on a boat. I didn't find much information on sticking collets, so I guess this isn't a common occurrence. In any case, I need to get this thing apart to either service it or replace it so these collets will have to come out one way or another. In the end, I used a heat gun and vice grips and were finally able to get them out without too much damage to the collets.
From what I can tell, it appeared that dried grease was the reason that the collets were stuck. As I disassembled the rest of the winch, I found the parts to be just as in the above video, but in my case most were caked with grease. Some older and dried and some that was in better shape. But, if you watch the video above you will note that they say "lightly" oil and "lightly" grease...but this winch was treated more like a wheel bearing that was packed with grease.
It took me 4 hours and copious amounts of solvent (most of my supply) to clean all the grease off of the gears and other parts (next time I'll just use diesel). It was a real pain to get this winch clean. The picture below doesn't really do it justice, I should have pulled the gear stack on the right apart so you could see the gobs of grease caked inside and surrounding the pawls.
 |
| Clean on the left, dirty on the right. |
The real test was to winch the dinghy back up and, other than the broken stripper ring I still need to order (so for now this winch's self-tailing feature shouldn't be used), it worked flawlessly. It raised the dinghy without complaint and sounded like a happy winch. Going to have to do this to the rest of the winches, I do hope that the rest are not packed in grease...but I guess I better go pick up some diesel to use as solvent just in case.
Monday, February 24, 2014
A Little Too Secure.
Included with the purchase of my Leopard 38 catamaran was a dinghy with a motor. The dinghy wasn't in the greatest shape (in fact one hole appears to have been "fixed"...to use the term loosely...with some sort of caulk like sealant that looks like bird poo) but it does hold air for at least a little while. The motor, if it works, is a 2 stroke 15hp Yamaha...something definitely worth keeping if it runs or can be revived. When I took possession of the boat, the motor was mounted on the dinghy and both were hoisted in the davits. The weight imbalance was causing the davit bar to bend down on the motor side, so it was time to remove the motor from the dinghy.
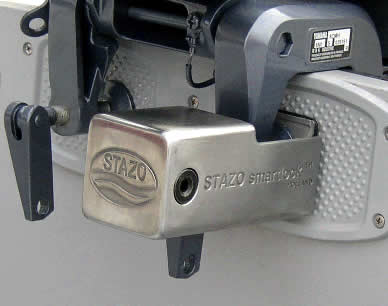
The previous owner was apparently worried a great deal about someone stealing the dinghy motor and bought a fancy lock to lock it onto the dinghy in addition to his Master Cable Lock. The Stazo lock is a big hollow square piece of stainless steel that fits over one of the clamping arms of the motor and prevents the clamp from being set free. I rummaged around and found the key to the lock and gave it a try. Of course, as is my usual luck, the lock would not budge. I sprayed some penetrating oil into the lock...and a stream of rusty oil came out. This does not look good. Who would make a lock for an outboard motor where the lock cylinder would rust?
The next several days I would spray some penetrating oil into the lock and try the key...and each time the lock would not budge. A fellow boater in the marina had a die grinder and some cut-off blades, so we decided that we would take the brute force approach and cut the lock off the dinghy. It took two cutoff blades but we were finally able to remove the lock. Underneath the lock I found a prime example of dissimilar metal corrosion as the stainless steel lock had corroded a hole through the aluminum motor mount on the transom of the dinghy. I had wondered why that mounting plate had looked so corroded. It is true that aluminum doesn't rust (because rust is defined as iron oxide), but aluminum certainly does corrode. The entire motor mount was rather corroded and had warped to the point that, even with the lock off and the clamps backed off all the way, we were having a hard time removing the motor from the mount. Cleaning out the (aluminum oxide) corrosion from behind the plate we were finally able to get enough clearance to remove the motor.
The motor is now resting comfortably on the pushpit railing mount and I have a new project...to replace the corroded engine mounting plate on the dinghy.
I was able to find a small, used piece of StarBoard (high density polyethylene plastic) at Sailors Exchange for a few dollars that I figure would work well as a replacement for the corroded mount. I cut it to shape, drilled and countersunk the mounting screw holes, and viola, good as new...well...OK...not so pretty...but good enough for this dinghy. No point throwing too much money at it when this should work for the remaining life of the dinghy.
Of course, in true boat project fashion, while working with the dinghy I found another problem. The davit winch that spins nicely when free, squeaks under load and I also noticed the plastic stripper for the self-tailer is broken (after it tried jamming the davit line under the tab on the winch), so winch servicing is now added to "the list". The dinghy and motor can now be separated and the davits look happier without the motors weight on them, so task completed.
| You can see how the davit bends in this old picture. |
The previous owner was apparently worried a great deal about someone stealing the dinghy motor and bought a fancy lock to lock it onto the dinghy in addition to his Master Cable Lock. The Stazo lock is a big hollow square piece of stainless steel that fits over one of the clamping arms of the motor and prevents the clamp from being set free. I rummaged around and found the key to the lock and gave it a try. Of course, as is my usual luck, the lock would not budge. I sprayed some penetrating oil into the lock...and a stream of rusty oil came out. This does not look good. Who would make a lock for an outboard motor where the lock cylinder would rust?
 |
| Stock photo - Mine was far more rusted. |
The next several days I would spray some penetrating oil into the lock and try the key...and each time the lock would not budge. A fellow boater in the marina had a die grinder and some cut-off blades, so we decided that we would take the brute force approach and cut the lock off the dinghy. It took two cutoff blades but we were finally able to remove the lock. Underneath the lock I found a prime example of dissimilar metal corrosion as the stainless steel lock had corroded a hole through the aluminum motor mount on the transom of the dinghy. I had wondered why that mounting plate had looked so corroded. It is true that aluminum doesn't rust (because rust is defined as iron oxide), but aluminum certainly does corrode. The entire motor mount was rather corroded and had warped to the point that, even with the lock off and the clamps backed off all the way, we were having a hard time removing the motor from the mount. Cleaning out the (aluminum oxide) corrosion from behind the plate we were finally able to get enough clearance to remove the motor.
 |
| Trying to remove the motor from the corroded mount. |
The motor is now resting comfortably on the pushpit railing mount and I have a new project...to replace the corroded engine mounting plate on the dinghy.
 |
| Corrosion hole from the lock. |
I was able to find a small, used piece of StarBoard (high density polyethylene plastic) at Sailors Exchange for a few dollars that I figure would work well as a replacement for the corroded mount. I cut it to shape, drilled and countersunk the mounting screw holes, and viola, good as new...well...OK...not so pretty...but good enough for this dinghy. No point throwing too much money at it when this should work for the remaining life of the dinghy.
 |
| Maybe not pretty, but a functional mount. |
And below is part of the pile of aluminum oxide left behind after the replacement. Too bad there isn't a sandpaper plant nearby...bet they would like to have it (your bit of trivia for today...some sandpaper uses aluminum oxide as the abrasive grit).
 |
| A lot of aluminum "rust" in the bottom of the dinghy when we were done. |
Thursday, February 20, 2014
Drippy : 1, Mike : 0
Well, I did successfully get the refrigerator valve (a.k.a Drippy) to stop sweating and dripping. Unfortunately I also got it to stop cooling as well. Sigh. I went back to the manuals I found on the Sea Frost refrigeration system and they do say that if this valve is mounted outside of the "cold box", that it needs to be insulated. They, of course, recommend the cork tape stuff I was unable to ever find, but this foam tape should have been an acceptable, and probably better insulating, option. So it sure seemed like what I did would not have caused this response in the refrigerator.
But, what is step one in trouble shooting any problem: "Did you mess with it when the problem started -> If yes, put it back the way you found it". So, I ripped some of the insulation back off of the valve. When I did, I discovered what might be the problem. Since the vapor line, liquid line, and thermostat probe are bundled together and all run through the same 1 + inch hole into the cold box, I wrapped the lines together. After all, without the wrapping, this was exactly how the system was configured.
The problem is that bundling the lines together actually leaves a small amount of air space in the middle of the bundle. I apparently wasn't able to get the tape to produce an air tight seal for this air space, so the result is that ice then formed in the airspace between the pipes. Now that there is a nice amount of insulation around this airspace, I created what was probably a permanent ice cube. My current theory is that this ice was causing false readings for the thermostat and that caused the temperature to rise in the refrigerator but the rising temperature in the box didn't make it to the thermostat because of the ice.
To test the theory, I used a heat gun on low to melt the ice and I tried to separate the thermostat control wire from the liquid and vapor lines as best I could. The refrigerator is now cooling better...but ice is once again forming on the valve and condensing when the refrigerator cycles off. Since there is still some insulation in place, the cooling isn't completely back to where it was. Guess I will need to dig more of it out and try to re-route the thermostat wire.
Some days, far too many it seems recently, have been of the fixing either not working or the process of fixing results in finding a bunch of other issues. I have to say it is wearing on me more than just a little. The fun to suck ratio seems to be spiraling out of control in the wrong direction during this last push to get things ready to leave Florida.
Wednesday, February 19, 2014
Meet Patches...
One of the things I noticed during the engine fiasco (not discovered by the mechanic paid to look things over) was that the port side muffler had a very small leak. In the following picture you can see the stains created by the leak on the left side of the hose.

My friend and broker Pete recommended a welder in St. Augustine that he thought could fix it. I gave Capo Welding a call and they thought they could but couldn't be sure without seeing it. So a few days ago I dropped off the muffler at the welder. I decided to take the rail with the broken stud that I discovered in this post as well to see if the welder could fix the stud. After seeing them both, the welder said they could take care of both and would try to squeeze it into their busy schedule. I was very surprised to get a call from them the next day saying that they were able to fix both and it was only an hour of labor. Total cost was $65...a lot cheaper than two new parts.
I think I'll call the muffler patches...because it seems to fit.
This past weekend it was time to install the repaired muffler. You may have noticed in the first picture that the hose isn't in the best of shape, so I decided I should replace it as well. While you can go to West Marine and get the hose, they tend to be a bit pricey. There is a shop in St. Augustine that deals in overstock as well as used and trades called Sailors Exchange and I was able to pick up hose and good replacement hose clamps for about 1/3 the price of West Marine.
Installation was pretty straight forward. Using a heat gun was helpful for getting the hose on as well as off. The only snag was that the little piece of hose in the top picture has to be precisely the right size in order to be long enough to get the required dual hose clamps on each end and short enough so the muffler lines up with the mounting holes. Fortunately I had some extra hose and got the hose right on the second try.
I now have an exhaust system that isn't leaking...a pretty good thing, especially for the engine under the rear berth. I also installed the pushpit rail, rebedding it just as I did in this post. The boat is operational and looking fully assembled again.
All are good things as we need to move the boat out of Florida waters pretty soon to avoid their exorbitant taxes. It is too bad for Florida too, I could stay here and continue working on the boat and supporting their local businesses for another month or so, but since I'm not a resident, I don't see why I need to pay extra use taxes to them so I'll play by their rules and leave. I'm sure Georgia businesses appreciate Florida sending customers to them.
My friend and broker Pete recommended a welder in St. Augustine that he thought could fix it. I gave Capo Welding a call and they thought they could but couldn't be sure without seeing it. So a few days ago I dropped off the muffler at the welder. I decided to take the rail with the broken stud that I discovered in this post as well to see if the welder could fix the stud. After seeing them both, the welder said they could take care of both and would try to squeeze it into their busy schedule. I was very surprised to get a call from them the next day saying that they were able to fix both and it was only an hour of labor. Total cost was $65...a lot cheaper than two new parts.
I think I'll call the muffler patches...because it seems to fit.
 |
| Shiny patched muffler |
Installation was pretty straight forward. Using a heat gun was helpful for getting the hose on as well as off. The only snag was that the little piece of hose in the top picture has to be precisely the right size in order to be long enough to get the required dual hose clamps on each end and short enough so the muffler lines up with the mounting holes. Fortunately I had some extra hose and got the hose right on the second try.
I now have an exhaust system that isn't leaking...a pretty good thing, especially for the engine under the rear berth. I also installed the pushpit rail, rebedding it just as I did in this post. The boat is operational and looking fully assembled again.
All are good things as we need to move the boat out of Florida waters pretty soon to avoid their exorbitant taxes. It is too bad for Florida too, I could stay here and continue working on the boat and supporting their local businesses for another month or so, but since I'm not a resident, I don't see why I need to pay extra use taxes to them so I'll play by their rules and leave. I'm sure Georgia businesses appreciate Florida sending customers to them.
Monday, February 17, 2014
More Leaks
I have a bone to pick with the Florida Tourism department. They call this "the sunshine state" and winter is supposed to be the dry season. Well, much of the time I've been here it has been cold and rainy. I guess I can't complain though, as much of the rest of the country seems to be in winter blizzard mode. But I didn't pack much in the way of winter clothes, so temperatures in the 30's and 40's farenheit have made it an interesting time...I even had to break down and buy a sweatshirt when I was running low on long sleeve clothing.
One thing the cold and rain has done is point out that several hatches and windows leak. Ironically, the hatch that isn't leaking is the one that the surveyor said probably was. Of course, the problem when it rains and rains, all you can do is sit in the boat and play "catch the drip" with cups and towels. One of the worst offenders is a hatch located above the settee table...aka the dining room table and office desk. Not a great place for a leak.
I tried taping up the seams where the hatch mounts to the fiberglass to see if I could better determine if it was the gasket that was the problem or if I would need to rebed the hatch. The tape didn't help the next time it rained, so I started looking for gasket and hinge pins for the hatch. You would think a quick search would yield results, but you would be wrong. This South African manufactured boat used Goiot hatches that are made in France and I could only find one source in the U.S for the hatch parts and they were very expensive.

I was able to find the same parts at 1/2 to 1/4 the price at Budget Marine in St. Maarten. I thought shipping would be a hassle, but I was given a contact and decided to order from them. The shipping was a bit expensive, but not as bad as I would have thought for next-day and was easily covered (and then some) by the price difference in parts. The shipment arrived the next day and all I can say is I'm very impressed by the service received through Budget Marine...I can see why they are the go-to chandlery in the Caribbean.
I replaced the gasket and hinge pins and the hatch seems to seal well. Of course, the next rain proved that my trick taping the seams didn't work as the leak returned. I had to rebed the hatch. We finally had a nice weekend, so I decided to give it a try.
Since I have the butyl tape, I figured I would give it a try on the hatch since it has good properties for remaining flexible and maintaining a seal. In hindsight, I probably should have used 4200 since the hatches are screwed into the fiberglass without much additional support or backing material that makes compression of the butyl difficult.

To remove the hatch frame, you need to remove the hatch first. This requires you remove the hinge pins. As I've learned, they are a simple friction hinge consisting of a plastic cylinder that is squeezed by a screw and nut that each have a hex head. You loosen the screw and then from the slot in the middle of the hinge assembly on the hatch frame, you can push the hinge out. Or, if they are as old as the ones I have, you can remove the screw and the plastic disintegrates and the hatch just comes right off...then you push the pieces out. Taking out the screws on the frame made it apparent it was the source of the leak as half the frame was not attached to the surrounding fiberglass, the sealant had released from the frame. A thin scraper helped to sever the seal with the other half of the frame.

Once the frame was out, I used a plastic scraper to remove as much of the sealant from the frame and hole as possible. I then cleaned both with a little acetone and applied the butyl tape to the frame with loops around the screw holes. I centered the frame over the hole and pressed it into place. Since the screws only attach to the fiberglass, after applying some butyl to the heads and around the base, I very carefully tightened them...and went very slowly. I didn't get it as tight as I would have liked, but didn't want to risk stripping out the screw holes. I did consider removing it and going to find some 4200, but after backing out the screws the frame seemed to be stuck pretty well to the hull, so I reapplied some butyl and reinserted the screws.

Hopefully that will resolve the issue with this hatch...of course I'd like the nice weather to hold for a while so, Mother Nature if you are listening, I'm OK with not having to test it out anytime soon.
One thing the cold and rain has done is point out that several hatches and windows leak. Ironically, the hatch that isn't leaking is the one that the surveyor said probably was. Of course, the problem when it rains and rains, all you can do is sit in the boat and play "catch the drip" with cups and towels. One of the worst offenders is a hatch located above the settee table...aka the dining room table and office desk. Not a great place for a leak.
I tried taping up the seams where the hatch mounts to the fiberglass to see if I could better determine if it was the gasket that was the problem or if I would need to rebed the hatch. The tape didn't help the next time it rained, so I started looking for gasket and hinge pins for the hatch. You would think a quick search would yield results, but you would be wrong. This South African manufactured boat used Goiot hatches that are made in France and I could only find one source in the U.S for the hatch parts and they were very expensive.
I was able to find the same parts at 1/2 to 1/4 the price at Budget Marine in St. Maarten. I thought shipping would be a hassle, but I was given a contact and decided to order from them. The shipping was a bit expensive, but not as bad as I would have thought for next-day and was easily covered (and then some) by the price difference in parts. The shipment arrived the next day and all I can say is I'm very impressed by the service received through Budget Marine...I can see why they are the go-to chandlery in the Caribbean.
I replaced the gasket and hinge pins and the hatch seems to seal well. Of course, the next rain proved that my trick taping the seams didn't work as the leak returned. I had to rebed the hatch. We finally had a nice weekend, so I decided to give it a try.
Since I have the butyl tape, I figured I would give it a try on the hatch since it has good properties for remaining flexible and maintaining a seal. In hindsight, I probably should have used 4200 since the hatches are screwed into the fiberglass without much additional support or backing material that makes compression of the butyl difficult.
To remove the hatch frame, you need to remove the hatch first. This requires you remove the hinge pins. As I've learned, they are a simple friction hinge consisting of a plastic cylinder that is squeezed by a screw and nut that each have a hex head. You loosen the screw and then from the slot in the middle of the hinge assembly on the hatch frame, you can push the hinge out. Or, if they are as old as the ones I have, you can remove the screw and the plastic disintegrates and the hatch just comes right off...then you push the pieces out. Taking out the screws on the frame made it apparent it was the source of the leak as half the frame was not attached to the surrounding fiberglass, the sealant had released from the frame. A thin scraper helped to sever the seal with the other half of the frame.
Once the frame was out, I used a plastic scraper to remove as much of the sealant from the frame and hole as possible. I then cleaned both with a little acetone and applied the butyl tape to the frame with loops around the screw holes. I centered the frame over the hole and pressed it into place. Since the screws only attach to the fiberglass, after applying some butyl to the heads and around the base, I very carefully tightened them...and went very slowly. I didn't get it as tight as I would have liked, but didn't want to risk stripping out the screw holes. I did consider removing it and going to find some 4200, but after backing out the screws the frame seemed to be stuck pretty well to the hull, so I reapplied some butyl and reinserted the screws.
Hopefully that will resolve the issue with this hatch...of course I'd like the nice weather to hold for a while so, Mother Nature if you are listening, I'm OK with not having to test it out anytime soon.
Friday, February 14, 2014
Refrigerator Drip
Originally, the wet wood under the sink was attributed to the condensation from the refrigerator. Later I found a leak in the pressure water system that was the primary culprit. Unfortunately, it wasn't the only culprit. The refrigerator does play a smaller role in the issue.
You see, there is a valve in this Sea Frost cold plate system that is mounted outside the refrigerator box itself. It seems like an expansion valve and performs the same function, but someone told me it actually has another name...whatever...I think I'll name it Drippy. After all, being mounted outside the refrigeration box and being the point where it starts to cool, it does condense water out of the air and drip. It would make for a great dehumidifier if it would get rid of the water, but dripping it back into the cabinet where it can run down to the spot on the floor that was rotting.
After fixing the water leak a while back I noted the drip but have just been keeping a rag under it to keep the water in check while the floor dried. Well, every once in a while I would forget (or maybe the dripping was getting worse) and it started producing just enough water that the floor wouldn't fully dry, so I decided it was time to deal with Drippy.
There is a gooey black tape with cork (or some other semi-insulative) material in it that is often used to insulate refrigeration lines. It is pliable so I figured it would work well insulating this valve. In fact, there was a small amount of it wrapped around the valve in a feeble attempt by the installer to insulate it (visible in the picture above...the black wet stuff). Well, I found that this refrigerant line tape is rather difficult to find. It is not available in any of the hardware or big box stores anywhere in the area. I did, however, find a sticky foam rubber tape that should work at the local Lowes so I bought some in hopes it would work.
I also noted that the small refrigerant pipes running into the refrigeration box and cold plates pass through a hole that is over an inch in diameter and is completely un-insulated. Well, by the time I found it the hole was actually filled with ice (also visible in above picture). So I decided to pick up some spray foam and seal up that hole as well. Should help make the refrigerator more efficient as well as stop the condensation.
So, I turned off the fridge, defrosted the pipes and used the spray foam to seal up the big hole. Once the foam cured I trimmed it flush with the cabinet with a serrated steak knife (since I couldn't see the hole as I was filling, I overfilled it a bit and had a big blob to get rid of). I then wrapped the valve and exposed pipe with the foam tape, making sure there was at least 50% overlap per the instructions.
I turned the refrigerator back on and came back to check on it a day or so later. Unfortunately, there was still some condensation on the valve. It was far less than before, but there was still some. So, since I still had half of the roll of rubber foam tape, I doubled up on all the wrapping. I couldn't get the additional tape wrapped well when it got close to the cabinet and in a bit of frusteration, I got the can of spray foam out and sprayed that into the areas I couldn't wrap again. By the end, the valve looked a bit like a little black Michelin Man sitting on a yellow cloud of foam.
After the second wrapping, I waited a day and checked again. Still just a very tiny bit of condensation...drat. Well, it is far less than it was, it has been very humid lately, and the valve doesn't really seem to be dripping...just a few beads of water on the foam covering the valve. So, I decided I will just let it be for now and see if it is "good enough".
Oh, and I have noted that the pipes inside the fridge are frosting up where they did not before...so I appear to have changed something. And in the days since the floor has remained dry even without a towel under the valve...so definitely a good amount of progress was made on the dripping. Now maybe the floor will dry the rest of the way and I can complete that repair.
You see, there is a valve in this Sea Frost cold plate system that is mounted outside the refrigerator box itself. It seems like an expansion valve and performs the same function, but someone told me it actually has another name...whatever...I think I'll name it Drippy. After all, being mounted outside the refrigeration box and being the point where it starts to cool, it does condense water out of the air and drip. It would make for a great dehumidifier if it would get rid of the water, but dripping it back into the cabinet where it can run down to the spot on the floor that was rotting.
 |
| Drippy - Note the frost and ice in the hole behind |
After fixing the water leak a while back I noted the drip but have just been keeping a rag under it to keep the water in check while the floor dried. Well, every once in a while I would forget (or maybe the dripping was getting worse) and it started producing just enough water that the floor wouldn't fully dry, so I decided it was time to deal with Drippy.
There is a gooey black tape with cork (or some other semi-insulative) material in it that is often used to insulate refrigeration lines. It is pliable so I figured it would work well insulating this valve. In fact, there was a small amount of it wrapped around the valve in a feeble attempt by the installer to insulate it (visible in the picture above...the black wet stuff). Well, I found that this refrigerant line tape is rather difficult to find. It is not available in any of the hardware or big box stores anywhere in the area. I did, however, find a sticky foam rubber tape that should work at the local Lowes so I bought some in hopes it would work.
I also noted that the small refrigerant pipes running into the refrigeration box and cold plates pass through a hole that is over an inch in diameter and is completely un-insulated. Well, by the time I found it the hole was actually filled with ice (also visible in above picture). So I decided to pick up some spray foam and seal up that hole as well. Should help make the refrigerator more efficient as well as stop the condensation.
So, I turned off the fridge, defrosted the pipes and used the spray foam to seal up the big hole. Once the foam cured I trimmed it flush with the cabinet with a serrated steak knife (since I couldn't see the hole as I was filling, I overfilled it a bit and had a big blob to get rid of). I then wrapped the valve and exposed pipe with the foam tape, making sure there was at least 50% overlap per the instructions.
I turned the refrigerator back on and came back to check on it a day or so later. Unfortunately, there was still some condensation on the valve. It was far less than before, but there was still some. So, since I still had half of the roll of rubber foam tape, I doubled up on all the wrapping. I couldn't get the additional tape wrapped well when it got close to the cabinet and in a bit of frusteration, I got the can of spray foam out and sprayed that into the areas I couldn't wrap again. By the end, the valve looked a bit like a little black Michelin Man sitting on a yellow cloud of foam.
 |
| Drippy No Longer |
After the second wrapping, I waited a day and checked again. Still just a very tiny bit of condensation...drat. Well, it is far less than it was, it has been very humid lately, and the valve doesn't really seem to be dripping...just a few beads of water on the foam covering the valve. So, I decided I will just let it be for now and see if it is "good enough".
Oh, and I have noted that the pipes inside the fridge are frosting up where they did not before...so I appear to have changed something. And in the days since the floor has remained dry even without a towel under the valve...so definitely a good amount of progress was made on the dripping. Now maybe the floor will dry the rest of the way and I can complete that repair.
Tuesday, February 11, 2014
The Stars
I know most of my recent posts have been about boat repairs...and, well, that is most of what I seem to be doing when I'm not working the day job. But one of the simple pleasures I have is that I get to sleep under the stars.
You see, that hatch that is over my berth that was dripping on me the other day is also my view of the stars on clear nights. I can see Orion or other constellations depending on the orientation of the boat and the moon makes it's periodic appearance. It is one of the little perks of living on a boat.
And as for that dripping, keeping air circulating with the fan seems to cut down on the condensation on cool nights so I haven't had any further problems with that. Not intuitive to have a fan running when it is cool, but it works.
Looking up at the stars makes a nice way to end the day.
Sunday, February 9, 2014
How Are You Heating That Water, Mr. Heater?
In a previous post I mentioned that after the engine work, I noticed that the water heater was no longer working using shore power. I thought maybe the mechanics had tripped a breaker or knocked something while they were down in the engine room where the heater is located. Well, what I found was far more disturbing. It seems the water heater was trying to heat water with fire...
Definitely not a good thing on a boat. From what I can tell, apparently whoever installed the water heater didn't find much of a need to secure the power cable. The result is the 120v wires rubbed against the metal casing of the water heater until the wire sheath was compromised. Then the combination of corrosion and the chafing likely caused heating and arcing of the wires which resulted in the extensive char marks on the inside of the electrical cover and casing around the electrical connections. Basically, the start of an electrical fire. It is fortunate that the wires played like a fuse and cut the power before a full on fire developed.
I cut away the burned and corroded wire, connected the wires back together according to the wiring diagram using marine grade heat-shrink crimp connectors. To help prevent further issues of this sort, I also used some electrical tape as added anti-chafe protection, added a rubber grommet to the bare metal hole the power wire runs through, and secured the wire so it should not move around and chafe in the future. I tested the heater and it is once again working just fine. After a couple heating cycles, I went back and checked the connections just to verify that the heater wasn't pulling too much current and melting the wires and I found no damage.
So, once again, I have hot water on board that works with shore power. And in a complete surprise, I didn't even find another problem to fix while I was working on the heater...so maybe I can start making a dent in "the list".
 |
| Note the burned and corroded wires and char marks. |
Definitely not a good thing on a boat. From what I can tell, apparently whoever installed the water heater didn't find much of a need to secure the power cable. The result is the 120v wires rubbed against the metal casing of the water heater until the wire sheath was compromised. Then the combination of corrosion and the chafing likely caused heating and arcing of the wires which resulted in the extensive char marks on the inside of the electrical cover and casing around the electrical connections. Basically, the start of an electrical fire. It is fortunate that the wires played like a fuse and cut the power before a full on fire developed.
I cut away the burned and corroded wire, connected the wires back together according to the wiring diagram using marine grade heat-shrink crimp connectors. To help prevent further issues of this sort, I also used some electrical tape as added anti-chafe protection, added a rubber grommet to the bare metal hole the power wire runs through, and secured the wire so it should not move around and chafe in the future. I tested the heater and it is once again working just fine. After a couple heating cycles, I went back and checked the connections just to verify that the heater wasn't pulling too much current and melting the wires and I found no damage.
So, once again, I have hot water on board that works with shore power. And in a complete surprise, I didn't even find another problem to fix while I was working on the heater...so maybe I can start making a dent in "the list".
Friday, February 7, 2014
The Grill and Easy Thai Style Peanut Sauce
Since I returned to the boat I have to admit I haven't been doing much fancy cooking. Being by myself it is hard to get inspired to make nice meals for one and by the time I get done working my day job and try to get some work done on the boat, I just don't have the time or energy to cook much. Spaghetti, hamburgers, and even peanut butter and jelly have been on the menu here when I haven't just grabbed something while out running errands.
A couple of days ago I spent some time cleaning and repairing the Magma Grill that came with the boat and I wanted to give it a try. I had some hamburgers, but I was getting pretty tired of them so I picked up some chicken breasts to throw on the grill. I bought the smallest package, marinaded them in a pepper and soy sauce mix and cut them up in strips and now I have pre-cooked chicken strips I can use for a variety of dinner options. And if anyone is interested in the grill, it seems to to run a bit hot...even on it's lowest setting the lid thermometer registered in the medium heat range (like most grills, the lid thermometer isn't very good and this one didn't even have a temperature scale...just blue, yellow, and red for low, medium, and high).
But what to do with them. Back when we were experimenting with recipes that might be suitable for the boat (inspired by The Boat Galley site), I came across a recipe for a simple Thai style Satay peanut sauce (sorry, I don't remember where I found it). While it is not the absolute best peanut sauce I've ever had, it is pretty good and the best part is that it doesn't require a bunch of fancy ingredients like curry pastes and coconut milk that many of the sauces do. Instead, it is made up of ingredients that you might actually find on your boat. I altered the original recipe a little bit and here it is:
A couple of days ago I spent some time cleaning and repairing the Magma Grill that came with the boat and I wanted to give it a try. I had some hamburgers, but I was getting pretty tired of them so I picked up some chicken breasts to throw on the grill. I bought the smallest package, marinaded them in a pepper and soy sauce mix and cut them up in strips and now I have pre-cooked chicken strips I can use for a variety of dinner options. And if anyone is interested in the grill, it seems to to run a bit hot...even on it's lowest setting the lid thermometer registered in the medium heat range (like most grills, the lid thermometer isn't very good and this one didn't even have a temperature scale...just blue, yellow, and red for low, medium, and high).
 |
| Magma Rail Mounted Grill |
But what to do with them. Back when we were experimenting with recipes that might be suitable for the boat (inspired by The Boat Galley site), I came across a recipe for a simple Thai style Satay peanut sauce (sorry, I don't remember where I found it). While it is not the absolute best peanut sauce I've ever had, it is pretty good and the best part is that it doesn't require a bunch of fancy ingredients like curry pastes and coconut milk that many of the sauces do. Instead, it is made up of ingredients that you might actually find on your boat. I altered the original recipe a little bit and here it is:
Simple Thai Style Peanut Sauce
- 2 Tablespoons of creamy peanut butter (I prefer the natural stuff, but any should work)
- 2 Tablespoons of Soy Sauce.
- 2 Tablespoons of Brown Sugar.
- 1.5 Tablespoons of White Vinegar.
- 1 Teaspoon Garlic Powder
- 1/8 Teaspoon Ground Ginger
- Cayenne Pepper to desired spiciness.
Mix the ingredients until they are an even consistency, adding the peanut butter after the liquids and spices are mixed together. That's it. Obviously you can alter to your individual taste, I tend to go a bit light on the vinegar and heavy on the peanut butter. It looks a bit darker than the typical peanut sauce, but the flavor is pretty good for something with common ingredients that can be made in just a couple minutes.
Tonight I took some of the chicken, added some heated frozen broccoli, put it over rice and drizzled on the peanut sauce. Made for a pretty flavorful and simple dinner.

If you have any simple recipes that you think would work on a boat, please feel free to share in the comments.
If you have any simple recipes that you think would work on a boat, please feel free to share in the comments.
Tuesday, February 4, 2014
So, Whatever Happened with the Engines?
Remember when I told you about having work done on the engines? I wouldn't blame you if you didn't as it has been a long time. So, to recap, the mechanic was cleaning the heat exchangers on all three engines (two Westerbekes and the Northern Lights generator), sending a fuel injector pump on one of the Westerbekes off to be rebuilt, replacing a rusted exhaust mixing elbow on the generator and removing a rusted and broken stud on the manifold that attaches to the elbow.
Well, after initial disassembly and removal of the heat exchangers, pump, mixing elbow and manifold, the mechanic said he would have the exchangers cleaned up in a couple of days and the pump would probably take a week or so to have rebuilt and returned (it was sent to a shop in Orlando that is supposed to be good at such things). They would come back and complete the job once the pump came back. The mechanic also wanted some money for the parts so he wrote up a bill for the work that had been completed thus far. My normal rule is to pay for parts once they arrive and pay for labor once the job is complete, but since this was a recommendation by a friend, I went ahead and paid the tab to date. This was probably my first mistake.
So, I waited. And waited. I didn't hear back from the mechanic. After a week and a half I gave him a call. I was told the pump would be in on that following Monday and they would call me and let me know when they would be back to complete the work. So I waited some more. Monday passed with no call, so did Tuesday. On Wednesday I gave him a call and he now told me that the pump would be in tomorrow (Thursday). On Friday I gave the mechanic a call and he said all the parts were in but it was too cold to work since the temperatures were in the 40's and 50's. I can understand that working in the cold can be miserable...but being from Colorado I really didn't consider this all that cold...especially if you were out of the wind in the engine room. He would call me and set up a time early next week.
I ran into him in the marina parking lot in the middle of that week and he said he would be over to finish up the work on...I think it was Thursday or Friday. So on the agreed upon day I waited and he again failed to show up and failed to give me a call. I got a hold of him and he again said he had everything but it would be Monday before they could come finish up. Sigh.
On Monday they finally showed up with the pump and coolers. Things were looking up. After several hours in the engine room they told me they were missing some parts, but they had them at their shop in St. Augustine. They didn't want to go get the parts so they would be back Tuesday at 2pm to finish up. Well at least that was some progress, but it amazes me that after all this time and claiming they had everything that they were once again missing something.
You know what happened next. Yep, I waited around for an hour and a half on Tuesday before I gave up. No show, no call...this was getting to be a little too predictable. I caught up with him again in the marina parking lot on Wednesday and asked what was up. This time the explanation was that the delivery guy failed to drop the parts off, but they would have them and be over to finish up on Friday. To my surprise I got a phone call on Friday from the mechanic. No, he wasn't going to be able to make it...but at least this time he called. He was apologetic and said he would be over Saturday morning to finish up. That would be this past Saturday.
To my complete shock, they did show up on Saturday. They weren't even very late. Also to my shock, he announced that both he and his assistant were quite hung over. Really?!?! How professional. I asked if it would be better if they come back when they were feeling better, but he insisted that they would be fine. They worked for several hours getting things back together (I thought this was just a bolt and some clamps...guess I could be wrong...or the hangover slowed them down...a nice thing when you are getting billed by the hour). The starboard engine, the one with the new pump, was difficult to get started. I think at one point they realized that they had forgotten to turn on one of the fuel valves...sigh. We eventually got everything bled and got the engine started. The generator and the other engine were much easier, once they got the coolant filled and everything back together, both of those engines started without too much fuss.
Now the things we were originally trying to address were making the generator reliable if it wasn't too expensive (it's not a high priority here since I want to go solar anyway), fixing the fuel leak, and solving the issue with one of the engines running warm. The generator is now working and not leaking...but I'm not sure what percentage of the bill was the generator so I kinda doubt it was cheap. The fuel leak appears to be fixed, so that is one in the plus column. After running the engines a bit, the starboard engine is again reading higher than normal temps if you rev it up. Sigh. And it was smoking a bit more than I recall it had in the past (I don't recall any smoke in the past).
I ask the mechanic about the temperatures since the cleaning was supposed to help and he said that the heat exchangers didn't look very bad even before he cleaned them. What?!?! I guess cleaning them was just another way to get some more money out of the job then? He offered to go check the engines with a laser thermometer and I told him that was probably a good idea. He checks and we find out that both engines are running at just about exactly the same temperature...172F at the coolant entry into the heat exchanger. So Mr. Expert Diesel Mechanic...why didn't we do this before we took the coolers off to have them cleaned? I think that could have saved us a fair amount of time and money to find out that 190 on the gauge is actually 172. I guess it is my fault as I should have thought about actually verifying the problem before attempting any fix...and I know better than this but I think the boat is somehow hypnotizing me or maybe I'm just a bit overwhelmed by the size of the "the list" and the shrinking time frame to get things done. This is lesson number 2...don't EVER believe a mechanic that doesn't actually run tests first. "Oh, marine diesels are simple systems and it has to be xxxxxxx"...yeah, right.
Anyway, the engines are back together now and seem to work. One important problem solved (fuel leak), one less important problem fixed at a higher cost than I really wanted to spend (the generator), and one problem that isn't really a problem and I just need to remember to do the math on the reading until I can trace down the issue (the false higher temp reading). At this point I certainly don't want this mechanic looking into that.
And the one time the mechanic was prompt and communicative...when he brought me the final bill this morning. He even had a little bit of a discount added with a note of "Good will"....heh...maybe that is the slow moving hangover discount. I could have brought him a bill for my hourly rate for all the time I waited on him and he never showed...that would have cut the bill in half at least (my hourly rate in my current occupation exceeds the combination of his and his helper). But I just wanted him gone so I paid the bill and sent him on his way. That was my experience with Marine Land Diesel...don't think I'll be using them again.
Oh, and now my electric hot water heater doesn't seem to be working. It's conveniently located in the starboard engine room...hopefully they just accidentally switched off a breaker or bumped into a fuse down there...but that is a task for another day since there is warm water for showers in the club house.
At least the engines all now run...yay! The final lesson I should take way from this...I should trust myself to be able to do these jobs even if I haven't done them before. I'm sure with a little help from the internet, I could have figured out how to do this stuff myself, probably done faster, and certainly a lot cheaper.
 |
| A Westerbeke 42B4 waiting for it's heat exchanger. |
Well, after initial disassembly and removal of the heat exchangers, pump, mixing elbow and manifold, the mechanic said he would have the exchangers cleaned up in a couple of days and the pump would probably take a week or so to have rebuilt and returned (it was sent to a shop in Orlando that is supposed to be good at such things). They would come back and complete the job once the pump came back. The mechanic also wanted some money for the parts so he wrote up a bill for the work that had been completed thus far. My normal rule is to pay for parts once they arrive and pay for labor once the job is complete, but since this was a recommendation by a friend, I went ahead and paid the tab to date. This was probably my first mistake.
 |
| The Northern Lights Generator waiting on it's exhaust system. |
So, I waited. And waited. I didn't hear back from the mechanic. After a week and a half I gave him a call. I was told the pump would be in on that following Monday and they would call me and let me know when they would be back to complete the work. So I waited some more. Monday passed with no call, so did Tuesday. On Wednesday I gave him a call and he now told me that the pump would be in tomorrow (Thursday). On Friday I gave the mechanic a call and he said all the parts were in but it was too cold to work since the temperatures were in the 40's and 50's. I can understand that working in the cold can be miserable...but being from Colorado I really didn't consider this all that cold...especially if you were out of the wind in the engine room. He would call me and set up a time early next week.
I ran into him in the marina parking lot in the middle of that week and he said he would be over to finish up the work on...I think it was Thursday or Friday. So on the agreed upon day I waited and he again failed to show up and failed to give me a call. I got a hold of him and he again said he had everything but it would be Monday before they could come finish up. Sigh.
On Monday they finally showed up with the pump and coolers. Things were looking up. After several hours in the engine room they told me they were missing some parts, but they had them at their shop in St. Augustine. They didn't want to go get the parts so they would be back Tuesday at 2pm to finish up. Well at least that was some progress, but it amazes me that after all this time and claiming they had everything that they were once again missing something.
You know what happened next. Yep, I waited around for an hour and a half on Tuesday before I gave up. No show, no call...this was getting to be a little too predictable. I caught up with him again in the marina parking lot on Wednesday and asked what was up. This time the explanation was that the delivery guy failed to drop the parts off, but they would have them and be over to finish up on Friday. To my surprise I got a phone call on Friday from the mechanic. No, he wasn't going to be able to make it...but at least this time he called. He was apologetic and said he would be over Saturday morning to finish up. That would be this past Saturday.
To my complete shock, they did show up on Saturday. They weren't even very late. Also to my shock, he announced that both he and his assistant were quite hung over. Really?!?! How professional. I asked if it would be better if they come back when they were feeling better, but he insisted that they would be fine. They worked for several hours getting things back together (I thought this was just a bolt and some clamps...guess I could be wrong...or the hangover slowed them down...a nice thing when you are getting billed by the hour). The starboard engine, the one with the new pump, was difficult to get started. I think at one point they realized that they had forgotten to turn on one of the fuel valves...sigh. We eventually got everything bled and got the engine started. The generator and the other engine were much easier, once they got the coolant filled and everything back together, both of those engines started without too much fuss.
Now the things we were originally trying to address were making the generator reliable if it wasn't too expensive (it's not a high priority here since I want to go solar anyway), fixing the fuel leak, and solving the issue with one of the engines running warm. The generator is now working and not leaking...but I'm not sure what percentage of the bill was the generator so I kinda doubt it was cheap. The fuel leak appears to be fixed, so that is one in the plus column. After running the engines a bit, the starboard engine is again reading higher than normal temps if you rev it up. Sigh. And it was smoking a bit more than I recall it had in the past (I don't recall any smoke in the past).
I ask the mechanic about the temperatures since the cleaning was supposed to help and he said that the heat exchangers didn't look very bad even before he cleaned them. What?!?! I guess cleaning them was just another way to get some more money out of the job then? He offered to go check the engines with a laser thermometer and I told him that was probably a good idea. He checks and we find out that both engines are running at just about exactly the same temperature...172F at the coolant entry into the heat exchanger. So Mr. Expert Diesel Mechanic...why didn't we do this before we took the coolers off to have them cleaned? I think that could have saved us a fair amount of time and money to find out that 190 on the gauge is actually 172. I guess it is my fault as I should have thought about actually verifying the problem before attempting any fix...and I know better than this but I think the boat is somehow hypnotizing me or maybe I'm just a bit overwhelmed by the size of the "the list" and the shrinking time frame to get things done. This is lesson number 2...don't EVER believe a mechanic that doesn't actually run tests first. "Oh, marine diesels are simple systems and it has to be xxxxxxx"...yeah, right.
Anyway, the engines are back together now and seem to work. One important problem solved (fuel leak), one less important problem fixed at a higher cost than I really wanted to spend (the generator), and one problem that isn't really a problem and I just need to remember to do the math on the reading until I can trace down the issue (the false higher temp reading). At this point I certainly don't want this mechanic looking into that.
And the one time the mechanic was prompt and communicative...when he brought me the final bill this morning. He even had a little bit of a discount added with a note of "Good will"....heh...maybe that is the slow moving hangover discount. I could have brought him a bill for my hourly rate for all the time I waited on him and he never showed...that would have cut the bill in half at least (my hourly rate in my current occupation exceeds the combination of his and his helper). But I just wanted him gone so I paid the bill and sent him on his way. That was my experience with Marine Land Diesel...don't think I'll be using them again.
Oh, and now my electric hot water heater doesn't seem to be working. It's conveniently located in the starboard engine room...hopefully they just accidentally switched off a breaker or bumped into a fuse down there...but that is a task for another day since there is warm water for showers in the club house.
At least the engines all now run...yay! The final lesson I should take way from this...I should trust myself to be able to do these jobs even if I haven't done them before. I'm sure with a little help from the internet, I could have figured out how to do this stuff myself, probably done faster, and certainly a lot cheaper.
Monday, February 3, 2014
Is the Boat Dissolving?
This actually started just after we bought the boat, but I haven't managed telling the story until now. When my wife and I bought the boat, we didn't actually stay on it until after we moved it to the marina at Hammock Beach.
Well, the first night at the marina we climb into the berth and turn off the lights. It was a good temperature so we didn't have AC, heat, or fans running. In the quiet of the dark, we started hearing a crackling sound. We both thought it was a bit strange and just a little concerning. In our limited time staying on boats, we had never heard anything like it so I got up and listened intently trying to locate the sound. It appeared to be coming from the lower hull. Not sure what the sound was, I pulled up the floorboards to look into the bilge. I didn't see a thing out of the ordinary. With the floorboards up, I once again listened and the sound seemed to come from all around on the hull. And with the floorboards up it sounded a bit like the fiberglass was cracking.
I sat there and listened, tapped on the hull (which I know is about 5/8" solid fiberglass at the bottom) and pondered what the noise could be. Is the somewhat cool water causing the fiberglass to expand and contract unevenly? Is something eating through the hull? Is this just a "normal" sound that I've never heard before? After staring at the dry fiberglass hull for a while, it was getting late and I decided that the boat wasn't sinking so we just put the floorboards back and went to sleep. Hopefully the rush of water will wake us up if the hull gives way. The next days the boat remained afloat but the crackling sound could be heard anytime the boat was quiet.
Now, fast forward to a week or two after I get back to the boat. I still hear the noise but, while I have no explanation for it, have dismissed it as a "normal boat noise". Talking to one of my dock neighbors, they were telling me how they were hearing a noise like crackling or water leaking into their boat. They invite me to come listen and, sure enough, it is the same noise that I've been hearing all along. They hadn't noticed it until they started doing some work near the hull (they are a motor yacht and their hulls are covered with cabinets and other things that mask the sound). I told them I had been hearing the same thing since I've owned the boat and had dismissed it. They couldn't believe it was the same noise so I invited them to come listen. Sure enough, they agreed it was the same noise.
As we were standing on the dock discussing the strange sound that we both hear, one of the locals wandered by and offered an explanation. Apparently, when it gets a bit cooler, some small shrimp tend to come out and they are the cause of the noise. Neither of us had every heard of such a thing, but sure enough, a quick Google search reveals it is quite common.
http://en.wikipedia.org/wiki/Alpheidae
Or for an over-dramatic video explanation...
In any case, it is fascinating...and good to know that my fiberglass boat isn't dissolving.
Subscribe to:
Posts (Atom)