Sunday, February 14, 2016

Just In Time

I had a hard time with the title for this post.  There were so many options based on what we've been up to the last couple days. "How not to burn down your boat", "Battling freezing temperatures", and a few others.  But, as of yesterday, this one seems to sum it up best.

We are still in Southport, North Carolina, waiting on the weather to improve enough to continue the trip.  Cold and/or windy and/or  rainy sums up the forecast for the last couple and next couple days. While we sit, it only made sense to knock a couple more items off the to-do list.

Weather Underground report this morning.

Due to the cold weather, we decided to utilize an electric space heater in the boat.  The reverse cycle air conditioning units can generate heat, but they get less efficient as the water temperature drops. Once the water temperature dips below 40F, there just isn't enough heat to extract out of the water. This boat, being designed for Caribbean charter, just doesn't have much option for dealing with really cold weather. In the process of using the plug-in electric heater, we found that a few of the 115v AC electrical outlets were in need of replacement.

Electrical outlets have a limited lifetime.  Anyone who has owned an older home knows that the outlets wear out and eventually don't hold a plug all that well.  And in the harsh marine environment, you add corrosion to that mix.  The combination of poor clamping force on the plug and corrosion can cause a lot of resistance in the outlets.  Resistance causes heat, and if you have enough heat...well, it ain't pretty.  So, it was obviously time to retire the 15+ year old outlets on the boat.  What to replace them with was the next question.

The old outlet and the new mounting "box".
One of the corroded plug contacts below.

Off I went down the rabbit hole of what is a good, marine-grade electrical outlet. I tried finding the plugs currently used on the boat, but they are, naturally, no longer made. Searching all the usual marine suppliers resulted in GFCI outlets touted as marine.  We have two 15 amp 115v circuits on the boat and both are currently protected by newer GFCI outlets already, so we just need standard plugs down the line. The only standard plug provided by a marine supplier is a bright yellow plug that looks just like any normal household 3-prong outlet.  In fact, looking closely at the picture showed it was made my Leviton. The information I found showed that, internally, it was no different than the normal weather resistant Leviton or other industry standard plugs.  Since we prefer white to bright yellow, we decided to go that route for the replacements.

Naturally, as a boat project, this wasn't the end of the puzzles on the project. When attempting to remove the old outlets, I discovered that the factory didn't mount the plugs well (the holes were cut just a bit too large for the mounting screws), and a previous owner resolved the issue by gluing them in with silicone caulk. In order to make everything mount properly, I picked up some low voltage remodeling electrical boxes.  These are basically the front edge of an electrical box (so it has the needed receptacle mounting holes) and can clamp to a hole cut in drywall (or in this case, fiberglass). Now the outlets can be secured in the holes without the need of silicone to glue them in place.

No sooner had we finish installing the new outlets than the boat decided to give us another challenge.  We discovered that the reverse cycle air conditioner in our berth was not producing any heat. Checking out the system, I found the raw water pump stopped working sometime in the past few hours.  Not good when the coldest temperatures we will experience on the boat thus far were only 24 hours away. Good thing we just finished the plugs so we could use the space heater that night.

The next morning we dug into the issue. We started with the obvious. Since it was a little past time for us to clean the sea water strainers, we pulled the strainers and cleaned them. Unfortunately the strainer on this unit didn't look that bad so it likely wasn't the issue.  But, just to confirm it was a boat project, the strainer decided to leak when we put it back together.  It took a while messing with it, but we were finally able to get it to seal properly.

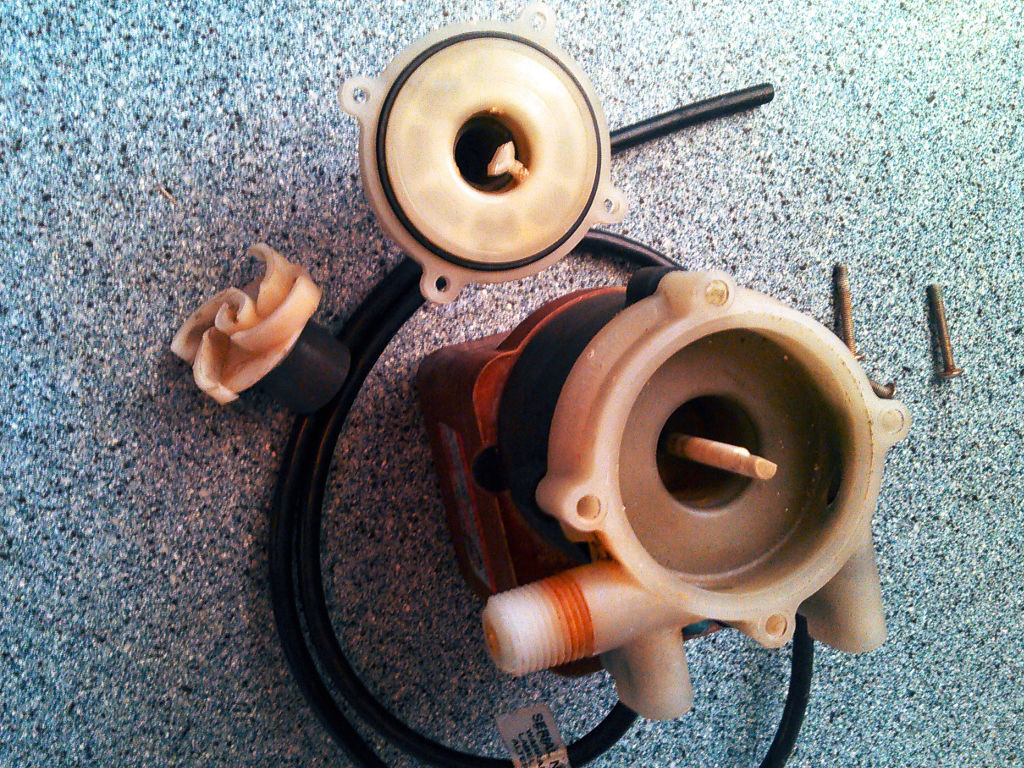
Since I already had a little experience dealing with the raw water pump (this is the pump I previously replaced), I decided to dig into it to see if we couldn't get it running again.  Attempting to run the unit this morning resulted in a small amount of water being produced, so there was some hope.  I pulled the head off the pump (not an easy feat given its location in the bilge) and it became obvious what was wrong.  The used pump I purchased had obviously been rebuilt, and the rebuild wasn't done properly.  A spacing washer was missing from the impeller housing, and one of the spindle supports was broken.  The missing spacer may have been the initial fault and the impeller rubbing on the housing may have been what broke the support, but I'm not really sure.

March Pump. Worn cover with broken support top.
Worn impeller left.
In any case, we were in luck.  I still had the old pump that was removed when it failed.  On that pump, the motor seized but the pump head was still in good shape.  I was able to scavenge the impeller, housing with the intact support, and missing spacer from my old pump to "rebuild" the pump head.  After getting it all back together, we once again have good water flow from the pump. While it is a pain to have to fix things, it is nice when everything needed to repair a complex thing like an air conditioner raw water pump can be found on the boat, and all it cost was a little time.

So, just in time for the cold, we have all our possible heat generating items working again on the boat, although we would much prefer warmer weather.

Friday, February 12, 2016

Waiting On The Weather

While working on the battery bank replacement the weather was nice.  So nice, I almost forgot it was February. Now that the battery bank is installed and seems to be working fine and we are ready (OK, WE'VE been ready for a while...but the boat is now more ready), the weather has been an issue.  Our hope was to make a run on the outside from Southport down to St. Augustine, reversing the trip we made last summer.

But mother nature has had other ideas.  The past couple of days there have been small craft advisories with waves nearing 10 feet on relatively short periods. This morning talk about the Polar Vortex has returned to the forecasting vernacular and temperatures are expected to dip into the 20's and maybe even the teens by the weekend.  Add in the occasional forecast for rain (or maybe snow) and it is not exactly the type of weather you want to be in when the helm of the boat is outside.

The other choice is to continue the trip down the Intracoastal Waterway (ICW).  It is a much slower trip that way since we are only on the move during the day time.  Add in the fact the next stretch of the ICW includes the infamous Rock Pile (a rather narrow, rock ledge lined section), and I'm just not that enthusiastic about making that trip in my wide-beam boat. Even on the ICW, the cold temperatures and less than good weather would make the trip miserable...we know, we've already done it on this trip.

Right now the current plan is to hang out for a few more days in Southport while the Polar Vortex does it's thing this weekend.  Early next week we will start down the ICW.  The weather is supposed to slowly improve (as of the last few forecasts we saw) so we hope after a couple days in the ditch, we can hop out and make a run for St. Augustine.

Sunday, February 7, 2016

Safety Check Time Again

If you have been reading my blog for a while, you probably already know this. The U.S. Coast Guard Auxiliary does a free safety check for boats.  The admirable goal of this program is to make the waters and the boats on them just a little bit safer.  Ever since I learned of them I've had one done on the boat each year. Now that we have the navigation lights all working again and we are waiting for a weather window, I figured I would see if I could get one done before we departed Southport.

I checked with the marina office and they had the name of a local Coast Guard Auxiliary member who might be able to squeeze me in on short notice.  I contacted him and unfortunately he was out of town, but he passed me on to an associate of his who came out within a few hours of my original contact.

There are some obvious reasons for doing the safety check.  They will go through the boat and check all the things that the Coast Guard will if they stop and board you.  But unlike the Coast Guard, they won't fine you if you are not in compliance, instead they just let you know what you need to correct. I know I have the occasional senior moment, so it is good to have a second set of eyes making sure the boat is safe. Add in the fact that the check is free, and it seems like an obvious thing everyone should do. It isn't too often that a free program helps to keep you safer and may save you some money and time.

It is also rumored that the safety check may even reduce the number of times you are boarded by the Coast Guard.  Upon successful completion of the safety check you are given a sticker to apply to the port side of the boat.  The theory is that if the Coast Guard is considering boarding you and come up along side and see the sticker, they may decide you are most likely to be in compliance and not worth the time to board and inspect your boat.  This, of course, assumes you haven't done anything else to attract their attention. I don't know that it is true, but I can tell you that the Coast Guard has pulled up alongside my boat on a couple of occasions, waved, and moved on.

If you own a boat, I highly recommend getting a safety check done each year.  To see what they check and request a safety check, go the Coast Guard Auxiliary web site:


It is well worth the small amount of time spent.

Image from the US Coast Guard Auxiliary web site.

Saturday, February 6, 2016

One Less Incandescent Light

A while ago I started converting most of the incandescent lights over to LED. When I bought the boat, there were a number of incandescent bulbs. All the navigation lights and a number of interior lights used incandescent bulbs, so as I found LED alternatives and when lights or fixtures started giving me problems, I would switch them out.

All of the salon lights were 10 watt festoon bulbs and have been converted to homemade or pre-purchased LED bulbs. The navigation lights were converted once I found the right bulbs at a reasonable price.  When the anchor light burned out, it was replaced with an LED.  When the deck light went on the fritz, I found a nice Par LED replacement bulb and replaced it.  The only incandescent lights left on the boat were the reading lamps in the berths (I hadn't found a bulb replacement for them), a couple of cockpit lights (the new top will be getting new lights to replace them), and the steaming light (not a high priority since it is only on when engines are running).

Well, on our trip south, the steaming light went out.  So, I guess it was time to convert that one to LED too. All of the navigation lights on the boat use the same BAY15d base bulb. Of course I couldn't find one in stock in Southport, so I ordered one from the local Napa store that also sells a lot of marine supplies.  I had been using the bright white bulbs in these fixtures, but since I had to order one, I went with the warm white this time.

Why warm white?  Well, it actually has to do with the red/green navigation light. The colored lenses on those lights were designed for use with an incandescent bulb.  When I went to the bright white bulbs, I noticed that the green looked a bit more blue than before (after all yellow + blue makes green). I had heard (after I bought the LED bulbs) that this might be the case.  So, by ordering the warm white bulb, it should help the bi-color light look the right color once again.

The bulb came in yesterday, so naturally it rained all day.  Today it was cooler, but sunny, so it was time to swap the bulbs around.  I removed the bulb from the bi-color navigation light and replaced it with the new one.  I then took the bright white bulb that was in the bi-color light up the mast with me to replace the steaming light.


I wasn't sure what I would find when I went up the mast to fix the steaming light.  With previous light issues on the mast, one was a burned out bulb and another was a bad connector.  So I gathered up a multi-tester, some crimp connectors, pliers, screwdrivers, and my trusty dielectric grease and headed up the mast. The steaming light is protected by a metal cage, and when I tried to remove it, I found the screws were pretty much frozen in place.  They wouldn't budge.  At all.  The screw that I needed to remove in order to remove the cover of the light was positioned right behind one of the bars, but I managed to get a screwdriver to it well enough to disengage it.  Then I carefully removed the cover and lens, maneuvering it through the openings in the cage.

Once I finally had access to the bulb, what did I find?  An intact incandescent bulb.  I removed it, inspected it, and put it back in place.  I asked my wife (since she wasn't hanging off the side of the mast) to go flip the switch.  Sure enough, the light came on.  Whew, it was just a little corrosion on the bulb that caused the outage.  After turning the power back off, I removed the old bulb.  I took out the LED bulb, applied a little dielectric grease on the contacts, and installed it in the fixture. We tested the new bulb and confirmed it worked.  I replaced the lens and cover and checked the function one more time before I headed back down.  All was well.

So, now all the lights on the big aluminum stick have working LED bulbs.  Hopefully the LEDs and the protective grease will make these lights a bit more trouble free for a while, and I won't have to climb the mast for any lighting issues any time soon.

Wednesday, February 3, 2016

Where's The Juice

The house battery bank has become our major task on this stop.  I had hoped we could partially revive the bank and deal with it once we were further south, but it was not meant to be.  Right now one battery has been removed from the bank (suspect an internal short that may have been the cause of the original issue), and the remaining two don't hold much power.

The old battery bank...and some baking soda to neutralize acid

I've been doing research on batteries and have found that many don't consider most of the marine deep cycle batteries to be very good or capable of deep cycles.  Add in the fact that the identical replacement batteries cost $700 each (and I need 3) and spending that kind of scratch on a less than good solution seemed silly.  Golf cart batteries (group size GC2) are generally considered to be much better at deep cycle use, and two of them fit within the footprint of the group 4D batteries (that is the size that currently make up my house bank). They are generally less expensive and have higher amp-hour (Ah) ratings so this decision was fairly easy.

Then came the great AGM versus wet cell debate.  There are certainly pros and cons to both options.  The big pros for AGM are the lower maintenance requirement, low self discharge rate, and faster charging.  The pros for wet cell are they can tolerate overcharging a bit better, seem to have a bit higher capacity, and are cheaper.  To us, it was a real toss up.  The existing batteries are AGM as are the engine start batteries, so we figured we would likely go that route.

That is, until we tried to get some.  The local Napa store didn't have any in stock, and the ones they could get seemed inferior to many others.  The guy at the local golf cart store tried to locate ones from a variety of different suppliers and only found two options.  One he wouldn't be able to get until mid February and the other was over $300 each. On the other hand, he had just received a pallet of 232 Ah wet cell batteries that cost $105 each. We tried looking online for AGM's as well, but between shipping and the inability or cost to ship the old batteries back (cost of batteries usually includes returning the old ones back for recycling...since all that lead is still worth some money) and the resulting core charge we would have to pay (over $200), it wasn't a feasible option.  So, the decision was pretty much made for us...we would go with the wet cell batteries. Since the race between AGM and wet cell was so close in our minds, we really didn't mind this route.

The new batteries

We bought 6 of the US 2200 XC2. These are 6 volt batteries rated at 232 Ah.  By wiring two of these in series, I end up with a 232 Ah 12 volt "battery".  Wiring 3 sets of these in series would give me 696 Ah.  The old batteries were 198 Ah each, so the battery bank, when it was good, was a total of 594 Ah.  This means the new setup will give me an extra 102 Ah.  Of course, for best life you are only supposed to discharge batteries to 50%, so this gives me an extra 51 Ah of usable power.  Not too bad, particularly when you consider the fact that all the batteries cost less than just one of the West Marine batteries.

Of course, the batteries weren't the only cost related to this change.  I needed 3 new cables to connect the 6 volt batteries in series to make 12 volt battery sets.  I considered ordering some custom cables from GenuineDealz (I've purchased wire from them before and have seen their custom assemblies), but being a bit impatient, I opted to have them made locally.  The Napa Auto Parts in Southport stocks a variety of marine grade stuff and that included the 2/0 marine grade wire and crimp on connectors needed to make the cables. They made me the 3 cables I needed for a little under $40.

Getting the old 4D batteries out of their home in the cockpit locker wasn't as bad as I thought it might be.  Doug, the harbormaster at Deep Point Marina, came and helped me lift them out of the locker and get them off the boat and to the car. We put them in some heavy duty trash bags and took them to the battery store to trade them in for the $35 per battery core charge (the golf cart store was nice enough to understand that a 4D battery was roughly equivalent to two "cores" so we could get the 6 core charges refunded with the 3 4D batteries). After getting the batteries out, we had a little cleanup to do.  We ended up using 3 boxes of baking soda and copious amounts of water to clean up the mess we made trying to revive the old batteries.  This took quite a bit of time, but after a few hours the battery box was reasonably clean and ready for the new batteries...or so I thought.

Before I decided to go this way I spoke with a couple of people who owned Leopard 38's and have done this change, and they reported no fit issues.  When I measured the space (as best I could when the old batteries were still sitting in there) it looked like it was going to be close. So, naturally, the batteries didn't quite fit.  I guess my battery box was just a bit smaller than the boats that came after mine, and the two golf cart batteries, when placed end to end, wouldn't quite fit into the tray built to hold the old 4D batteries.  I ended up having to modify the tray so there was enough room. Height was also a minor issue, and I had to modify the ledge that holds the shelf/lid to the battery compartment in order to get the batteries to fit. Not major reconstruction, but not a slide in replacement either.

Minor technical adjustments to the battery box

Finally, after many hours of cleaning and reworking the battery box, the new batteries were placed in the compartment and wired up.  Connections were checked, and after verifying everything looked OK, we flipped the switch and brought the electrical system on the boat back to life.  Before letting the inverter/charger go to work charging the bank, I changed the settings to represent the new battery bank configuration.  Then the charger was started.  It seemed happy with the batteries and charged them up after an hour or so (being new, they were mostly charged when we got them). Since it was getting dark and cold, we decided to finish the last parts of the install in the morning.

The new house battery bank wired up

The next morning I started by running a couple tests to confirm everything was working as it should.  I ran the inverter with high load (our smaller cabin AC unit) and checked temperatures of the batteries, battery terminals, and cables with a non-contact thermometer and only saw a couple degrees of difference after letting the unit run for 15 minutes or so.  I then turned the charger back on and took more measurements to verify everything is fine.

Then came the finish work on the battery box itself.  With the cables attached it took up even more room above the batteries, and I decided I needed a little under an inch of extra height for the lid. I added some wood strips to the battery box lid and mount to give it more clearance for the taller batteries and cables. I also repositioned a couple of the wires to allow better access to the battery vent caps.

Modified ledge so everything fits

The one last hurdle was how to strap the batteries down.  The box had 6 straps and I figured I could use one per battery.  But I didn't take into account the wires and the funky battery caps on the battery.  Simply running a strap over them would hold down the caps so you couldn't open them to add water (a necessary maintenance task on flooded cell batteries) and worst case might even break the caps. I thought about just putting wood blocks on the top of the batteries to hold the strap off of the caps, but I was worried that they could slide and that would result in the straps coming loose.

My solution was to create some wood spacing blocks that would slide in between the battery and tabs of the battery tray and run up the side of the battery.  At the top, a second piece of block was added to sit atop the battery so the straps would hold the batteries down.  This solution will hopefully prevent the batteries from moving side to side as well as allow the straps to hold them down without crushing the battery caps or putting a lot of strain on the cables.

Modified battery box lid and battery hold down shims

Of course, constructing these things and then painting them so they might survive a little while in the harsh environment of a boat battery box has taken a lot of extra time.  The temperatures have been OK here in Southport, but still not good paint drying temperatures. I let the shims dry for a good day, and they still feel just a bit sticky to the touch but I'm sick of waiting.  The batteries are strapped in now and everything is finally back in the locker, and the cockpit is looking a bit more like a cockpit and less like a garage. It has taken me about 5 days to do this battery replacement. I'm still hoping for the day I find a project that doesn't take 10 times longer than I think it should on this boat. But now we seem to have a well functioning battery bank.  Only time will tell if going the golf cart battery route will be worth it.

Saturday, January 30, 2016

Severn Yachting Center

I usually like to review the places where I've spent time, and this marina and boatyard is no exception. Having been there for almost 6 months, I feel I have a pretty good understanding of the place.  "Severn Yachting Center and Yacht Yard" (formerly Severn River Marina if I believe the name printed on the travel lift) is located on the Severn River (bet you would have never guessed that) just off  Mobjack Bay in Hayes, Virginia.

Severn Yachting Center Marina

The marina is a combination of fixed and floating wood docks.  The fixed docks are obviously older but seem in OK condition, only in need of a few minor repairs. The wood is older and would not be recommended for bare feet (floating docks are attached to the fixed so you will walk on them regardless of slip assignment). The floating docks are obviously a newer addition and were retrofitted into the marina on wood pilings and are generally in good shape. The marina has two bath houses, one free standing near the docks and the other attached to the office and shop building. The free standing house is the usual his and hers arrangement with two showers on each side.  The latter are three unisex rooms, two with showers that seem to be favored by most, including us.

The facilities at Severn Yachting Center

The main building used to be the shop building but part of it was built out to contain the offices, a decent ships store, and the newer bath house.  In front of the building (the side facing the river) they have a pool and deck area that makes a nice place to hang out when the weather is comfortable. The back 2/3 of the building is still the maintenance shop.  Behind the shop is the path that leads to a modest sized boatyard. The facility has a new reverse osmosis water system so water quality is very good.  They also have WiFi (more on this below) and fuel.

It is somewhat off the beaten path, but a bit more convenient to civilization than up in Deltaville. Other than the on-site ships store, a bicycle, or preferably a car, is needed for acquiring most off-site items or provisioning. The marina is reasonably well suited for longer-term liveaboards, particularly if they have transportation. Overall the facility is decent for the price.

The owner is a nice guy and is probably one of the main reasons we chose this marina when we were researching places to stay and take on the hardtop project. Unfortunately the customer-oriented attitude is hit or miss depending on the day, who you are dealing with, and the moods of those who work there.

Our first experience with this was during the boat haul out. While power-washing the boat I wanted to confirm how they intended to block the boat since my boat has bolt-on sacrificial keels (designed so when charterers ran over things they wouldn't sink the boat). They told me they were going to block it on the keels, something the manufacturer does not recommend.  They proceeded to argue with me about it stating they block in accordance with ABYC standards. I showed them the manual where it talks about sacrificial keels and lack of load bearing. Finally, they called the manufacturer and confirmed what I, and the manual, told them.  Then they had me sign a waiver stating that I wanted the boat blocked other than their standard way and charged me for "special blocking" or something like that.  I later checked the ABYC standards, and wouldn't you know it states "check the boat manufacturer's owner's manual, if available, for lifting and blocking instructions, limitations, or restrictions" and "Keel blocking should be used to support the weight of the boat, unless otherwise specified by the boat manufacturer.[emphasis added] " At one point during this ordeal I even overheard the employee question my abilities or if I should even own a boat. So, if you have this marina haul your boat, make sure you are well aware of any blocking needs specific to your boat well before you arrive (and confirm again once you do arrive), and make sure they follow those instructions.

Later, while on the hard, I discovered that one of the shaft bearings (cutlass bearings) needed replacement.  Wanting to speed up my time in the yard and give the yard a little work, I asked if they could do it.  I received a verbal quote from the yard that it would take a day or two and they would not be able to get to it for a couple weeks.  They explained they would have to cut the bearing out and how difficult the job would be.  I declined because I knew better.  If you look at the bearing holder, you see one large bolt above it.  Removal of this bolt allows you to slide the holder out of the boat, where you can take it to a shop press and easily press the old bearing out and new bearing in place. Given it was my first time, it took me about 3 hours to remove the prop and the holder, take it to the shop so they could use their press, and get everything cleaned up and reinstalled. It took me longer to find a prop puller (actually used a bearing puller rented for free at the local auto parts store) than it did to do the work.

Late in the hardtop project, I was told that they needed the space I was using (and paying for) in the yard and they may have to move my work space.  We were nearing completion so we hustled even more to get the top done.  I came back to them and told them that we were ready to move the top, and they could have their space back.  Then the story became that they were way too busy and could not help us until after the Christmas break (it was December 8th at the time). Since they are closed between Christmas and New Year's, that would be a delay of several weeks. My wife said they seem to have a real "No Can Do" attitude unless you are an expensive yacht or government contract. We were finally able to talk with the boatyard manager the next day, while the marina/yard owner was also present, and he was then able to "squeeze" us in the following week.  The next week came, and the owner and manager were not around.  The staff didn't seem busy so I approached the lift operator and asked if he could move my top that week.  He suggested the next morning.  I later found out that neither he nor any other employee was ever even told of my original request to move the top.

The Fixed Docks (note two missing power pedestals along left side)
Maintenance seems to be an issue at the marina.  There were two power pedestals on our dock that were missing, the wires simply wrapped in plastic.  They have been that way since the day we arrived.  I was told that there was some sort of electrical short and possible fire so they were removed and have never been replaced.  While we were there, two of the flexible hoses that fed fresh water to the newer floating docks ruptured, and one has yet to be replaced.  On three separate occasions within a one-month period they had problems with the water system, which caused the water to the entire marina to be off for 24 hours or more each time.  Only once did the marina have water trucked in, but that was because the boatyard manager was present and his house was also impacted by the outage.  Back in the yard where my work space was, the electrical plug didn't work and they had to string a long extension cord from the next plug down the line so I would have power. The water spigot at the same location is capped off because it leaks so we had to use others. The parking lot is dirt/rock (like a boatyard) and has a lot of potholes to dodge. Feels a bit like we were driving on the moon.

One section of potholes in the parking lot

They have WiFi at the marina, but it doesn't work very well at all.  I know marinas often have issues with this as it is a complex environment to configure, but this marina is worse than most, and much of the problem seems to stem from poor setup.  When I spoke with one of the boaters here who was also charged with setting up and maintaining the system, he blamed Cox (the internet provider) and the equipment.  I know Cox wasn't an issue because the internet works fine from the computers hardwired to the network in the office.  Being an ex "computer guy", I did a little investigation and found that the way they have the WiFi routers configured causes much of the intermittent access issue.  But I don't get the impression that the marina is interested in paying to have someone who knows how to fix it come out and do so.

Most of the regular janitorial work and some landscaping are done by one of the residents who is also a part-time employee of the marina. She seems to be the hardest working employee they have. Despite having another job, the bathrooms are usually clean, the trash is regularly emptied, and the grounds look good (particularly for a boatyard that seems unwilling to spend much on maintenance).

The owner and yard manager seem to split their time between this location and other(s) and are absent some of the time.  In addition, as hinted at above, communication seems to be an issue. I know of a few boats that had issues getting work done in a timely manner and one that couldn't even get them to come do an estimate for some work (they ended up going elsewhere to have the work done). When a hurricane threatened, they had only one employee who was out in the rain helping boaters get things secured.  I later found out he was actually supposed to be their maintenance guy, but seemed to always be pulled into boat projects while I was there.  Unfortunately, this hard working guy no longer works at the marina.

If you do go to this marina, don't expect to be able to hail them on your VHF radio.  They have a handheld, but don't seem to use it.  Expect to call them on your cell phone (if you can get a cell signal).

I understand that this is not the most expensive marina and there are budgetary concerns, but the phrase penny wise and pound foolish comes to mind. If they need to boost the rent by a modest amount, it may serve them well if they can use that extra cash to resolve some of the issues.  They also need to get the entire staff on board with the idea that their jobs are in a service industry and providing good and friendly service goes a very long way in creating a loyal customer base.

This may seem a bit harsh, but it is what I encountered while I was there.  And as I've said, it isn't all bad.  Some of the folks are pleasant to work with at the marina.  There are some good folks who live there as well.  The facility is fairly nice, particularly for a boatyard.  They have a fairly well stocked store and can get most things they don't have within 24 hours through their suppliers. It wouldn't take a lot of work to propel them from the industry average to a marina I would enjoy returning to.  I hope they can get their maintenance and staffing issues under control.

Thursday, January 28, 2016

Getting Things Done

Our trip from Hayes, Virginia, to Southport, North Carolina, in addition to trying to escape the cold, was a bit of a shakedown cruise.  That wasn't really the intention, but as Cap'n Ron said "if it is going to happen, it is going to happen out there".  I guess that is true even when "out there" is motoring along the Atlantic Intracoastal Waterway.  So, since we arrived in Southport, we have been back in fix-it mode.

Before much fixing though, we needed to go fetch our car from the Severn Yachting Center.  We also had a crew member that needed to see a doctor.  Our eldest dog has been battling a condition where one of her ears has sores that don't want to heal (it is called ear margin vasculitis), and a specialist we have been seeing is in Richmond, Virginia.  We decided to combine the trip to get our car with an appointment with this veterinarian.  Our plan was to leave the day or so after we arrived, but a winter storm hit southern Virginia (as well as northern VA, MD, DC, and other nearby areas).  So we pushed it off a few days while I investigated my house battery bank  issue.

On Sunday, we started making our way to Richmond.  We went to visit a friend of my wife in Chapel Hill and stayed with them that night.  The next day we continued our trek to Richmond. Unfortunately, as we were driving, we got a call from the vet.  I guess Richmond was having a hard time dealing with the 10 inches or so of snow and still hadn't cleared the streets after a few days.  As a result, the vet was closed and had to cancel the appointment. We continued on to pick up the car and return both to Southport. We arrived at the marina, said our goodbyes to some friends we made there, and headed back to the boat.

Some of the snow we escaped.

After getting back, the next task was to see if I could locate a small coolant leak in the starboard engine.  I pump the coolant sitting in the bilge into a container to throw away and then look over the engine trying to find the leak.  I find one hose that wasn't clamped all that well and fix that.  Didn't see any other signs of a leak so we clean the engine and bilge, top off the coolant, and test run the engines.  While looking over everything, I start seeing a drip.  Not from the engine or the coolant tanks, but coming from the hose that leads to the overflow tank.  No idea why it wasn't dripping when cold, but it didn't start until everything was warm.  So I drain the overflow tank, pull the hose and check for a leak in the tank.  I didn't find anything so I cut about a half inch off the end of the hose and reconnect it all.  Refill and retest, and everything seems fine now.

While I was in the engine room, I also looked over the alternator.  The tachometer was intermittent at times during the trip, so I checked the connections.  I cleaned the connectors and used a little dielectric grease to help prevent further corrosion, then secured the wires better.  During the test the tach seemed to behave better, so hopefully that is also fixed.  I also took a little time to wire brush and paint the engine and generator as they were showing a little wear and chipping to their corrosion-inhibiting layers of paint.

One of the comments I received from my post on the battery house bank suggested that we might be able to recover the batteries if they weren't too damaged.  I debated this for a while and looked online for information and finally decided to give it a try.  Worst case I figured was that we would still have batteries that needed to be replaced, and best case is we might get a little more life from the batteries. If all it cost us was a dollar or two of distilled water, seemed like it would be worth the risk.  I tried popping one of the dust covers off the battery and find that underneath was a plug that leads to the battery cell.  The plug contains the valve and is sealed with an o-ring so all I had to do was unscrew it.  We added a little distilled water to the cells to see if that would help.  Unfortunately, adding a little water only uncovered the fact that the case was apparently cracked somewhere out of view and the water leaked out of one of the cells creating a bit of a mess.  Guess we will need to replace the batteries before we continue our trip. I'm pretty sure we will go with golf cart batteries, but still debating the pros and cons of AGM versus wet cell versions (as well as trying to figure out how we can source them here).

So, that is where we stand.  Some things we think are fixed, more to go.  At least the weather has improved a bit and is warmer than where we were in Virginia.