Wednesday, February 21, 2024

What a Long, Strange Trip It Has Been (part 1)

 For a long time I've wanted to take the boat to the Bahamas.  To sail in crystal blue waters, explore tropical islands, scuba and snorkel, and find tranquil anchorages.  This past Friday, I finally made it across the gulf stream and am now in Bimini.  I'm still looking for most of that above list, but am now 90% of the way there.

I started this trip back in 2019.  I found some crew and came to the boat to start preparing it for the trip.  After numerous updates and repairs, there was one major bit of work to be done, to replace the standing rigging (the wires that hold the mast up).  It was ordered in early 2020, and then the unplanned delay struck the entire world, the COVID pandemic shut everything down.

Almost four years later and I am back at it.  A new home marina, more boat repairs and upgrades, the rigging that was ordered before the pandemic was finally installed, and the boat was as ready as I thought she could be.  There were a couple minor projects to do, but I figured they could easily wait for a warmer climate. The crew had changed a bit.  My wife and dog are with me now and there are plans to meet up with others from the original crew along the way.

Not quite shorts and t-shirt weather yet.

We departed New Bern, North Carolina at the very end of December.  It was cold.  We made our way slowly south along the Intercoastal Waterway as the weather wasn't suitable for travel in the Atlantic. We stopped at night at marinas so we could plug the boat in and run heaters to stay warm.  It was a slow journey from New Bern back to my old marina in Southport.  It was the last leg into Southport where I discovered I had picked up some bad fuel and clogged the filters. One engine sputtered as we entered the marina basin to provide a little added excitement. A few days in Southport replacing filters, polishing fuel, provisioning, and catching up with friends, and we finally had a small weather window to actually sail further south.

We departed Southport on an overnight passage down the coast to Charleston.  It was still cold and we wore winter coats and foul weather gear...determined to find warmer weather.  The winds varied, so we sailed some and motored some. At one point while motoring, one of the engine room blower fans started squealing, apparently a bearing was going bad.  It made quite a noise so we shut down the engine for a while.  Then one time when I started it to see if the fan would behave for at least a little while, I was met with silence from the fan.  It had died.  It was also on this leg of the trip that we noticed the volume on the VHF radio wasn't as loud as it should be, making it difficult to hear calls when the motors were running.  We made it to Charleston just fine, but with a couple new repair items to take care of.  It is a boat after all.

We stayed in Charleston long enough to order and install a replacement fan and radio.  Then, while waiting on the weather for another chance to move south, the area was hit by a freak high wind thunderstorm line.  This is the first time I've ever seen waves breaking inside a marina, between the boats and the shoreline. During the storm, the docklines on our boat loosened one of the cleats and one of our docklines broke (fortunately I had prepared for the storm and had extra lines securing us). The boat behind us snapped one of the cleats off of the dock.  Elsewhere in the marina, others had broken lines and cleats and during the storm two boats were rocking so bad that their masts hit.  One piece of the marina’s dock broke free and one of their ramps ripped loose and sank.  It was a wild ride, but we made it through unscathed.

Charleston Maritime Center

...and during the storm.

The next weather window was small and only allowed us a day sail from Charleston to Edisto Beach.  The winds weren't quite from the right direction, but we were able to sail a beat (into the wind) that got us to the channel right at sunset.  It was nice to be able to sail for a while without hearing the drone of the motors. 

We made our way up the channel as it grew darker.  The marina said they were easy to find, just look for their sign at the fuel dock.  Well, they failed to mention that the sign was unlit, there was a strong cross current, and they probably didn't know about the fishing vessel that was squatting in our assigned spot on the T head with its bright deck lights shining in our faces.  This combination made finding the marina a bit difficult.  We were able to finally tie up to the dock with only minor issues after getting the squatter to move.  The next morning when staff arrived, one gave us a ride to the local grocery store to pick up a few things as we we hadn't taken into account the length of time it was taking us to make it south when we had provisioned.  Then we waited several days for another weather window to continue.

We wanted to go from Edisto SC to St. Augustine FL on a 2-night passage and, originally the weather looked like it might oblige.  But as the day approached, the forecasts started shifting and we decided we would try for a single night and arrive at Brunswick GA instead.  Again it was a combination of sail and motoring, but we were still heading south at least.  As we approached Brunswick, the weather reports changed. This time it was in our favor as the window that shortened at the beginning was now lengthening at the end.  Given how much we had been delayed by the strange weather this year, it was an easy decision to press on to St. Augustine.  So we continued to sail that evening and into the night.

Before sunrise, we started seeing lightening flashes in the distance.  At first they were east of us and moving east away from us.  Then some started appearing to the southwest, in our path.  We were somewhere near Jacksonville when the weather radio came alive with a warning about a strong thunderstorm around Marineland and heading northeast.  Wanting to avoid that, we reverse course for a bit and allow it to pass by.  Oh, there was also another storm that was around Fernandina Beach to our north, so we waited in between them.  They passed by without much concern and, once the flashes of light were east of us, we turned back on course for St. Augustine.

As the morning light started overtaking the early morning darkness, a fog started to develop.  Listening to the current condition weather reports on the radio, it sounded like all of Florida was covered in fog.  I guess this is a good time to mention, for those not familiar with St. Augustine, that this particular inlet is not detailed on navigation charts because of shifting sands that supposedly change the navigable part of the channel.  It has always seemed rather stable the times I've been in it before, but it has been a while.  As the fog thickened, I grew concerned about having to navigate a potentially changed channel in the fog.  We found our horn and made the required sound signals while we Listened for others. Our radar should be able to locate channel markers...I hope.  Or will we have to wait out the fog or continue on to another inlet...

(More to come next time)

Monday, January 8, 2024

A 15" Touchscreen Chartplotter for around $500?

 First a belated Merry Christmas and Happy New Year everyone!

My boat came with a Garmin 4208 chartplotter.  Unfortunately, the prior owner(s) did quite a hack job installing it and, as a result, there was a rather large and unsightly open hole in the hull behind the unit.  This hole prevented me from ever removing the chartplotter from the helm as it was the rain shield.  Well, a chartplotter is an expensive umbrella, and after having spent many years acting as such, it began having some issues.  The case seal had failed and allowed moisture to enter. Best I can tell, this caused a light film of mold to start growing in the screen and was slowly making it unreadable.  It was time to find a solution.

The Old Garmin Plotter,
as installed by prior owner

I could have bought Garmin's current replacement unit for around $3000, and would have the same functionality that I had.  There were a couple problems with this.  Since my depth, wind, and autopilot are Raymarine, they did not like talking to the Garmin.  Being from the aviation world, I'm also not a big fan of Garmin (particularly after they charged me over $150 for a 32 MB data card while standard 1GB SD cards were selling for around $20).  While talking with the harbormaster at my new marina, he was telling me about Openplotter and how he and others had built their own chartplotters using a Raspberry Pi computer and a few other inexpensive electronic bits.

Who cuts a hole like this?

Fixed, with a mount and connectors
for the new touchscreen

I did some research and decided that it would be worth the effort to try and build my own chartplotter using Openplotter.  If successful, I would have a nice chartplotter that would be capable of integrating the information from the Garmin radar, Garmin sonar, Raymarine wind, Raymarine depth, and Raymarine autopilot without having to replace all of this equipment with items from the same maker.  I could also add a 15" touchscreen interface, AIS receive functionality and, the best part, this would cost me only a fraction of the cost of a complete solution from any of the big name marine electronic manufacturers (a 16" Garmin package would likely run over $7000 by the time all was said and done).

So, for this experiment, I purchased the following:

  • A Raspberry Pi 4 w/4GB memory, case, data card, fan, and card reader $125
  • 15" touchscreen display $120
  • Outdoor VESA mount for monitor $23
  • 3 64 GB micro SD cards for programming and backup $20
  • 12v powered USB hub (for connecting and powering peripherals $20
  • A USB GPS antenna that outputs NMEA sentences $20
  • A Berry IMU gyroscope/compass/acceloremeter chip $38
  • USB RS485/422 converter (for NMEA output) $18
  • RTL-SDR Radio (for AIS receive) $33
  • VHF whip antenna (for AIS receive) $10
  • Opticoupler (for SeaTalk input) $8
  • 2 128GB USB flash drives (for chart/data storage) $25
  • 12v to 5v USBC power supply $12
  • Various cables, connectors, fuses $80
Installing the OpenPlotter software package is pretty easy.  You download the Openplotter image for Raspberry Pi and use an imaging tool to copy it to the micro SD card.  You then insert the MicroSD card into the Pi, hook up the monitor and boot it up.  In order to program and modify things, I also used a Bluetooth keyboard that I was able to add once the Pi booted up.  Then the fun really started.

A touchscreen at the helm
(had to add an anti-glare screen protector)

I won't go into all the details on how to setup OpenPlotter as there is a fair amount of information out there already and it all depends on what sensors and equipment you are trying to connect.  I actually started work on this at home, and overall it took me several months worth of occasional tinkering plus the actual installation on the boat.  But, if you are considering taking on a project like this, I do have a one bit of advice.  Buy a couple spare memory cards for the Raspberry Pi.  You will want them to make backups.  I would suggest keeping two different backups, one for every major milestone and another for more often created backups.  This way you will have options for going back to two points without having to start over.  There were a couple times during my work where a bug was introduced but not noticed until several changes later.  If I didn't have the major milestone backup, I would have been unable to back up to the point before the bug was introduced.

Another thing I didn't realize was that the Raspberry Pi, at least at the time of writing this, does not support the equivalent of a "right click" for touchscreens (either a long-press or double tap).  Since OpenCPN is difficult to use without the right click, I had to find a solution.  I found there is a software driver called Twofing that converts a two fingered tap into a right click.  I installed and configured this driver and was able to right click on things by tapping two fingers on the screen on either side of the item I wanted to right-click on.

I setup the Raspberry Pi to automatically start OpenCPN on boot such that it takes up about 75% of the screen real-estate and another package called Kip to display the information I wanted and is typical of a chartplotter on the other 25%.  The Kip package is actually a configurable web page and can display basic numeric and text data, graphs and gauges, and has a nice compass rose that can display wind speed, direction, laylines, and direction to your next waypoint all on a single dial.  It can display any data that is collected by the system.

Plotter interface in Day mode

...and in night mode

I've still got a little work to do, but so far I am very happy with the results.  The Raspberry Pi gets position information from the USB GPS receiver, wind and depth information from the Raymarine Seatalk connection, AIS information from the RTL-SDR card.  An OpenCPN plugin supports the Garmin HD radar and utilizes free NOAA digital charts and even Explorer charts for the Bahamas (and other areas) from O-charts.  Routes are finally able to be output via NMEA 0183 to the Raymarine autopilot, and I even have pitch and heel information from the IMU. Using a GRIB file downloader, I can load and display weather forecast information overlayed on OpenCPN charts. I can also connect wirelessly to the Raspberry Pi and monitor the boat using my cell phone or a tablet.  And one more added bonus, with the 128GB memory stick, I not only have enough storage for charts, but can also use it as a media server/player...so much of my music collection can be streamed to my Bluetooth enabled stereo. 

The two items supported by the old Garmin that I don't have working are the XM radio and the Garmin sonar.  Although I haven't removed the XM unit, I've never used it and thus far I don't have any intention of using it.  I am unaware of any existing support for the sonar and when I have more time will look at writing a plugin or app to interface and decode the data sent from it (I do see the sonar data on the Pi, just don't know what to do with it yet).  I should be able to at least get depth information from it, if not a full sonar image with fish detection, etc.

The one thing I may change is the touchscreen I am using.  Since this was essentially an experiment, I didn't want to throw too much money into it without knowing how well it was going to work.  I thought the screen I chose would be bright enough to be daylight readable, but I didn't take into account all the reflected glare onto a shiny touchscreen.  The first time I tested it with the sun behind me, the shiny surface made a better mirror than display.  I added an anti-glare screen protector that has helped a lot, but would also like if the screen was brighter.  I know there are brighter screens out there, but they will increase the price of this project a bit.

I will say that, if you are not comfortable with computers and soldering and playing with electronic internals, this project may not be for you.  There is a lot of fiddling with hardware and configuring software involved.  There is nothing that is too complex (except for possibly the sonar, I didn't write any code beyond the script to automatically start the interface the way I wanted it), but there are a lot of individual pieces that need to be setup to work together.  If you are comfortable with these tasks, you can make yourself a very capable chartplotter using well developed and free open-source software.

Thursday, November 23, 2023

Adventures in Refrigeration

Refrigerators in boats aren't typically like those at home.  Unless you have an endless supply of power, you need one that is a bit more power efficient.  In my case, the refrigerator cabinet is a large, fairly well insulated cabinet that opens at the top (like a good portable cooler) and has a divider inside that splits the space into a freezer section and refrigerator section.  The "cold" in the freezer is provided by what is called a cold plate system. There are two metal plates filled with a liquid that will freeze when the refrigeration compressor runs and then they slowly absorb the heat.  Think of it kind of like a block of dry ice that is repeatedly re-frozen to keep the freezer cool.  The refrigerator side of the cabinet is kept cool by allowing some of the heat from the refrigerator side to passively bleed over into the freezer through a couple holes in the divider between the compartments.  

Freezer and Refrigerator Controls

This works OK,  but has a couple issues. The temperature of the freezer plays a large part in the temperature of the refrigerator.  Both the refrigerator and freezer are colder at the bottom than at the top.  If you open the refrigerator much, the refrigerator side can warm above safe temperatures and take a while for the spillover air to cool it back off.  Conversely, if you don't open it enough, things can freeze in the refrigerator side, particularly at the bottom.  And while I like a cold beer, frozen ones can  be an issue. And finally, my freezer could only reach a low of around 15° F (ideal is near 0°F).

One more issue, specific to my fridge, is that the genius who installed it placed the expansion valve (the point in the refrigeration circuit where the cold starts to be generated) outside of the refrigerator cabinet.  This valve freezes and thaws with each refrigeration cycle and therefore condenses water out of the air and makes a big wet mess in the cabinet.  

Other than some of the issues above, my refrigerator did work OK, until the last few trips.  The refrigeration compressor started developing an issue where it would try but fail to successfully start up until after a random and increasing number of attempts. This caused the freezer to warm to unacceptable levels at times. After some investigation, I could only narrow it down to either a failure of the controller or the compressor.  Since those components make up the majority of the system, the system is over 30 years old, it was showing a fair amount of corrosion, and I wanted to correct that installation problem, I decided to bite the bullet and replace the entire system myself.

The old cold plate configuration

This may seem like an excessive step to take, but new systems come pre-charged with refrigerant and special connectors so they can be done as a DIY projects.  Given the difficulty I've had in the past hiring "professionals" to come work on the boat, I actually thought I will either break even or come out ahead...and I wouldn't have to be at the mercy of a "professional's" schedule. So I did a little research and decided I would replace the refrigerator with a newer version from the same manufacturer (SeaFrost).  A similar system should at least minimize the complications of the install.

Replacement System
(image from SeaFrost)

Of course, as often happens with projects, what started out as a simple swap-out of the old system for a new one and the relocation of the valve location slowly grew with several of those "while I'm doing this, I might as well..." thoughts.  The freezer would freeze, but not quite cold enough for ice cream.  Ok, actually, the colder the better for all longer term food storage...but ice cream would be nice too.  When talking with the SeaFrost salesman, it didn't take much convincing for me to upgrade from the smaller equivalent replacement to the next step up with a bit higher capacity.  The upgrade also had the ability to control compressor speed, so I could turn it down and and achieve the same results as the smaller system while using less power.  The existing system had the cold plates mounted in an L shape along adjacent walls, and the salesman highly recommended moving one plate so the two would be on opposing walls for more even freezer temperatures (stuff in the freezer would be sandwiched between the plates).

The old fridge removed

Naturally, if I could get the freezer colder, this would likely exacerbate the problem of the beer freezing in the bottom of the refrigerator.  So I began to think about how to solve that issue.  I had heard of others using small fans to mix up the air so the cold wouldn't settle at the bottom. I also thought of adding some sort of movable shutter to manually control how fast the "spillover" between the freezer and refrigerator would occur.

Patching holes and installing
a new cold plate

I finally settled on a theory that wasn't too mechanically complex and I believed would solve several issues.  My theory was that I would plug the two holes at the bottom corners of the divider, I would construct a small duct on the refrigerator side of the divider that would route the air from the hole about 1/4 of the way up the wall to near the top of the refrigerated section, and I would put a fan at the top of that duct that would pull cold air from the freezer and dump it out near the top of the refrigerator. I would leave the gap between the refrigerator lid and the top of the divider alone to allow return airflow.  Since warm air rises and cold air falls, I figured this duct would limit the majority of the spillover without a mechanical shutter to close the hole.  Then, when the fan was turned on, it would draw the cold air from the freezer up the duct and spill it over the top of the refrigerator.  As the cold air fell down through the refrigerator compartment, the warmer air of the fridge should rise and the pressure differential caused by the fan would cause that warm air to enter the top of the freezer section to be re-cooled.  This mixing should also make the temperature more consistent from the top to the bottom of the refrigerator. And by drawing the cold air from the higher point in the freezer than the very bottom, there would be a section at the very bottom of the freezer where the coldest air would still pool and become a deep freeze section that wouldn't be impacted by the bleeding off of cold air for the refrigerator.

New plates installed with valve
inside refrigerator box

I'm no thermodynamics expert, but this all sounded reasonable to me. So I decided to give it a try.  I installed the new refrigerator...which takes much more time than that one sentence gives it credit for.  Carefully bending copper tubing so it doesn't kink, by yourself, while working in cabinets where you can barely reach what you are working on is not trivial.  Then I found a vinyl (PVC) downspout at the local home improvement store that I could cut into a U shape and create a duct.  Estimating that the refrigerator section was around 5 cubic feet, I ordered a fan that would move about 2 cubic feet of air per minute.  This would theoretically do a complete air exchange in the empty cabinet in about 2.5 minutes.  I figured there would be a balance that would need to be figured out between taking cold air from the freezer too quickly and cooling the refrigerator too slowly, so this was my best guess at a reasonable flow rate.

Testing the duct

In order to experiment a bit, I temporarily sealed the lower corner holes (and the wire/line access hole) with excess packing materials, built the duct using some PVC glue, and ordered a small dual-bearing computer fan and a digital temperature controller for it.  I ran experiments and found that I did seem to have positive control over the refrigerator temperature.  With the freezer at about 15° F at the time of the test, I set the other controller to turn the fan on at 37°F and off at 36°F. The temperature in the refrigerator would slowly fall when the fan was on (about 30 minutes to go from 37°F to 36°F) and would slowly rise when it was off (about an hour to rise from 36°F to 37°F).  I also checked the temperature at several levels within the refrigerator compartment and found only 1 degree of difference between the top and bottom.  During the tests, I did not observe any noticeable rises in the freezer temperature beyond the normal operation.  I did run the tests with both the fridge empty and with several milk jugs filled with water to simulate a partial refrigerator load.

Fridge duct with fan installed

Happy with the results, I made the changes permanent.  I did make one additional change and lined the lower half of the duct with some thin, foil backed, closed cell foam insulation to help further reduce unwanted bleed over.  After warming the refrigerator cabinet back up, I attached and sealed the duct with silicone, cut foam to make removable seals for the bottom corner holes, ran the wires and temperature probe needed to control the fan, and sealed the cabinet access.  I added a magnetic switch in the fan circuit so the fan would shut off when the lid was opened, and I installed a small electrical project box to hide the connections and extra wire from the fan and switches.  

So far I'm pretty happy with the results.  The only thing I'm wondering right now is if I need to increase the size of the fan to improve the speed at which the refrigerator section cools.  But I think I need a bit more experience with the current behavior before I make any changes.  I can also probably tweak the settings of the temperature controllers for both the refrigerator and freezer sections; however, this will be done slowly over time as I determine a sweet spot once the whole system stabilizes.  The first picture above is the system running with the freezer and refrigerator cabinet temperatures displayed.

I'd also like to give a shout-out to the folks at SeaFrost.  They were very helpful with advice and design recommendations on this project.  I wish more marine industry parts and service suppliers were this helpful and responsive.

Now I have a reliable refrigerator/freezer that acts a bit more like a home system than it does the normal boat cold plate system.  

Monday, November 13, 2023

A Couple of Projects

 Well, if you have read through my blog, you probably have a good idea of the amount of maintenance required to keep a boat going.  And this post will be no exception.  It still amazes me how many new issues appear when you leave a boat sitting for even a short period of time.  So, upon returning to the boat I had a list of minor things to address (for example, some running rigging needed to be replaced and some leaks needed to be addressed) and a couple of bigger projects.

The first project was the inverter.  As I mentioned in my previous post, my old Xantrex Freedom Marine inverter decided to give up during our spring shakedown cruise.  I pulled the unit and did some troubleshooting and found a blown internal fuse.  I tried replacing it, however the fuse immediately blew when attempting to start it up...so something in the internal circuitry has obviously failed.  I guess I could try repairing the unit, but it is 30+ years old and there are newer options out there that provide pure sine wave output and are more efficient.  It made the most sense to replace.  Of course, I don't want to rewire the boat, so in addition to finding newer technology, I needed to find one that would fit in the available space.

I narrowed my search down to two or three options that would fit, were at least theoretically suitable for the marine environment, and would provide pure sine wave output.  Two of the options could be found listed on marine supplier websites with prices north of $1500.  The third option was from Renogy, a company that is more well known for solar and off-grid land based setups, but claimed their unit was marinized and could handle the more corrosive environment found on a boat.  The fact that their unit was also 1/2 to 1/3 the price of the others, I decided I would give it a try.

Renogy 3000w pure sine wave inverter
(Image from Renogy.com)

The unit was a bit longer than my old one, fortunately, that was the one dimension where I had a bit of extra space.  Otherwise, it was a direct replacement as it specified the same gauge battery cables and fuses and was a mostly drop-in replacement.  Wiring was pretty straight forward, and other than finding and replacing a poorly crimped cable end on one of my cables, the unit itself wasn't too difficult to install.  The unit comes with a remote panel, but unlike the Xantrex, it is not very informative, just a switch with a couple of status LEDs.  A remote that mimics the on-board display would be a better option, and hopefully they will consider making one.  The remote was also smaller than the Xantrex, so I had to custom fabricate a plate to mount the new remote where the old one was.  Fortunately, this was easy to accomplish by purchasing a 3-gang black switch plate from the local hardware store and making a few modifications.

Other than the remote display and a couple minor quirks, so far I really like the unit.  Unlike the Xantrex, it has a very clean, pure sine wave output. Things like my induction plate and microwave are happier about the supplied power.  It also switches over to inverter power much faster than the Xantrex, so the microwave clock doesn't need to be reset and the TV doesn't even flicker.  The most annoying thing about it is that the battery charger cannot be disabled when the unit is on and the AC circuits downstream of the inverter are not active in bypass mode when the inverter is off.  These are minor issues and easy to work-around, but would be nice features to add.  Given I could buy 2 or 3 of these for the price of the others, to me it is a worthwhile tradeoff.

Another bigger project is replacement of my old chartplotter.  The main reason for its demise is that the prior owner of the boat did quite a hack job when installing that resulted in a large hole behind it and so I never removed it from the helm.  I could possibly replace just the screen and maybe the seals that caused the current problem with the unit, but just like the inverter, the entire unit is older and I suspect other internals are likely soon to have problems as well.  I could buy a new unit from Garmin that would be mostly a drop in replacement with the same 8" display, but that will set me back about $2k...not to mention I'm not a huge fan of Garmin.  

The other option to replace the chartplotter is to essentially build my own.  There are a couple of open-source software packages out there that are capable of replacing an existing chartplotter and can better integrate most of my Garmin and Raymarine instruments.  For the cost of a Raspberry Pi computer, a touchscreen display, and a few other electronic bits, I could have a more capable chartplotter than what I have now.  All that for what should come in at under $500 and some of my time.

Openplotter running on my Raspberry Pi.

I decided to go this route and have been working on the solution for a little while.  I'm using OpenPlotter, which includes the OpenCPN chartplotter software, SignalK for data integration, and a variety of interfaces to deal with a variety of instrument data.  Above is a picture of my working system on a 15" touchscreen display that is temporarily hooked up to my boat instruments.  You can see current wind, depth, location, direction, speed, pitch and roll information.  You can even see the AIS data from a few nearby boats in the marina.  Not displayed but working is the radar information and overlay.  Since the computer isn't mounted yet, the sensors aren't fully calibrated so some of the information like pitch and roll are a bit off...but it is sufficient for proof of concept.  And for the first time since I've owned the boat, I can now send route data to the autopilot.  The only thing I haven't figured out yet is how to get more detailed sonar information as Openplotter doesn't seem to have a means of supporting a fish-finder type of sonar.  This solution will also be setup so I can easily detach the display and store it inside.

The final bigger project I'm working on is my refrigerator.  Over the past several years it had started developing an issue where the compressor made multiple attempts before it successfully started.  Originally, this was infrequent, but more recently it has happened with increasing frequency to the point that it was no longer reliable.  While looking into the issue I noted that the compressor was rather old and had significant surface corrosion.  Apparently the original controller had failed at some point and was jury-rigged with one from Alder Barbour.  So, my best guess is that either the controller or the compressor was the likely the current issue...of course, that makes up the vast majority of the system.  As a reliable refrigerator is necessary for any longer trip, I decided to bite the bullet and replace the whole system.  New systems have more efficient compressors and often come pre-charged so at least I won't need a refrigeration technician to come install it.

Seafrost BDxp Refrigerator system
(image from Seafrost)

The original system was from SeaFrost. Not wanting to significantly alter the setup, I decided to go with them again.  After talking with someone from SeaFrost (I think it may have been the owner), I decided to get the upgraded version with a bit higher capacity.  The belief is that it should be sufficient to store ice cream (something that was just a bit beyond the ability of the old system).  The old setup of the refrigerator is what is known as a spillover system.  Some of the cold of the freezer "spills over" into the refrigerator side through some holes to provide refrigeration.  While this does work, it does have some drawbacks.  There was a tendency for items at the bottom of the refrigerator section to freeze while the top was barely within the safe zone for a refrigerator.  With the increased capacity of the new system, I think this issue might become worse.  So, I also intend to alter the spillover system by adding a duct, small fan, and temperature control in hopes that it will better meter the temperature of the refrigerator as well as provide a bit of air circulation to keep the temperatures a bit more uniform.  

So, those are the bigger projects currently going on or completed.  Hopefully they all will be done soon and I can head south and to the Bahamas.

Friday, October 20, 2023

What's Shakin'

Oops...thought I had published this months ago...so this is a bit behind... 

Well, this last trip back to the boat can best be described as shaken.  My intention was to take at least a shakedown cruise, but other things also shook things up a bit.

One shakeup was that my friend TJ from the Retirement Project had what was described as a "cardiac event".  In hindsight it was a good thing that it took longer to get their outboard fixed and they were still in Oriental when this occurred as he was able to get the medical attention he needed quickly.  After a short time in the hospital in New Bern, I'm happy to report he is doing better now.  Unfortunately it has altered their plans for the Great Loop, but ever changing plans seems to be the norm for cruising.  I was glad to be able to provide some help and support for such a lovely couple and am glad TJ is getting back to being himself.  Stay well my friends and let us know if we can do anything for you....either here or when we are back at the boat.

A variety of things were fixed or worked on while at the boat.  The house battery bank was replaced.  The old chartplotter seems to have developed a screen issue and, instead of replacing the screen or the unit, I've decided to try building my own chartplotter using Openplotter.  If successful, this system will have a 15 inch touchscreen display at the helm, provide AIS receive functionality so I can identify nearby boats, and finally integrate all the systems so the Garmin radar and sonar and Raymarine winds and depth instruments can all talk to one another and the autopilot.  All at a fraction of the cost of an existing commercial unit. I'll (hopefully) write more on this later.

We did get a chance to take a shakedown cruise.  It was a relatively short trip from New Bern to the Cape Lookout bight.  We anchored there for several days, enjoying the area and testing systems.  


Of course, as a shakedown cruise, we tested several systems.  Unfortunately, while trying to make some ice for drinks one evening, the inverter suddenly died.  The inverter isn't a critical piece of equipment, but it is nice to be able to run standard AC electrical items, particularly if you want some ice for your evening adult beverage.  So this is another item that will need some attention.  Since it is an older inverter, it might be time for a replacement, we will see.

So, we managed a shakedown run, we shook things, and something broke.  But that is about par for the course on a boat.  Guess I have a bit more work to do before the Bahamas trip in the fall.


Sunday, April 30, 2023

We're Back

After getting the boatyard work done, I returned home to take care of some things while Rover got used to her new digs at the marina. I returned to the boat about a week ago...this time with my wife (who is giving this boat thing another try) and our dog. 

 There were several goals for this trip. One was to wrap up a few (hopefully) minor boat projects. We also wanted meet up with some friends in both Oriental and Southport. And most importantly, to refamiliarize ourselves with life aboard a boat and do a few short trips with the boat to see the local area and test out systems for our big trip in the fall. Yes, the trip to the Bahamas that was planned before the pandemic. 

When I was last at the marina, there was a Leopard 43 behind me that was for sale. I met the owner and found out he was actually familiar with this blog. It always amazes me how large and yet small the cruising community is. Unfortunately, he was not around much before the boat was sold and I was busy on the phone getting some insurance issues resolved when he last stopped by. Andy, wherever you are, I hope you are well.

Recently Sold Leopard 43


The boat was sold and the new owner departed with the boat for new adventures...or so I thought. Imagine my surprise when the Leopard returned a few days after we arrived back at the marina. The new owner, Tom, has owned other sailboats in the past, but I believe this was his first catamaran. He was preparing the boat for a trip south to its new home in Florida. I spent a couple days helping him get things ready for his trip, getting the sails put up and providing what little knowledge and tips I have about Leopards that were not specific to my model. My wife and I spent a couple evenings talking over sundowners and meals, and quite enjoyed his company. I do love how cruising allows one to make friends from all walks of life so quick and easy. 

Since Tom had prior boats, he also had duplicates of a few items that are often handy on boats. He already owned folding bikes, so the older ones that came with his boat were extra and unneeded. Given the limited storage space on a boat, duplicates or spares of such large items only serve to take up too much of that coveted storage space. As a result, we were gifted and now have two folding bikes again. Having been stored on a boat, they are in need of a little TLC (mostly cleaning, adjustment, and treating some rust with Ospho), but are functional and we look forward to using them. 


Another big item that he had was a spare watermaker. Most cruisers that don't have one, wish they did (particularly in places like the Bahamas), and I am no exception. Since he had two virtually identical Rainman portable watermakers, we were able to make a deal and I purchased his spare. Ironically, now I have to figure out where to store it...lol. But being able to make fresh water from the ocean when needd instead of having to pay for and haul water at Bahamas prices I know will come in handy and make the trip even more pleasant. 

Rainman portable watermaker
(Picture from Rainman)


Tom, I hope your trip south is going well and I hope our paths cross again in the future.

We were also able to catch up with some, now long-time..at least by cruising standards, friends in Oriental. My friends at The Retirement Project have moved from a blue water cruising sailboat to a trawler and will soon be starting a trip along the American Great Loop. It was great getting a chance to catch up with them and swap stories over a meal. Safe journeys on your new adventure my friends!

Having spent a number of years in Southport, we had some friends there that we wanted to see. A convergece of several factors, had us make the long drive there a couple days ago. We met up with some of those friends at the marina and then went to one of our favorite seafood restaurats in Southport. If you are ever in Southport and want some good seafood at reasonable prices, check out "Provisions" (officially, I think the name is The Provision Company). 

West Marine recently had a rasonable sale on line (yes, you read that right... reasonable... at West Marine), so I've now replaced much of the running rigging. It also gave me a chance to practice adding eye splices to double braid line using a fid set I was gifted a number of years ago. I still have to follow the written insructions (pdf), but I seem to be proficient at it, albeit very slow. 

As I write this, we are waiting for the weather to calm down so we can finally get the sails back up (the last window was when I was helping Tom). A couple day sails after that and we should be ready to do some exploring of the area. Mabe we will go check out the Albemarle ...again... and hopefully not chased away by a hurricane this time. Then there is Cape Lookout and the outer banks. Much to explore.  Can't wait to get back to using Rover for what she is meant to do.

Friday, February 24, 2023

Where's Rover?

So, when I came back to the boat in November, the goal was to again make her ready for a trip to the Bahamas. There were two big-ticket items I wanted to get done in a boatyard: new bottom paint and finally getting the new standing rigging I had purchased just before the pandemic installed. There were also a few other items that needed to be ticked off the repair list. 

 I tried, and failed, to get boatyards near Southport to haul out the boat and get the work done. Eventually I was able to schedule an appointment with Wilmington Marine Center on Jan 9th. So I went back home for the holidays, expecting I would return to take the boat to the yard at the beginning of the year. Unfortunately, that boatyard went radio silent and I was unable to confirm the appointment after the holidays. So, figuring that Wilmington Marine apparently didn't want my business, I then scheduled with another yard in New Bern NC. 

It was a 3 day trip to relocate the boat there with the help of some friends in Southport. Unfortunately, the trip was during some of the coldest weather of the season, but the new 3/4 enclosure made the trip far better than our trip down from Virginia in January a few years back after building the hardtop. 

A calm but cool evening...

The boat was hauled two weeks ago last Tuesday after a one day delay due to high winds. It was on the hard for 2 weeks. The bottom fortunately didn't look as bad as I had feared, thanks to a trustworthy diver I found in Southport that took a great deal of time to remove the marine sanctuary that grew there during my absence caused by the pandemic. The bottom was cleaned and new bottom paint was applied. 

Rover out of the water


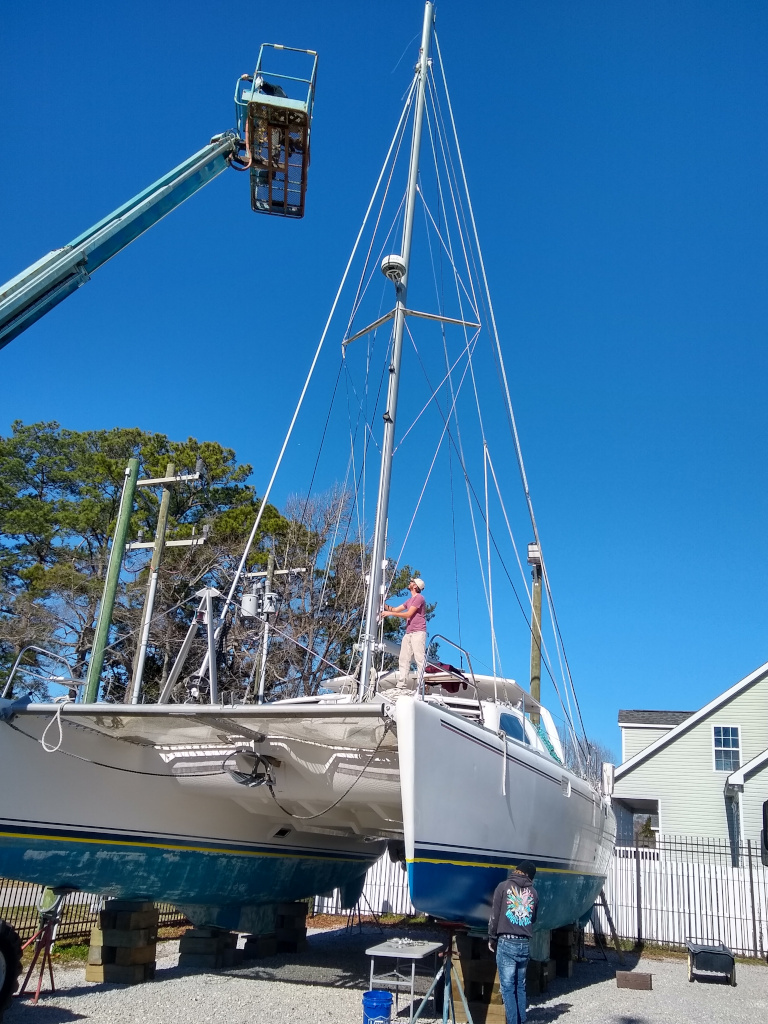
 I was also able to find a good rigger in New Bern that was willing to install the standing rigging I had purchased just prior to the beginning of the pandemic. On the hard, and using a man-lift, it took about a day and a half to replace the rigging without un-stepping the mast. Other than one set of fittings that were supplied required modification, the rigging kit from Sparcraft contained everything we needed.  The rigger reported during the rigging replacement that the threads in one of the old turnbuckles all but crumbled during disassembly...so it was definitely good that I didn't try to squeeze in one more sail. Finally, after almost 3 years, Rover now has brand new standing rigging. 

New rigging and bottom paint


During the trip up to New Bern, I found that one of the shaft seals was leaking a bit. I also found some wear of the cutlass bearings during my out-of-water inspection. So, I pulled both props, bearings, seals, and prop shafts. The shafts were cleaned, inspected, polished, and reinstalled with new shaft seals and bearings. Both props were cleaned and painted with cold galvanizing compound (the same stuff Petit sells as prop coat...only at 1/3 the price) and reinstalled with new zincs. The motors were then re-aligned with the prop shafts.

While at the yard, I also had the chance to replace the last of the fluorescent fixtures in the cabin with new dimmable LED fixtures. Unfortunately the puck lights I ordered to replace the main cabin lights were a little too large so I donated them to my friends at The Retirement Project. At least the bulbs in the existing fixtures are already LED. The raw water strainers for the air conditioning units that were failing (the baskets were breaking apart and replacements were impossible to find in the US) were also replaced with brand new strainers. 

The boat was splashed last Monday, and after spinning up the motors and checking for leaks, the boat left the yard in much better mechanical condition than when it arrived.  

With all the problems getting reliable marine services and parts in Southport, and the fact that my slip rental was doubling in price with an expected 50% additional increase in a year, I have decided to change the home base for Rover. I was able to find a marina near the boatyard where we were hauled out at the same rate we were initially paying at the old marina before the price increase. The marina doesn't have a pool, but it also doesn't have a ferry blowing its horn at 5:30am or rocking the boat every half hour. Being a bigger town, it is also much easier to find any needed parts and supplies.  The facility is simple but nice with several showers, a boaters lounge, and laundry. The docks are floating with large steel pilings and a wave attenuator that seems to do a really good job of keeping the water inside the marina calm.  The harbormaster and his assistant are really nice folks, are happy to help with anything you need, and they seem to keep up with maintenance.  I'm looking forward to having my boat here. 

And a new home.